20

TIMERRECORDING(cont.)


ENTER SHOWVIEW


NUMBER


Press OK, and a cursor


appears above “GUIDE

12345 5


4 PROG”. Then, using the


GUIDE PROG TV PROG


NUMBER keys, input the


ShowView number (found

1

1


in most TV listings) of a


program scheduled to be

[0 – 9] =


broadcast on each station


on the list from step 1,

When entering a ShowView


starting at the top. If you

number for ARD


enter the wrong number,


press CANCEL and input the correct number.


ENTER CHANNEL POSITION


NUMBER


4


Press OK and the display


under “TV PROG” begins


5 blinking.

GUIDE PROG TV PROG


250

39

If the blinking number under “TV PROG” agrees with the channel

position . . .[] =

. . . press OK.

If the numbers do not agree . . .

. . . input the channel position using PUSH JOGor the NUMBER keys, then press OK.

If you input the ShowView number of a program that has already aired, “ERROR” appears on screen for a few seconds. Input the correct ShowView number.

Repeat steps 4 and 5 as necessary.

CLOSE MENU

6 Press CH SET and selection is complete.

If you already know the Guide Prog. number for a station . . .

1– After step 3, press PUSH JOG %.

The GUIDE PROG number begins blinking.

2– Enter the Guide Prog. number using the NUMBER keys or PUSH JOG, then press PUSH JOG %.

The TV PROG number begins blinking.

3– Enter the channel position using the NUMBER keys or PUSH JOG, then press PUSH JOG% .

Repeat 2 and 3 as necessary. 4– Press CH SET.

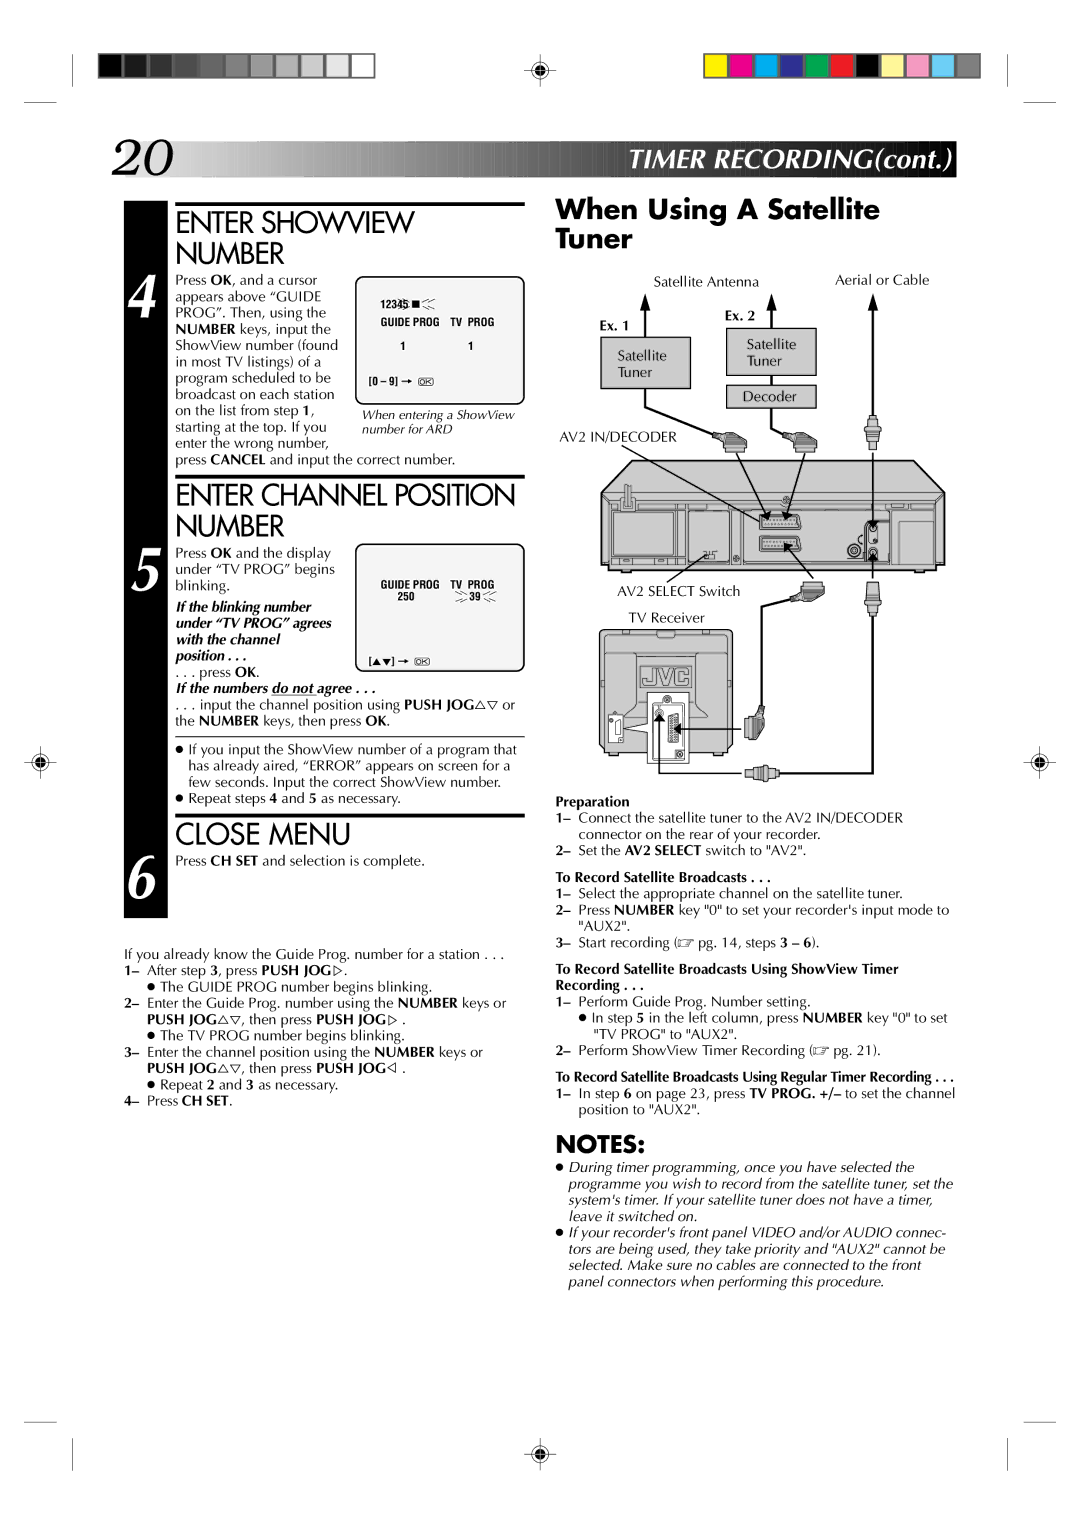
When Using A Satellite Tuner

Satellite Antenna

Aerial or Cable

Ex. 1

Ex. 2


Satellite

Satellite


Tuner


Tuner


Decoder


AV2 IN/DECODER


AV2 SELECT Switch

TV Receiver

Preparation

1– Connect the satellite tuner to the AV2 IN/DECODER connector on the rear of your recorder.

2– Set the AV2 SELECT switch to "AV2".

To Record Satellite Broadcasts . . .

1– Select the appropriate channel on the satellite tuner.

2– Press NUMBER key "0" to set your recorder's input mode to "AUX2".

3– Start recording (pg. 14, steps 3 – 6).

To Record Satellite Broadcasts Using ShowView Timer Recording . . .

1– Perform Guide Prog. Number setting.

In step 5 in the left column, press NUMBER key "0" to set "TV PROG" to "AUX2".

2– Perform ShowView Timer Recording (pg. 21).

To Record Satellite Broadcasts Using Regular Timer Recording . . .

1– In step 6 on page 23, press TV PROG. +/– to set the channel position to "AUX2".

NOTES:

During timer programming, once you have selected the programme you wish to record from the satellite tuner, set the system's timer. If your satellite tuner does not have a timer, leave it switched on.

If your recorder's front panel VIDEO and/or AUDIO connec- tors are being used, they take priority and "AUX2" cannot be selected. Make sure no cables are connected to the front panel connectors when performing this procedure.

Page 20
Image 20
JVC HR-J438E Enter Showview Number, Close Menu, When Using a Satellite Tuner, Preparation, To Record Satellite Broadcasts

HR-J238E, HR-J438E specifications

The JVC HR-J238E and HR-J438E are notable VHS video cassette recorders that emerged during the late 1990s and early 2000s, providing users with reliable performance and a range of desirable features. Both models are part of JVC's extensive lineup of VCRs, well-regarded for their durability, quality, and user-friendly interfaces.

One of the defining characteristics of the HR-J238E is its ability to deliver high-quality playback and recording capabilities. This model is equipped with a 4-head system, which allows for superior picture quality during playback. It significantly minimizes distortion and enhances the sharpness of the image, thus ensuring that viewers enjoy a more engaging experience. The HR-J438E offers a similar setup but comes with some additional features, making it more suitable for those who desire enhanced capabilities.

Both models are designed with versatile recording options. Users can easily program recording schedules thanks to the incorporated timer function. This feature offers flexibility, allowing users to record their favorite shows while being away from home. The VCRs come with an easy-to-navigate on-screen display, making it simple for users to set up and manage their recording preferences without requiring extensive technical knowledge.

In terms of connectivity, the HR-J238E and HR-J438E feature a variety of input and output options, including composite video and audio connections. This allows for easy integration with other home entertainment devices, such as televisions and external audio systems. Furthermore, both models are equipped with an RF out for connecting to an antenna or cable service, ensuring a wide range of viewing possibilities.

A unique feature of the HR-J438E is its support for video noise reduction technologies, which help to improve the overall quality of recordings by minimizing graininess and enhancing picture clarity. This is particularly beneficial for users looking to record older or lower-quality footage.

Overall, both the JVC HR-J238E and HR-J438E stand out for their solid construction, user-friendly designs, and impressive recording features. Whether for personal use or as part of a more extensive home entertainment system, these models offer reliable performance and quality that continues to satisfy nostalgia for analog media even in a predominantly digital era.