BSelect host channel

You can either select “AUTO” or enter a PBS channel number. Press OK or e to move the highlight bar to “HOST CH”, then press rt repeatedly until “AUTO” or the desired PBS channel number is selected.

Some PBS channels do not transmit clock setting data.

CSelect D.S.T. mode

Press OK or e to move the highlight bar to “D.S.T.”, then press rt repeatedly until the desired setting is selected.

AUTO: Select if you want to adjust your VCR’s clock automatically by the incoming signal from the host channel. (Auto Daylight Saving Time enables automatic adjustment of the VCR’s clock at the start and end of Daylight Saving Time.) Be sure to select the correct time zone manually in step 4.

ON: Adjustment will be made by the built-in clock itself.

OFF: Select when Daylight Saving Time does not apply to you.

DSelect time zone

Press OK or e to move the highlight bar to “TIME ZONE”, then press rt repeatedly until “AUTO” or the desired time zone is selected. Each time you press the button, the time zone changes as follows:

{AUTO { ATLANTIC { EASTERN { CENTRAL

{MOUNTAIN { PACIFIC { ALASKA { HAWAII

{(back to the beginning)

EComplete Semiauto Clock Set

Press MENU to return to normal screen. Turn off the VCR. “Aut” will appear on the display panel while the clock is being set. The current clock time will appear automatically when the clock setting is complete.

Selections of host channel and D.S.T. mode will be reset to “AUTO” after a power failure occurs.

Setting clock manually

— Manual Clock Set

First follow steps 1 to 2 in “Preparations” above, then go to the following steps.

A Set time, date and year

Press rt until the desired time appears, then press OK or e. Set the date and year in the same way.

Holding rt changes the time in 30- minute intervals, or changes the date in 15-day intervals.

B Select D.S.T. mode

Press OK or e to move the highlight bar to “D.S.T.”, then press rt to select the desired setting.

ON: Adjustment will be made by the built-in clock itself.

OFF: Select when Daylight Saving Time does not apply to you.

CStart clock

Press MENU and normal screen appears.

To make corrections any time during the process

Press OK or e repeatedly until the item you want to change blinks, then press rt.

Manual setting of the clock will be lost after a power failure occurs.

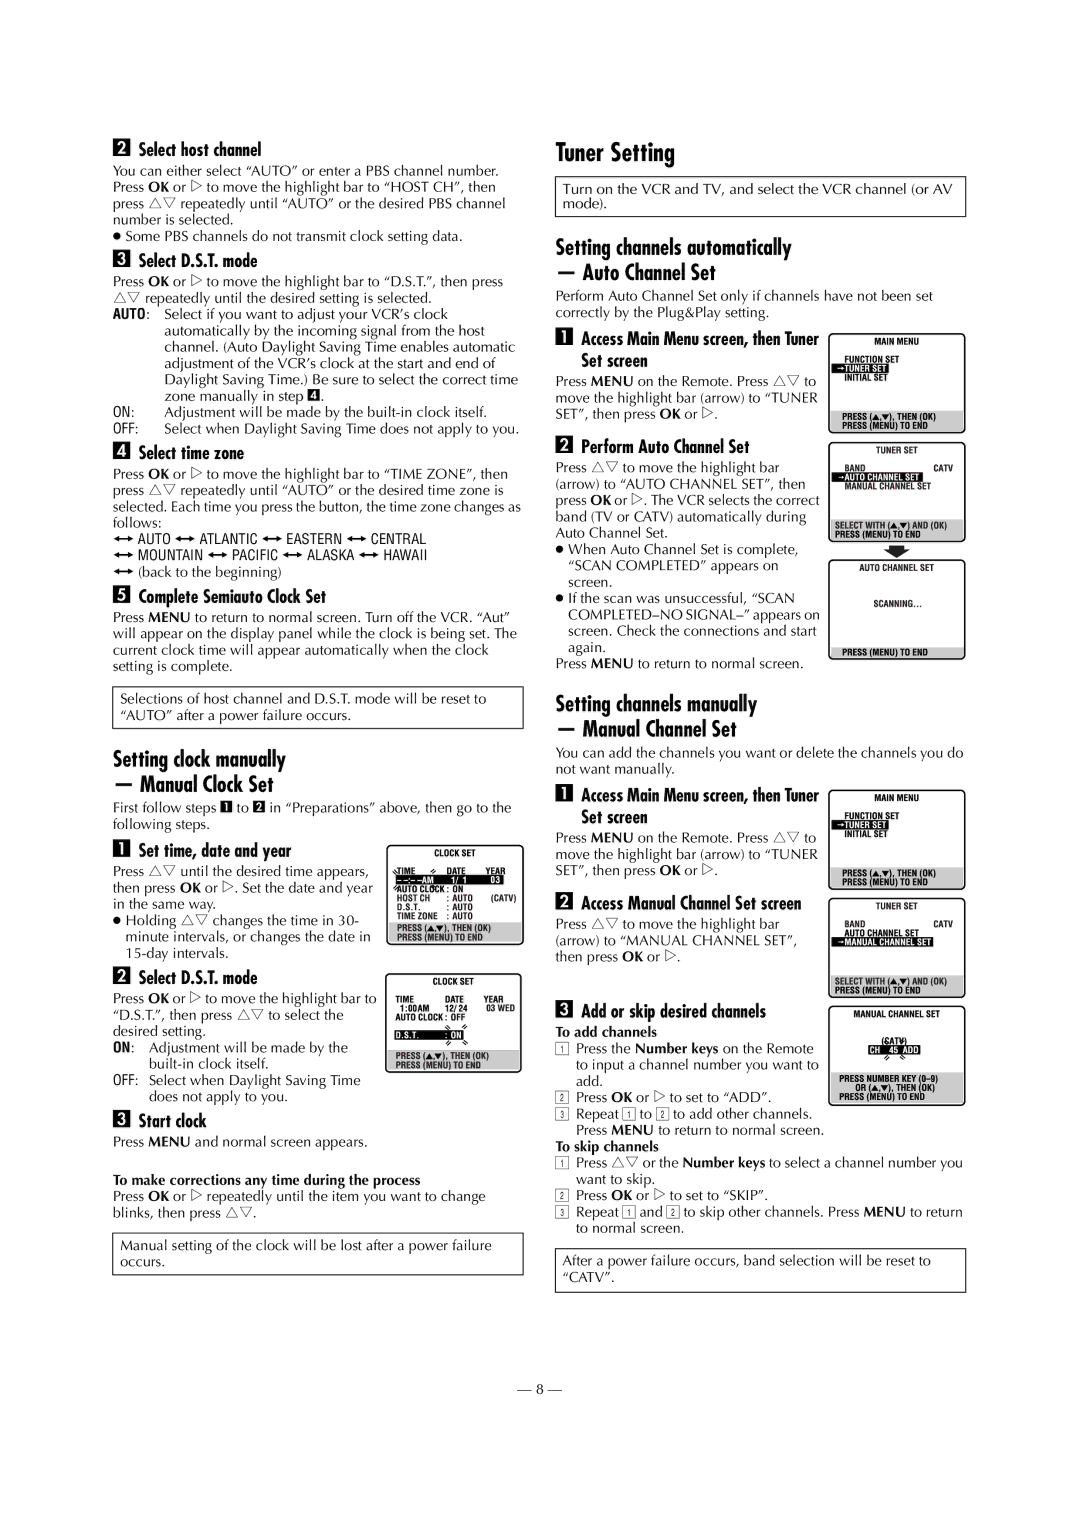
Tuner Setting

Turn on the VCR and TV, and select the VCR channel (or AV mode).

Setting channels automatically

— Auto Channel Set

Perform Auto Channel Set only if channels have not been set correctly by the Plug&Play setting.

A Access Main Menu screen, then Tuner

Set screen

Press MENU on the Remote. Press rt to move the highlight bar (arrow) to “TUNER SET”, then press OK or e.

B Perform Auto Channel Set

Press rt to move the highlight bar (arrow) to “AUTO CHANNEL SET”, then press OK or e. The VCR selects the correct band (TV or CATV) automatically during Auto Channel Set.

When Auto Channel Set is complete, “SCAN COMPLETED” appears on screen.

If the scan was unsuccessful, “SCAN

COMPLETED–NO SIGNAL–” appears on screen. Check the connections and start again.

Press MENU to return to normal screen.

Setting channels manually

— Manual Channel Set

You can add the channels you want or delete the channels you do not want manually.

A Access Main Menu screen, then Tuner

Set screen

Press MENU on the Remote. Press rt to move the highlight bar (arrow) to “TUNER SET”, then press OK or e.

B Access Manual Channel Set screen

Press rt to move the highlight bar (arrow) to “MANUAL CHANNEL SET”, then press OK or e.

C Add or skip desired channels

To add channels

A Press the Number keys on the Remote to input a channel number you want to add.

B Press OK or e to set to “ADD”.

CRepeat A to B to add other channels. Press MENU to return to normal screen.

To skip channels

APress rt or the Number keys to select a channel number you

want to skip.

BPress OK or e to set to “SKIP”.

CRepeat A and B to skip other channels. Press MENU to return to normal screen.

After a power failure occurs, band selection will be reset to “CATV”.

— 8 —

Page 8
Image 8
JVC HR-S2913U Tuner Setting, Setting clock manually Manual Clock Set, Setting channels automatically Auto Channel Set

HR-S2913U specifications

The JVC HR-S2913U is a high-performance VHS VCR that has carved a niche for itself through a combination of advanced technologies and user-friendly features. JVC, a pioneer in the video and audio industry, designed this VCR with a focus on enhancing the quality of video playback and recording, making it an attractive choice for home entertainment enthusiasts.

One of the main features of the HR-S2913U is its S-VHS (Super VHS) compatibility, which enables the playback of both standard VHS and S-VHS tapes. This capability allows users to enjoy enhanced video quality with greater detail and improved color depth. The inclusion of a built-in TBC (Time Base Corrector) ensures stable, flicker-free images, which is especially important for resolving flaws in older tapes.

This VCR is equipped with the JVC’s unique Digital Wide System, which provides a greater aspect ratio for video recordings, giving viewers a more cinematic experience. The built-in 3D Noise Reduction technology minimizes video noise, thus improving the overall viewing experience, especially in low-light scenes. Furthermore, the HR-S2913U supports stereo sound, ensuring that audio playback is as convincing as its visual component.

The multibrand remote control enhances user convenience by allowing control over other components, making it a central part of an entire home theater system. The automatic tape tracking feature adjusts the playback head alignment, ensuring optimal performance across different tape formats. The HR-S2913U also includes an easy-to-use on-screen display, simplifying navigation through its various features and functions.

For recording, the VCR provides multiple timer settings, allowing for effortless scheduling of recordings, even from different sources. The front A/V inputs enhance connectivity options, giving users the flexibility to connect camcorders or other devices directly to the VCR.

The JVC HR-S2913U is also noted for its durability and reliability, reflecting the brand's commitment to quality. With robust construction and an emphasis on long-lasting performance, this VCR is an excellent choice for anyone looking to preserve and enjoy their video collection. Overall, the HR-S2913U represents a blend of advanced technology and practical features, making it a valuable addition to any home entertainment setup.