6INSTALLINGYOURNEWVCR

Basic Connections

Antenna or Cable

Coaxial Cable


Flat Feeder


AC Power

Maching Transformer


Cord


Back of VCR

ANTENNA-IN

RF


AC Outlet

(Antenna or Cable input)

OUT


TV

RF Cable

(provided)


75 ohm terminal

Back of VCR

AUDIO

L

VIDEO

CH3 CH4


CHECK CONTENTS


Make sure the package contains all of the accessories

1 listed in “SPECIFICATIONS” (pg. 56).


SITUATE VCR

2 Place the VCR on a stable, horizontal surface.

3

CONNECT VCR TO TV

The connection method you use depends on the type of

TV you have.


RF Connection


To Connect To A TV With NO AV Input Terminals . . .


a– Disconnect the TV antenna from the TV.


b– Connect the TV antenna cable to the ANT IN jack


on the rear of the VCR.


c– Connect the supplied RF cable between the RF


OUT jack on the rear of the VCR and the TV’s


antenna terminal.

AV Connection

To Connect To A TV With AV Input Terminals . . .

a– Connect the antenna, VCR and TV as shown in the illustration.

b– Connect an Audio/Video Cable (not supplied) between the AUDIO OUT and VIDEO OUT jacks on the rear of the VCR and the AV IN jacks on the TV.


CONNECT VCR TO

4

POWER SOURCE

Connect the power plug to an AC outlet.


The clock will automatically be set when the antenna

is connected and when the AC is first connected to


the VCR (pg. 7).


FINAL PREPARATION FOR

5

USE

Select the VCR channel (3 or 4) by setting the switch

on the rear of the VCR as shown in the illustration.

Turn on the power to the TV. You are now able to perform


simple playback (pg. 22) and recording (pg. 23).


(If 'Auto' is displayed on the front display panel, the


clock is being set automatically. Wait for the time to be


displayed before powering on the VCR.)

NOTES:

The VCR channel is the channel on the TV which will display the audio and video signals from the VCR. The VCR's CH3- CH4 switch sets the VCR channel to CH3 or CH4.

The CH3–CH4 switch is preset to the CH3 position. Set to CH4 if CH3 is used for broadcasting in your area.

If your TV has no AV input terminals, set the channel on the TV to correspond to the CH3–CH4 switch on the back of the VCR.

Even if your TV has AV input terminals, you must connect it to the VCR using an RF cable in order to record one show while watching another (pg. 34).

For full identification of the VCR's rear panel, refer to the Index (REAR VIEW pg. 54).

Page 6
Image 6
JVC HR-VP634U manual Basic Connections

HR-VP634U specifications

The JVC HR-VP634U is a versatile VHS VCR that combines both performance and user-friendly features, making it a popular choice for enthusiasts of vintage media. Designed to offer high-quality playback and recording, this model stands out with its robust technological capabilities and practical functionality.

One of the key features of the HR-VP634U is its Super VHS capability, which supports enhanced video resolution and offers a sharper image quality compared to standard VHS recordings. This feature is particularly beneficial for users who may have a collection of Super VHS tapes, allowing them to experience their content in the best possible quality. The VCR also includes a built-in TBC (Time Base Corrector), which minimizes picture distortion and ensures smoother playback of older tapes, often plagued by video artifacts.

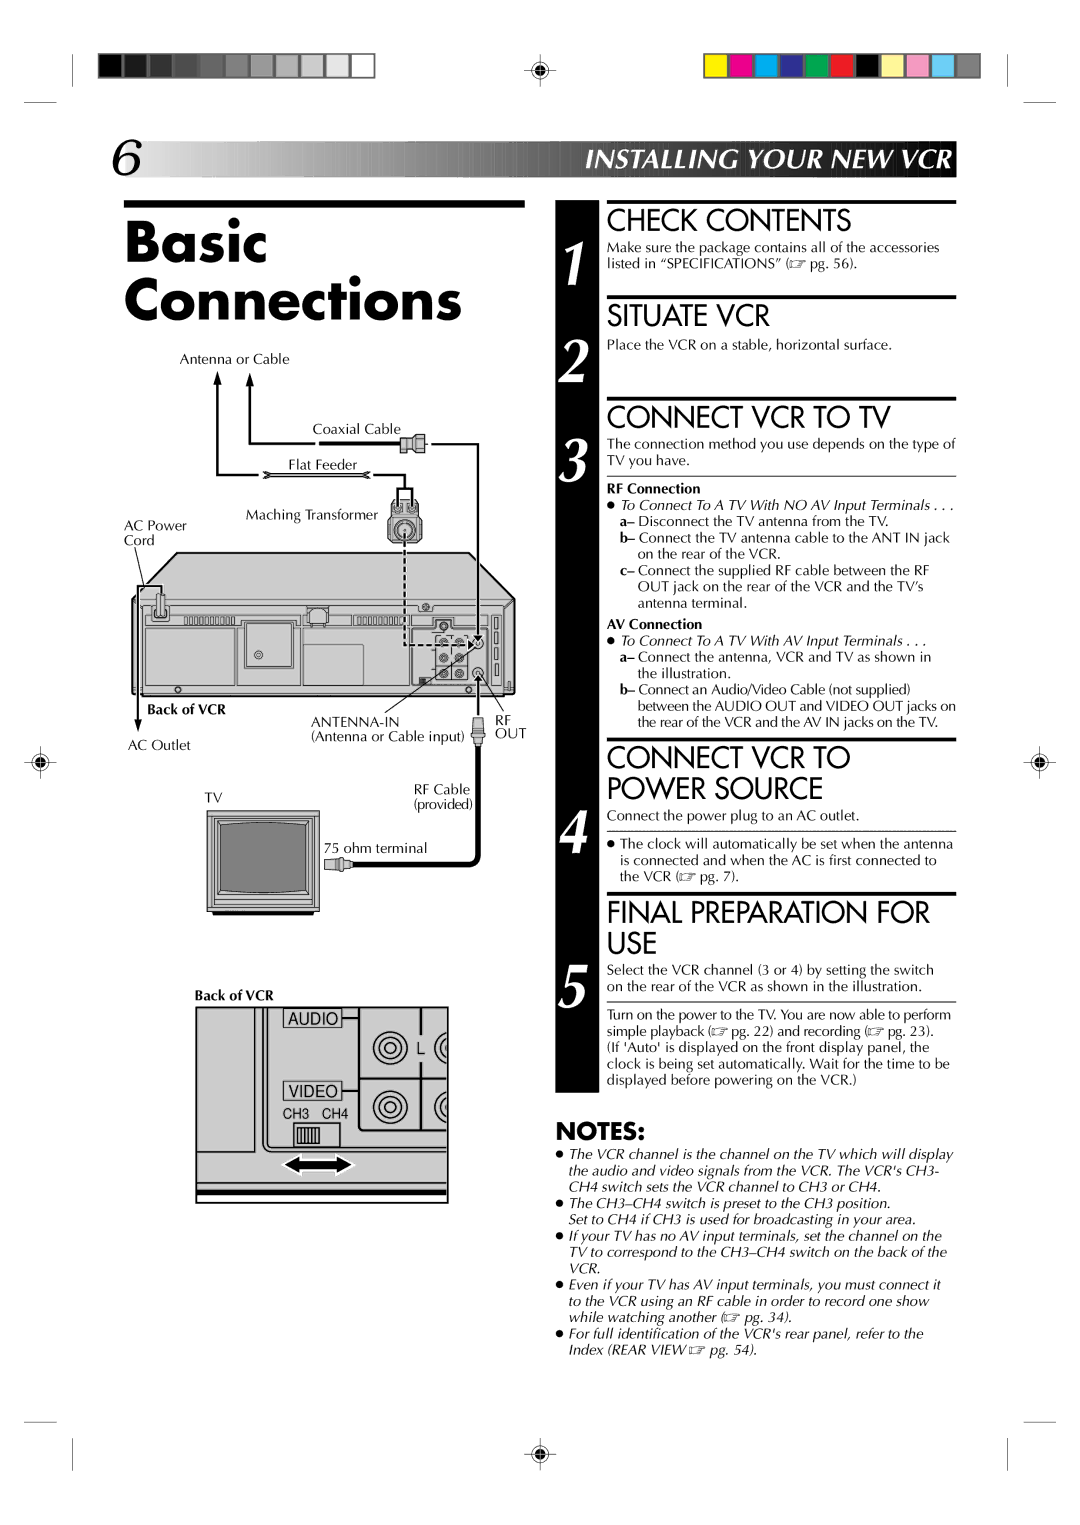
The JVC HR-VP634U comes equipped with several playback options, enabling users to enjoy various tape formats seamlessly. It includes a versatile set of connectivity options, including composite video inputs and outputs, an S-Video output for superior image quality, and an RF output for integrating with older televisions. This flexibility ensures compatibility with a range of equipment, making it easy to connect to modern setups or classic displays.

Recording capabilities are another highlight. The HR-VP634U allows for hassle-free programming through its on-screen display, making timer recording straightforward. This feature is perfect for capturing your favorite shows or events without needing to be present. Additionally, the VCR supports high-speed dubbing, enabling users to replicate their tapes efficiently.

The design of the JVC HR-VP634U is typical of VCRs from its era with a classic, sturdy chassis that is both durable and functional. The intuitive front panel layout provides easy access to controls, making it user-friendly for those who are familiar with VCR operations.

In conclusion, the JVC HR-VP634U is a reliable VCR that offers a blend of advanced technology and ease of use. Its Super VHS capability, TBC feature, diverse connectivity options, and robust recording functions make it a standout choice for preserving and enjoying your media collection. Whether you are a casual viewer or a dedicated collector, this model brings a nostalgic charm to video playback and recording.