Connections and Plug&Play Setting

ACheck contents

Make sure the package contains all of the accessories listed in “Specifications”.

BSituate VCR

Place the VCR on a stable, horizontal surface.

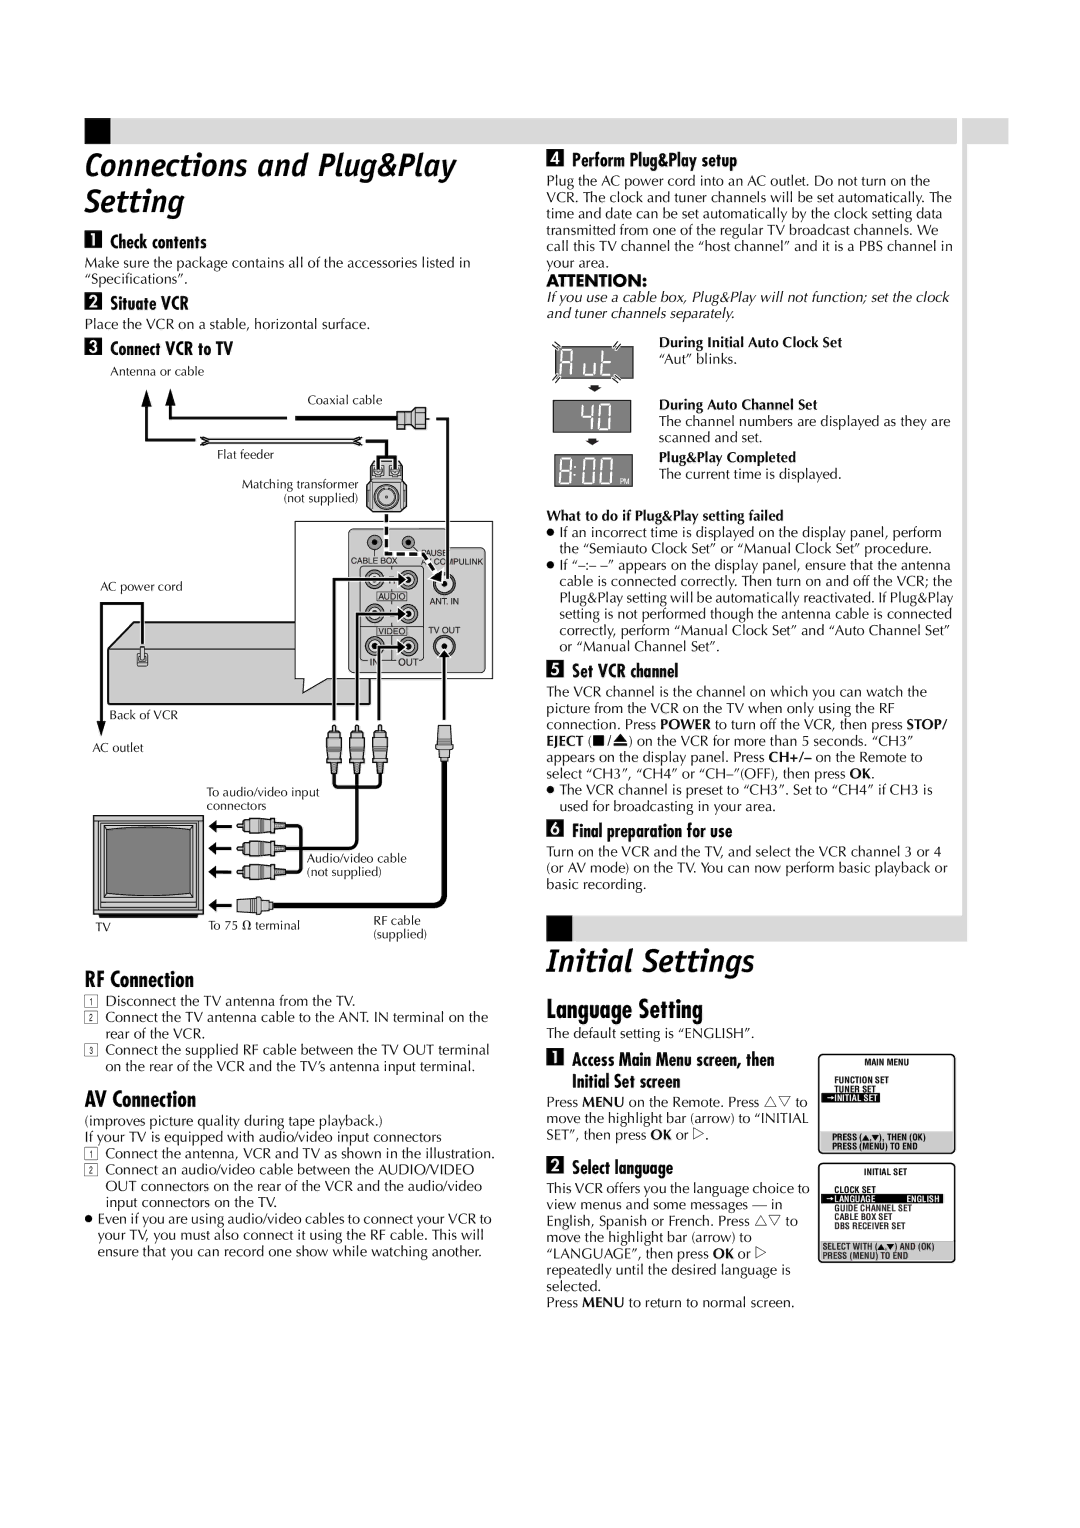
CConnect VCR to TV

Antenna or cable

Coaxial cable

Flat feeder

Matching transformer (not supplied)

AC power cord

Back of VCR

AC outlet


To audio/video input


connectors


Audio/video cable


(not supplied)

TV

To 75 ￿ terminal

RF cable

(supplied)


DPerform Plug&Play setup

Plug the AC power cord into an AC outlet. Do not turn on the VCR. The clock and tuner channels will be set automatically. The time and date can be set automatically by the clock setting data transmitted from one of the regular TV broadcast channels. We call this TV channel the “host channel” and it is a PBS channel in your area.

ATTENTION:

If you use a cable box, Plug&Play will not function; set the clock and tuner channels separately.

During Initial Auto Clock Set “Aut” blinks.

During Auto Channel Set

The channel numbers are displayed as they are scanned and set.

Plug&Play Completed

The current time is displayed.

What to do if Plug&Play setting failed

If an incorrect time is displayed on the display panel, perform the “Semiauto Clock Set” or “Manual Clock Set” procedure.

If “–:– –” appears on the display panel, ensure that the antenna cable is connected correctly. Then turn on and off the VCR; the Plug&Play setting will be automatically reactivated. If Plug&Play setting is not performed though the antenna cable is connected correctly, perform “Manual Clock Set” and “Auto Channel Set” or “Manual Channel Set”.

ESet VCR channel

The VCR channel is the channel on which you can watch the picture from the VCR on the TV when only using the RF connection. Press POWER to turn off the VCR, then press STOP/ EJECT (0) on the VCR for more than 5 seconds. “CH3” appears on the display panel. Press CH+/– on the Remote to select “CH3”, “CH4” or “CH–”(OFF), then press OK.

The VCR channel is preset to “CH3”. Set to “CH4” if CH3 is used for broadcasting in your area.

FFinal preparation for use

Turn on the VCR and the TV, and select the VCR channel 3 or 4 (or AV mode) on the TV. You can now perform basic playback or basic recording.

RF Connection

ADisconnect the TV antenna from the TV.

BConnect the TV antenna cable to the ANT. IN terminal on the rear of the VCR.

CConnect the supplied RF cable between the TV OUT terminal on the rear of the VCR and the TV’s antenna input terminal.

AV Connection

(improves picture quality during tape playback.)

If your TV is equipped with audio/video input connectors

AConnect the antenna, VCR and TV as shown in the illustration.

BConnect an audio/video cable between the AUDIO/VIDEO

OUT connectors on the rear of the VCR and the audio/video input connectors on the TV.

Even if you are using audio/video cables to connect your VCR to your TV, you must also connect it using the RF cable. This will ensure that you can record one show while watching another.

Initial Settings

Language Setting

The default setting is “ENGLISH”.

AAccess Main Menu screen, then

Initial Set screen

Press MENU on the Remote. Press rt to move the highlight bar (arrow) to “INITIAL SET”, then press OK or e.

BSelect language

This VCR offers you the language choice to view menus and some messages — in English, Spanish or French. Press rt to move the highlight bar (arrow) to “LANGUAGE”, then press OK or e repeatedly until the desired language is selected.

Press MENU to return to normal screen.

MAIN MENU

FUNCTION SET

TUNER SET

INITIAL SET

PRESS ( ,), THEN (OK)

PRESS (MENU) TO END

INITIAL SET

CLOCK SET

LANGUAGE ENGLISH GUIDE CHANNEL SET CABLE BOX SET

DBS RECEIVER SET

SELECT WITH ( , ) AND (OK)

PRESS (MENU) TO END

Page 4
Image 4
JVC HR-VP790U manual Connections and Plug&Play Setting, Initial Settings, Language Setting, RF Connection, AV Connection

HR-VP790U specifications

The JVC HR-VP790U is a sophisticated VCR that showcases JVC's renowned expertise in the field of video technology. As a versatile VCR, it combines high-quality video playback and recording capabilities, making it a desirable choice for both casual viewers and video enthusiasts alike.

One of the standout features of the HR-VP790U is its ability to support VHS, S-VHS, and S-VHS ET formats. This flexibility allows users to enjoy a wide range of video content, whether it comes from standard VHS tapes or high-resolution S-VHS tapes. The incorporation of the S-VHS ET technology enhances the video output quality of standard VHS tapes, enabling users to experience sharper and clearer images compared to traditional VHS playback.

The HR-VP790U is equipped with JVC's advanced digital noise reduction technology, which minimizes visual artifacts and enhances the overall picture quality. This technology is particularly beneficial for users who often deal with older tapes that may have suffered from degradation over time. Additionally, the VCR features various playback modes, including slow motion and frame-by-frame playback, which add to the viewing experience by allowing users to engage with the content more intimately.

Another significant characteristic of the HR-VP790U is its robust recording capabilities. The unit features a one-touch recording function that simplifies the process of capturing video content onto tape. Users can easily set the timer recording functions to ensure they never miss their favorite shows. This feature is especially useful for those with busy schedules who want to keep up with television programming.

In terms of connectivity, the HR-VP790U boasts composite video and audio outputs, making it compatible with a wide variety of televisions and other multimedia devices. Additionally, the unit provides a simple and intuitive interface, allowing users to navigate through menus and settings with ease.

Overall, the JVC HR-VP790U is a well-rounded VCR that combines quality, versatility, and ease of use. Whether you are reliving memories from your VHS collection or recording new content, this model delivers impressive performance tailored to meet the needs of modern users while honoring the legacy of traditional video technology. Its combination of advanced features and user-friendly design makes it a remarkable choice for home entertainment enthusiasts.