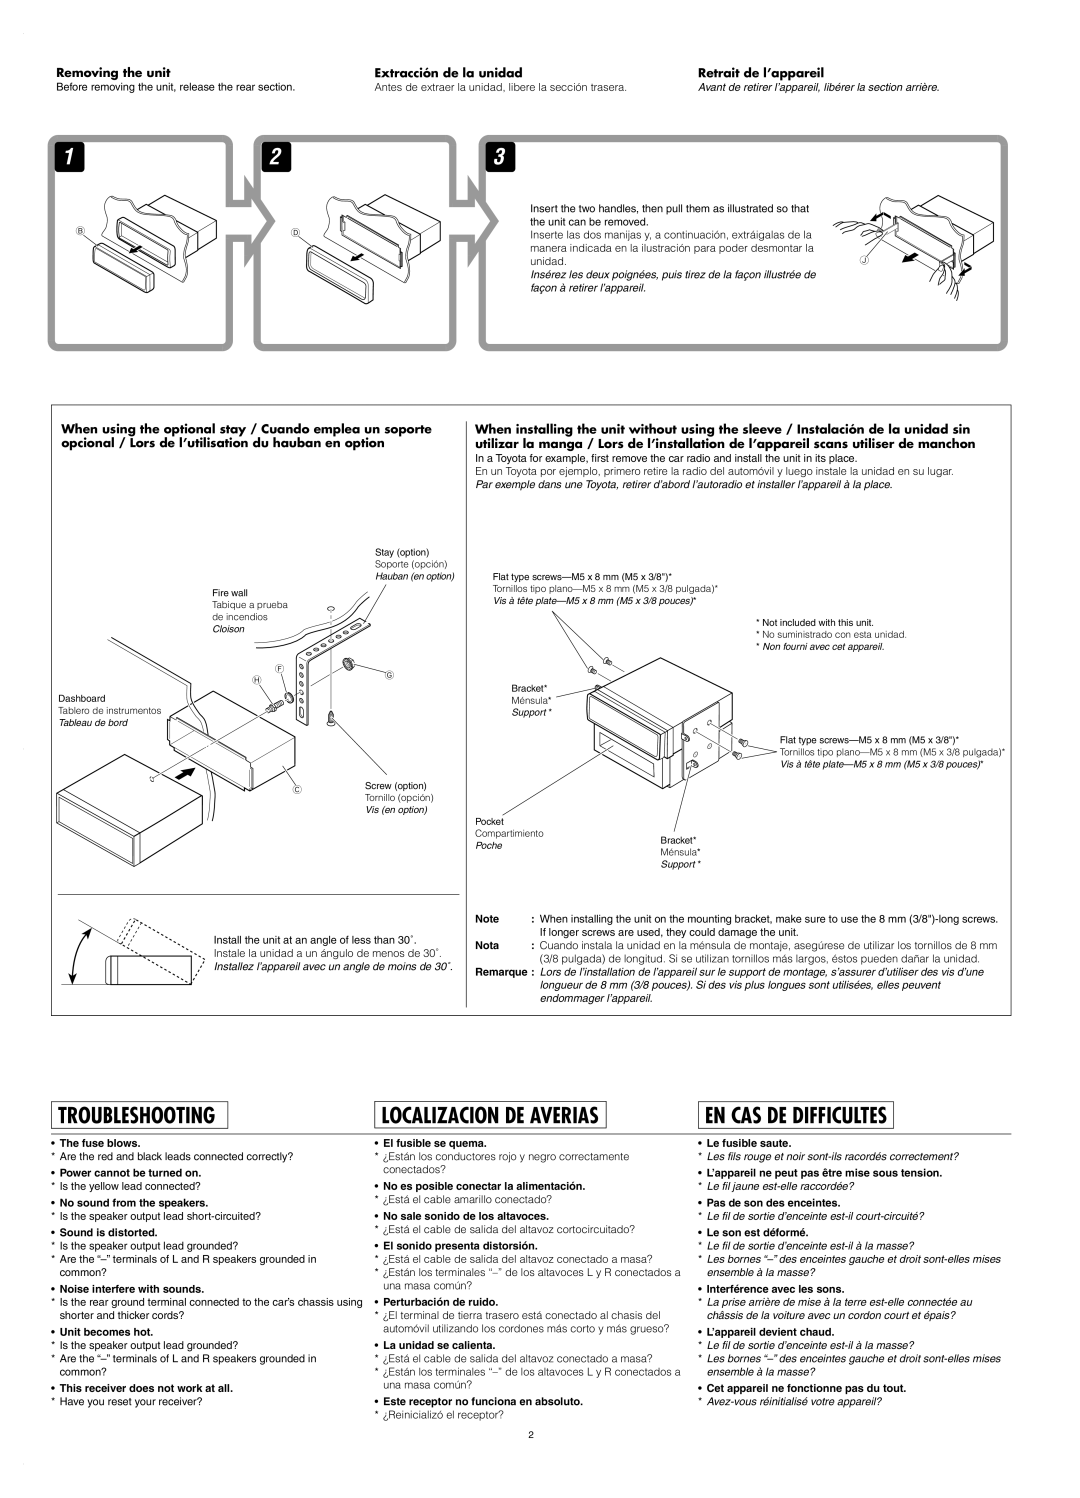
Removing the unit

Extracción de la unidad

Retrait de l’appareil

Before removing the unit, release the rear section.

Antes de extraer la unidad, libere la sección trasera.

Avant de retirer l’appareil, libérer la section arrière.

1


2

3


Insert the two handles, then pull them as illustrated so that


B


the unit can be removed.


D

Inserte las dos manijas y, a continuación, extráigalas de la


manera indicada en la ilustración para poder desmontar la


unidad.

J

Insérez les deux poignées, puis tirez de la façon illustrée de façon à retirer l’appareil.

When using the optional stay / Cuando emplea un soporte opcional / Lors de l’utilisation du hauban en option

When installing the unit without using the sleeve / Instalación de la unidad sin utilizar la manga / Lors de l’installation de l’appareil scans utiliser de manchon

In a Toyota for example, first remove the car radio and install the unit in its place.

En un Toyota por ejemplo, primero retire la radio del automóvil y luego instale la unidad en su lugar. Par exemple dans une Toyota, retirer d’abord l’autoradio et installer l’appareil à la place.

Fire wall

Tabique a prueba de incendios

Cloison

F

H

Dashboard

Tablero de instrumentos

Tableau de bord

C

Stay (option) Soporte (opción) Hauban (en option)

G

Screw (option)

Tornillo (opción)

Vis (en option)

Flat type screws—M5 x 8 mm (M5 x 3/8")*

Tornillos tipo plano—M5 x 8 mm (M5 x 3/8 pulgada)*

Vis à tête plate—M5 x 8 mm (M5 x 3/8 pouces)*

* Not included with this unit.

* No suministrado con esta unidad. * Non fourni avec cet appareil.

Bracket*

Ménsula*

Support *

Flat type screws—M5 x 8 mm (M5 x 3/8")*

Tornillos tipo plano—M5 x 8 mm (M5 x 3/8 pulgada)*

Vis à tête plate—M5 x 8 mm (M5 x 3/8 pouces)*

Pocket

Compartimiento

Poche

Bracket*

Ménsula*

Support *

Install the unit at an angle of less than 30˚. Instale la unidad a un ángulo de menos de 30˚. Installez l’appareil avec un angle de moins de 30˚.

Note

: When installing the unit on the mounting bracket, make sure to use the 8 mm (3/8")-long screws.


If longer screws are used, they could damage the unit.

Nota

: Cuando instala la unidad en la ménsula de montaje, asegúrese de utilizar los tornillos de 8 mm


(3/8 pulgada) de longitud. Si se utilizan tornillos más largos, éstos pueden dañar la unidad.

Remarque : Lors de l’installation de l’appareil sur le support de montage, s’assurer d’utiliser des vis d’une longueur de 8 mm (3/8 pouces). Si des vis plus longues sont utilisées, elles peuvent endommager l’appareil.

TROUBLESHOOTING

LOCALIZACION DE AVERIAS

EN CAS DE DIFFICULTES

The fuse blows.

* Are the red and black leads connected correctly?

Power cannot be turned on. * Is the yellow lead connected?

No sound from the speakers.

* Is the speaker output lead short-circuited?

Sound is distorted.

*Is the speaker output lead grounded?

*Are the “–” terminals of L and R speakers grounded in common?

Noise interfere with sounds.

*Is the rear ground terminal connected to the car’s chassis using shorter and thicker cords?

Unit becomes hot.

*Is the speaker output lead grounded?

*Are the “–” terminals of L and R speakers grounded in common?

This receiver does not work at all. * Have you reset your receiver?

El fusible se quema.

*¿Están los conductores rojo y negro correctamente conectados?

No es posible conectar la alimentación. * ¿Está el cable amarillo conectado?

No sale sonido de los altavoces.

*¿Está el cable de salida del altavoz cortocircuitado?

El sonido presenta distorsión.

*¿Está el cable de salida del altavoz conectado a masa?

*¿Están los terminales “–” de los altavoces L y R conectados a una masa común?

Perturbación de ruido.

*¿El terminal de tierra trasero está conectado al chasis del automóvil utilizando los cordones más corto y más grueso?

La unidad se calienta.

*¿Está el cable de salida del altavoz conectado a masa?

*¿Están los terminales “–” de los altavoces L y R conectados a una masa común?

Este receptor no funciona en absoluto. * ¿Reinicializó el receptor?

Le fusible saute.

*Les fils rouge et noir sont-ils racordés correctement?

L’appareil ne peut pas être mise sous tension. * Le fil jaune est-elle raccordée?

Pas de son des enceintes.

*Le fil de sortie d’enceinte est-il court-circuité?

Le son est déformé.

*Le fil de sortie d’enceinte est-il à la masse?

*Les bornes “–” des enceintes gauche et droit sont-elles mises ensemble à la masse?

Interférence avec les sons.

*La prise arrière de mise à la terre est-elle connectée au châssis de la voiture avec un cordon court et épais?

L’appareil devient chaud.

*Le fil de sortie d’enceinte est-il à la masse?

*Les bornes “–” des enceintes gauche et droit sont-elles mises ensemble à la masse?

Cet appareil ne fonctionne pas du tout. * Avez-vous réinitialisé votre appareil?

2

Page 26
Image 26
JVC KD-AR260 Nota, Fuse blows, Sound is distorted, Noise interfere with sounds, Unit becomes hot, Perturbación de ruido

KD-G210, KD-AR260 specifications

The JVC KD-AR260 and KD-G210 are two popular car audio receivers that cater to different audio preferences and requirements. Both models present a blend of functionality, sound quality, and user-friendly features, making them great choices for enhancing in-car listening experiences.

Starting with the JVC KD-AR260, this model is designed to optimize audio playback in diverse conditions. One of its standout features is the 24-bit Digital-to-Analog Converter (DAC) that provides superior sound clarity. The receiver supports a wide range of media formats, including CDs, MP3, WMA, and USB playback. This versatility ensures that users can bring their favorite music along in various formats. Additionally, it boasts a built-in equalizer with customizable presets, giving users the ability to fine-tune their audio experience to suit their listening preferences.

Another noteworthy characteristic of the KD-AR260 is its compatibility with auxiliary inputs, letting users connect external devices such as smartphones and tablets easily. The vibrant, easy-to-read display enhances usability by providing clear visibility of track information and settings even in bright sunlight. The model also features a powerful amplification system that ensures rich sound quality, contributing to an impressive in-car audio experience.

Moving on to the JVC KD-G210, this model showcases an equally compelling set of features. With a strong emphasis on user convenience, the KD-G210 comes equipped with a front USB port for straightforward connectivity with devices. It supports playback for various file formats, including MP3, WMA, and AAC, catering to modern audio preferences.

The KD-G210 also incorporates an integrated Bluetooth system, allowing for hands-free calling and audio streaming directly from smartphones. This addition not only enhances safety by keeping drivers focused on the road but also adds an element of modern convenience to any drive. Moreover, it features a high-powered 50-watt output per channel, ensuring that users can enjoy robust sound without sacrificing audio clarity.

Both models possess an aesthetically pleasing design with customizable illumination options, allowing users to match the receiver's colors with their vehicle's interior. With their feature-rich designs, the JVC KD-AR260 and KD-G210 remain competitive options for anyone seeking enhanced audio performance in their car, blending technological advances with user-friendly applications. Overall, they stand as worthy contenders in today’s market, delivering quality sound and functionality for an enjoyable driving experience.