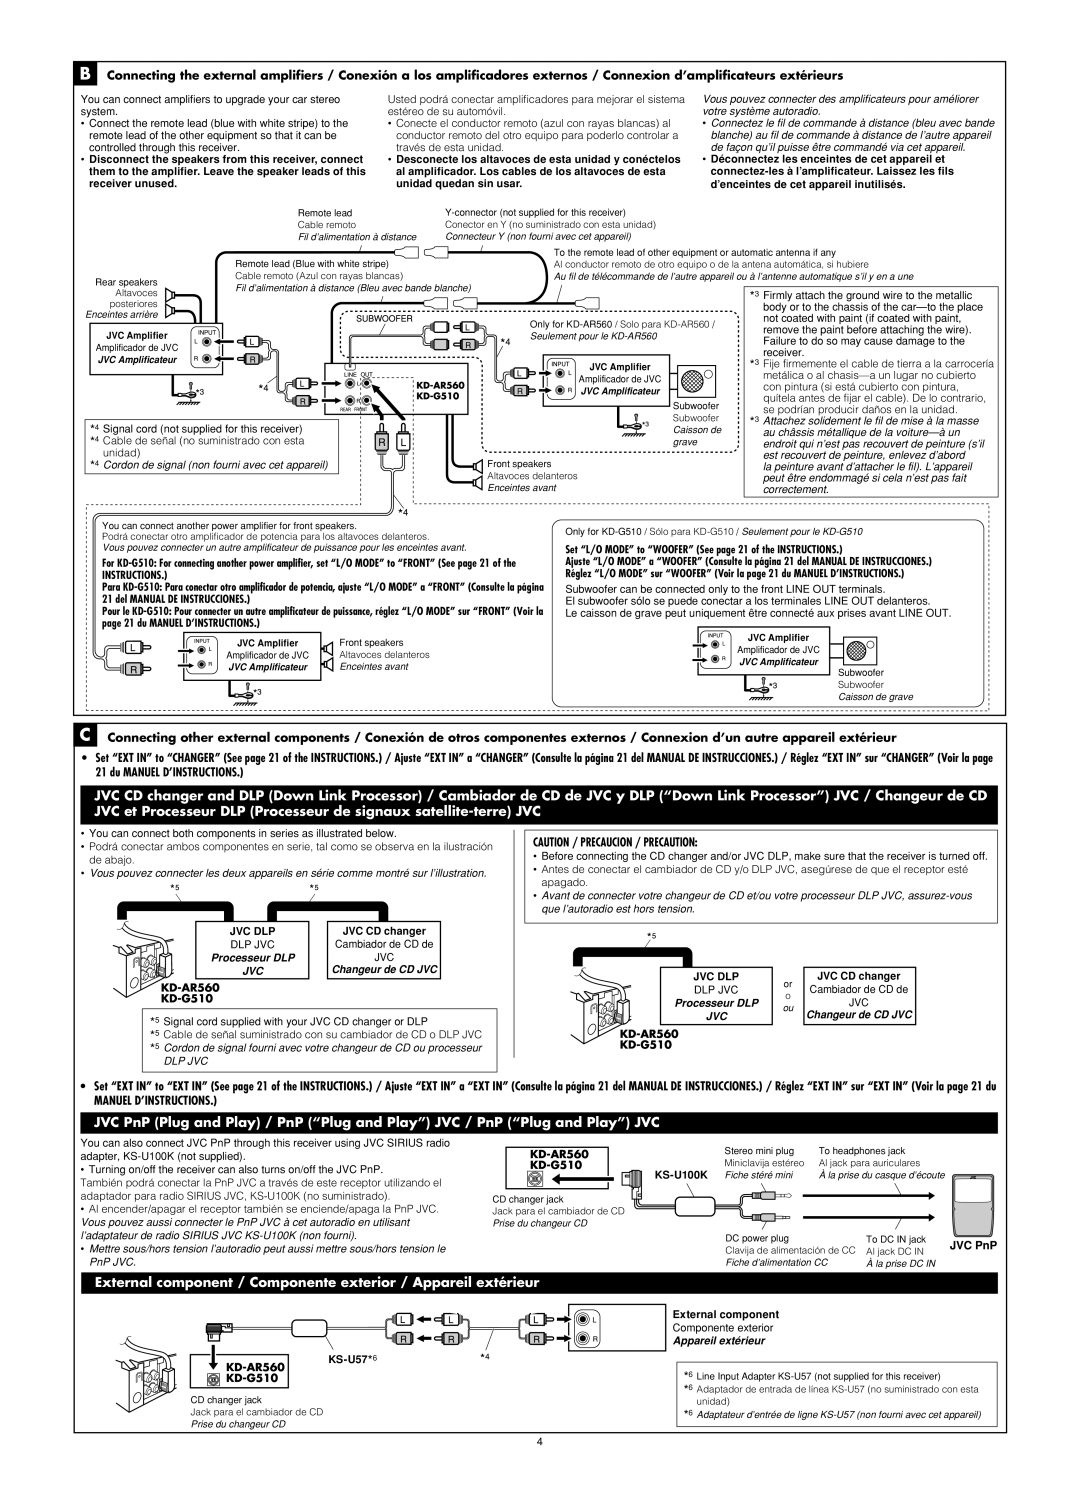
B Connecting the external amplifiers / Conexión a los amplificadores externos / Connexion d’amplificateurs extérieurs

You can connect amplifiers to upgrade your car stereo system.

Connect the remote lead (blue with white stripe) to the remote lead of the other equipment so that it can be controlled through this receiver.

Disconnect the speakers from this receiver, connect them to the amplifier. Leave the speaker leads of this receiver unused.

Usted podrá conectar amplificadores para mejorar el sistema estéreo de su automóvil.

Conecte el conductor remoto (azul con rayas blancas) al conductor remoto del otro equipo para poderlo controlar a través de esta unidad.

Desconecte los altavoces de esta unidad y conéctelos al amplificador. Los cables de los altavoces de esta unidad quedan sin usar.

Vous pouvez connecter des amplificateurs pour améliorer votre système autoradio.

Connectez le fil de commande à distance (bleu avec bande blanche) au fil de commande à distance de l’autre appareil de façon qu’il puisse être commandé via cet appareil.

Déconnectez les enceintes de cet appareil et connectez-les à l’amplificateur. Laissez les fils d’enceintes de cet appareil inutilisés.

Remote lead

Y-connector (not supplied for this receiver)

Cable remoto

Conector en Y (no suministrado con esta unidad)

Fil d’alimentation à distance

Connecteur Y (non fourni avec cet appareil)


To the remote lead of other equipment or automatic antenna if any


Remote lead (Blue with white stripe)

Al conductor remoto de otro equipo o de la antena automática, si hubiere

Rear speakers

Cable remoto (Azul con rayas blancas)

Au fil de télécommande de l’autre appareil ou à l’antenne automatique s’il y en a une

Fil d’alimentation à distance (Bleu avec bande blanche)


Altavoces


*3 Firmly attach the ground wire to the metallic


posteriores


body or to the chassis of the car—to the place

Enceintes arrière


Only for KD-AR560 / Solo para KD-AR560 /

not coated with paint (if coated with paint,


remove the paint before attaching the wire).

JVC Amplifier


Seulement pour le KD-AR560


Failure to do so may cause damage to the

Amplificador de JVC


receiver.

JVC Amplificateur


JVC Amplifier

*3 Fije firmemente el cable de tierra a la carrocería


Amplificador de JVC

metálica o al chasis—a un lugar no cubierto


con pintura (si está cubierto con pintura,


JVC Amplificateur


quítela antes de fijar el cable). De lo contrario,


Subwoofer


se podrían producir daños en la unidad.

*4 Signal cord (not supplied for this receiver)


Subwoofer

*3 Attachez solidement le fil de mise à la masse


Caisson de

au châssis métallique de la voiture—à un

*4 Cable de señal (no suministrado con esta


grave

endroit qui n’est pas recouvert de peinture (s’il

unidad)


est recouvert de peinture, enlevez d’abord

*4 Cordon de signal (non fourni avec cet appareil)

Front speakers


la peinture avant d’attacher le fil). L’appareil


Altavoces delanteros

peut être endommagé si cela n’est pas fait


Enceintes avant

correctement.

You can connect another power amplifier for front speakers.

Only for KD-G510 / Sólo para KD-G510 / Seulement pour le KD-G510

Podrá conectar otro amplificador de potencia para los altavoces delanteros.


Vous pouvez connecter un autre amplificateur de puissance pour les enceintes avant.

Set “L/O MODE” to “WOOFER” (See page 21 of the INSTRUCTIONS.)

For KD-G510: For connecting another power amplifier, set “L/O MODE” to “FRONT” (See page 21 of the

Ajuste “L/O MODE” a “WOOFER” (Consulte la página 21 del MANUAL DE INSTRUCCIONES.)

INSTRUCTIONS.)


Réglez “L/O MODE” sur “WOOFER” (Voir la page 21 du MANUEL D’INSTRUCTIONS.)

Para KD-G510: Para conectar otro amplificador de potencia, ajuste “L/O MODE” a “FRONT” (Consulte la página

Subwoofer can be connected only to the front LINE OUT terminals.

21 del MANUAL DE INSTRUCCIONES.)


El subwoofer sólo se puede conectar a los terminales LINE OUT delanteros.

Pour le KD-G510: Pour connecter un autre amplificateur de puissance, réglez “L/O MODE” sur “FRONT” (Voir la

Le caisson de grave peut uniquement être connecté aux prises avant LINE OUT.

page 21 du MANUEL D’INSTRUCTIONS.)


JVC Amplifier

Front speakers


JVC Amplifier


Amplificador de JVC


Amplificador de JVC

Altavoces delanteros


JVC Amplificateur


JVC Amplificateur

Enceintes avant


Subwoofer


Subwoofer


Caisson de grave

C Connecting other external components / Conexión de otros componentes externos / Connexion d’un autre appareil extérieur

Set “EXT IN” to “CHANGER” (See page 21 of the INSTRUCTIONS.) / Ajuste “EXT IN” a “CHANGER” (Consulte la página 21 del MANUAL DE INSTRUCCIONES.) / Réglez “EXT IN” sur “CHANGER” (Voir la page 21 du MANUEL D’INSTRUCTIONS.)

JVC CD changer and DLP (Down Link Processor) / Cambiador de CD de JVC y DLP (“Down Link Processor”) JVC / Changeur de CD JVC et Processeur DLP (Processeur de signaux satellite-terre) JVC

You can connect both components in series as illustrated below.

Podrá conectar ambos componentes en serie, tal como se observa en la ilustración de abajo.

Vous pouvez connecter les deux appareils en série comme montré sur l’illustration.


JVC DLP

JVC CD changer


DLP JVC

Cambiador de CD de


Processeur DLP

JVC


JVC

Changeur de CD JVC

*5

Signal cord supplied with your JVC CD changer or DLP

*5

Cable de señal suministrado con su cambiador de CD o DLP JVC

*5

Cordon de signal fourni avec votre changeur de CD ou processeur


DLP JVC


CAUTION / PRECAUCION / PRECAUTION:

Before connecting the CD changer and/or JVC DLP, make sure that the receiver is turned off.

Antes de conectar el cambiador de CD y/o DLP JVC, asegúrese de que el receptor esté apagado.

Avant de connecter votre changeur de CD et/ou votre processeur DLP JVC, assurez-vous que l’autoradio est hors tension.

JVC DLP

or

JVC CD changer

DLP JVC

Cambiador de CD de

o

Processeur DLP

JVC

ou

JVC

Changeur de CD JVC


Set “EXT IN” to “EXT IN” (See page 21 of the INSTRUCTIONS.) / Ajuste “EXT IN” a “EXT IN” (Consulte la página 21 del MANUAL DE INSTRUCCIONES.) / Réglez “EXT IN” sur “EXT IN” (Voir la page 21 du

MANUEL D’INSTRUCTIONS.)

JVC PnP (Plug and Play) / PnP (“Plug and Play”) JVC / PnP (“Plug and Play”) JVC

You can also connect JVC PnP through this receiver using JVC SIRIUS radio adapter, KS-U100K (not supplied).

• Turning on/off the receiver can also turns on/off the JVC PnP.

También podrá conectar la PnP JVC a través de este receptor utilizando el adaptador para radio SIRIUS JVC, KS-U100K (no suministrado).

Al encender/apagar el receptor también se enciende/apaga la PnP JVC. Vous pouvez aussi connecter le PnP JVC à cet autoradio en utilisant l’adaptateur de radio SIRIUS JVC KS-U100K (non fourni).

Mettre sous/hors tension l’autoradio peut aussi mettre sous/hors tension le PnP JVC.


Stereo mini plug

To headphones jack


Miniclavija estéreo

Al jack para auriculares

KS-U100K

Fiche stéré mini

À la prise du casque d’écoute

CD changer jack

Jack para el cambiador de CD

Prise du changeur CD

DC power plug

To DC IN jack

Clavija de alimentación de CC

Al jack DC IN

Fiche d’alimentation CC

À la prise DC IN

External component / Componente exterior / Appareil extérieur

KS-U57*6

CD changer jack

Jack para el cambiador de CD

Prise du changeur CD

External component

Componente exterior

Appareil extérieur

*6 Line Input Adapter KS-U57 (not supplied for this receiver)

*6 Adaptador de entrada de línea KS-U57 (no suministrado con esta unidad)

*6 Adaptateur d’entrée de ligne KS-U57 (non fourni avec cet appareil)

4

Page 39
Image 39
JVC KD-G510, KD-AR560 manual Manuel D’INSTRUCTIONS

KD-G510, KD-AR560 specifications

The JVC KD-AR560 and KD-G510 are two of JVC's notable car audio receivers, designed to enhance your in-car audio experience with a blend of innovative features and versatile functionality.

Starting with the KD-AR560, it boasts a sleek design that integrates seamlessly into any vehicle's dashboard. The unit supports a variety of audio formats, including MP3, WMA, and WAV files, making it a versatile choice for music lovers. One of its standout features is the 3-band equalizer, which allows users to customize audio settings according to their preferences. With a power output of 50 watts RMS per channel, the KD-AR560 delivers robust sound performance, ensuring that every note resonates clearly.

The KD-AR560 also includes a front-loaded USB port and an auxiliary input, providing multiple ways to connect your devices. Whether you prefer playing music from a USB flash drive or streaming via an auxiliary cable, this receiver covers all bases. Additionally, the unit is compatible with JVC's Bluetooth technology, enabling wireless audio streaming and hands-free calling, which enhances safety while driving.

Turning to the KD-G510, this model features a user-friendly interface with a bright, easy-to-read display. Similar to the KD-AR560, it supports multiple audio formats and comes equipped with a powerful 50 watts RMS output. The KD-G510 also includes a 3-band equalizer, giving users the flexibility to tailor their listening experience.

One of the key characteristics of the KD-G510 is its ability to connect with various external devices. It has a front USB port and an auxiliary input, allowing you to easily hook up smartphones or other media players. This unit is designed for convenience, offering features such as easy-to-navigate controls and remote compatibility.

Both models are engineered to deliver excellent sound quality, along with a durable build that can withstand the rigors of daily use. In terms of installation, they are designed to fit standard-sized slots, making them accessible for most vehicle types. Overall, the JVC KD-AR560 and KD-G510 stand out as powerful car audio receivers that combine advanced technology with user-friendly features, perfect for enhancing any road trip or daily commute.