KD-R326/KD-R325
Installation/Connection Manual | |
การติดตัง/คู่มือการติดตัง | |
้ | ้ |
0910DTSMDTJEIN | |
[U/UH] | EN, TH |
| © 2010 Victor Company of Japan, Limited |
ENGLISH / ไทย
WARNINGS / คำเตือน
•You need the installation kits which corresponds to your car.
•If you have any questions or require information regarding installation kits, consult your JVC car audio dealer or a company supplying kits.
•The unit can only be installed in a car with a 12 V DC power supply, negative ground.
•Disconnect the battery’s negative terminal and make all electrical connections before installing the unit.
•Connect speakers with a maximum power of more than 50 W (impedance of 4 Ω to 8 Ω). Otherwise, change the <AMP GAIN> setting. (See page 12 of the INSTRUCTIONS.)
•Insulate unconnected wires with vinyl tape or other similar material. To prevent a short circuit, do not remove the caps on the ends of the unconnected wires or the terminals.
•If the fuse blows, first make sure the wires are not touching to cause a short circuit, then replace the old fuse with one that has the same rating.
•Install this unit in the console of your vehicle.
•Mount the unit so that the mounting angle is 30° or less.
•Be sure to ground this unit to the car's chassis again after installation.
•After the unit is installed, check whether the brake lamps, blinkers, wipers, etc. on the car are working properly.
•Do not touch the metal part of this unit during and shortly after the use of the unit. Metal part such as the heat sink and enclosure become hot.
•ต้องใช้ชุดติดตังที่เหมาะสมกับรถของท่าน
•หากท่านมีคำถามหรือต้องการข้อมูลเกียวกับชุดติดตั่ง้ โปรดปรึกษาตัวแทนจำหน่ายเครืองเสียงติดรถยนต์JVC ของท่านหรือบริษัทที่จัดหาชุดอุปกรณ์ให้
•เครืองสามารถติดตั่งในรถยนต์ที้ ่ม แหล่งจ่ายไฟDC 12 V และต่อกราวน์ลบเท่าน้ั
•ถอดขัวลบของแบตเตอรี้ออก่ และเชือมต่อไฟฟ้้งหมดก่อนติดตัาทังเครื้ อง่
•ต่อลำโพงเข้ากับแหล่งจ่ายไฟฟ้50าไม่เกินW (ค่าความต้านทาน4 Ω ถึง8 Ω) หรือเปลี่ยนการตังค่า้ <AMP GAIN> (ดูหน้า 12 คำแนะนำ)
•หุ้มสายไฟทีไม่ได้เชือมต่อด้วยเทปไวนิลหรือวัสดุอื่นทใกล้เคียงกั่นนเพื่อป้ องกันไม่ให้เกิดไฟลัดวงจร อย่าถอดฝาครอบที่ปลายสายไฟหรือขัวต่อทียังไม่ได้เชือมต่อออก้
•หากฟิ วส์ขาด ก่อนอืนตรวจดูว่าสายไฟไม่ได้สมผัสกันจนเป็ นเหตุให้เกิดการลัดวงจร แล้วเปลี่ยนฟิ วส์เก่าด้วยฟิ์ใหม่ทีกำลังไฟเดียวกันวส
•ติดตังเครื้ องนีในแผงหน้าปั่ดของรถยนต์
•ติดตังเครื้ องโดยให้เครื่องทำมุม่30° หรือน้อยกว่า
•ตรวจสอบให้แน่ใจว่าติดตังเครืองกับโครงรถก่อนการติดตั้ง้
•หลังจากติดตังเครื้ องแล้ว่ ให้ตรวจดูว่าไฟเบรก ไฟกะพริบ่ปัดนที้ำฝน ฯลฯ ในรถยนต์ทำงานอย่างเหมาะสม
•ไม่สมผัสกับส่วนที่เป็ นโลหะของตัวเครืองในระหว่างการใช้งานและหลังจากที่ปิดเครืองได้่ ไม่นาน ชิ้นสวนโลหะอย่างเช่นแผ่นระบายความร้อนและตัวเครือง่ อาจร้อนจัด
PRECAUTIONS on power supply and speaker connections
•DO NOT connect the speaker leads of the power cord to the car battery; otherwise, the unit will be seriously damaged.
•BEFORE connecting the speaker leads of the power cord to the speakers, check the speaker wiring in your car.
ข้อควรระวังเกี่ยวกับการเชือมต่อแหล่งจ่ายไฟและลำโพง่
• อย่าต่อสายลำโพงทีเป็ นสายไฟกับแบตเตอรีรถยนต์่ ไม่เช่นนั้นเครืองอาจได้รับความเส่ียหายร้ายแรง
• ก่อนต่อสายลำโพงทีเป็ นสายไฟกับลำโพง ควรตรวจสอบการเดินสายลำโพงในรถของท่าน
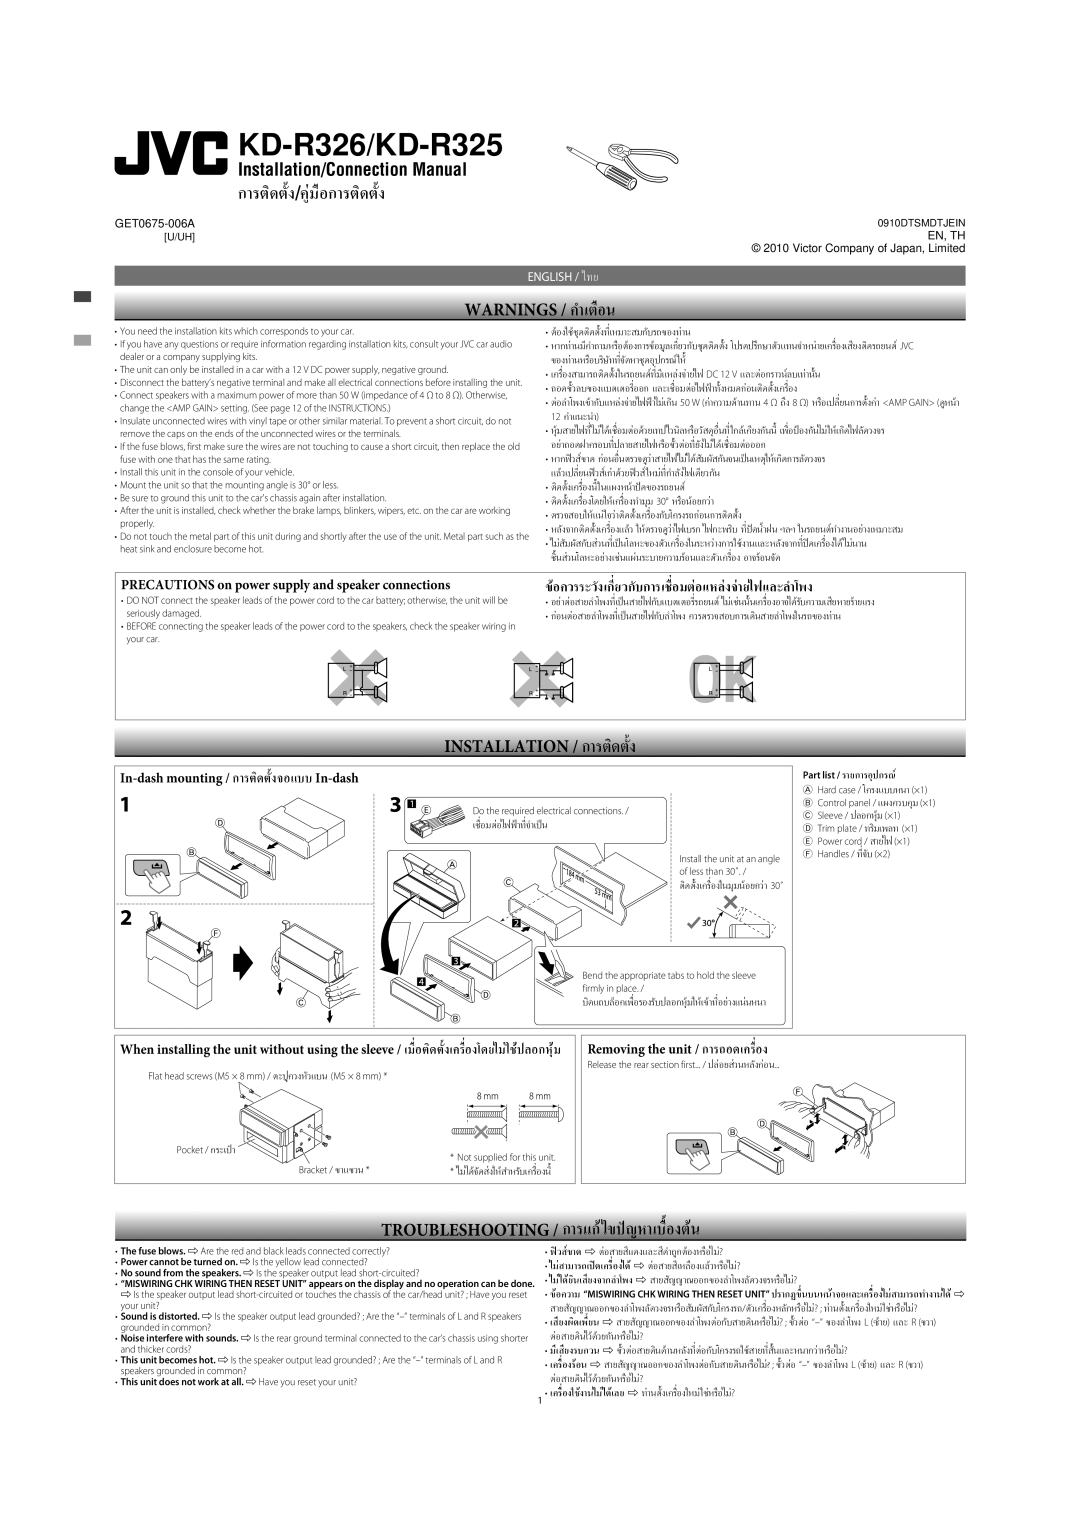
INSTALLATION / การติดตั้ง
In-dash mounting / การติดตั้งจอแบบ In-dash
Do the required electrical connections. /
เชือมต่อไฟฟ้่จำเป็าที น
Install the unit at an angle of less than 30˚. /
ติดตังเครื้ องในมุมน้อยกว่า30˚
Part list / รายการอุปกรณ์
AHard case / โครงแบบหนา (×1) B Control panel / แผงควบคุม(×1) C Sleeve / ปลอกหุ้ม(×1)
D Trim plate / ทริมเพลท(×1) E Power cord / สายไฟ (×1) F Handles / ที่จับ(×2)
Bend the appropriate tabs to hold the sleeve firmly in place. /
บิดแถบล็อคเพื่อรองรับปลอกหุ้มให้เข้อย่างแทีน่หนา
When installing the unit without using the sleeve / เมื่อติดตั้งเครืองโดยไม่ใช้ปลอกหุ้ม่Removing the unit / การถอดเครือง่
Flat head screws (M5 × 8 mm) / ตะปูควงหัวแบน(M5 × 8 mm) *
Release the rear section first... / ปล่อยสวนหลังก่อน...
Pocket / กระเป๋ า | * Not supplied for this unit. | |
Bracket / ขาแขวน * | ||
* ไมได้จัดส่งให้สำหรับเครืองนี่ ้ |
TROUBLESHOOTING / การแก้ ไขปัญหาเบืองต้น
•The fuse blows. ]Are the red and black leads connected correctly?
•Power cannot be turned on. ]Is the yellow lead connected?
•No sound from the speakers. ]Is the speaker output lead
•“MISWIRING CHK WIRING THEN RESET UNIT” appears on the display and no operation can be done.
]Is the speaker output lead
•Sound is distorted. ]Is the speaker output lead grounded? ; Are the
•Noise interfere with sounds. ]Is the rear ground terminal connected to the car’s chassis using shorter and thicker cords?
•This unit becomes hot. ]Is the speaker output lead grounded? ; Are the
•This unit does not work at all. ]Have you reset your unit?
• ฟิวส์ขาด ] ต่อสายสีแดงและสีดำถูกต้องหรือไม่?
• ไม่สามารถเปิดเครืองได้่ ] ต่อสายสีเหลืองแล้วหรือไม่?
• ไม่ได้ยินเสียงจากลำโพง ] สายสญญาณออกของลำโพงลัดวงจรหรือไม่?
• ข้อความ“MISWIRING CHK WIRING THEN RESET UNIT” ปรากฏขึนบนหน้าจอและเครืองไม่สามารถทำงานได้]
สายสญญาณออกของลำโพงลัดวงจรหรือสมผัสกับโครงรถ/ตัวเครืองหลักหรือไม่่ ? ; ท่านตังเครื้ องใหม่ใช่หรือไม่?
• เสยงผิดเพี้ยน ] สายสญญาณออกของลำโพงต่อกับสายดินหรือไม่? ; ขัวต่อ้
• มีเสยงรบกวน ] ขัวต่อสายดินด้านหลังทีต่อกับโครงรถใช้สายที่ันและหนากว่าหรือไม่?
• เครืองร้อน่ ] สายสญญาณออกของลำโพงต่อกับสายดินหรือไม่; ขั? วต่อ้
• เครืองใช้งานไม่ได้เลย ] ท่านตังเครื้ องใหม่ใช่หรือไม่?
1