JVC KD-S717 manual Electrical Connections

Models: KD-S717

1 24
Download 24 pages 57.71 Kb
Page 23
Image 23

ENGLISH

РУССКИЙ

ELECTRICAL CONNECTIONS

ЭЛЕКТРИЧЕСКИЕ ПОДКЛЮЧЕНИЯ

To prevent short circuits, we recommend that you disconnect the battery’s negative terminal and make all electrical connections before installing the unit. If you are not sure how to install this unit correctly, have it installed by a qualified technician.

Note:

This unit is designed to operate on 12 V DC, NEGATIVE ground electrical systems. If your vehicle does not have this system, a voltage inverter is required, which can be purchased at JVC IN-CAR ENTERTAINMENT dealers.

Replace the fuse with one of the specified rating. If the fuse blows frequently, consult your JVC IN- CAR ENTERTAINMENT dealer.

If noise is a problem...

This unit incorporates a noise filter in the power circuit. However, with some vehicles, clicking or other unwanted noise may occur. If this happens, connect the unit’s rear ground terminal (see connection diagram) to the car’s chassis using shorter and thicker cords, such as copper braiding or gauge wire. If noise still persists, consult your JVC IN-CAR ENTERTAINMENT dealer.

Maximum input of the speakers should be more than 40 W at the rear and 40 W at the front, with an impedance of 4 Ω to 8 Ω.

Be sure to ground this unit to the car’s chassis.

The heat sink becomes very hot after use. Be careful not to touch it when removing this unit.

Дëя ïðåäîòâðàùåíèя êîðîòêèõ çàìûêàíèé ìû ðåêîìåíäóåì Вàì îòñîåäèíèòü îòðèöàòåëüíûé ðàçúåì àêêóìóëяòîðà è îñóùåñòâèòü âñå ïîäêëþ÷åíèя ïåðåä óñòàíîâêîé óñòðîéñòâà. Еñëè Вû íå çíàåòå òî÷íî, êàê ñëåäóåò óñòàíàâëèâàòü ýòî óñòðîéñòâî, îáðàòèòåñü ê êâàëèôèöèðîâàííîìó ñïåöèàëèñòó.

Пðèìå÷àíèå:

Эòî óñòðîéñòâî ðàçðàáîòàíî äëя ýêñïëóàòàöèè íà 12 В ïîñòîяííîãî íàïðяæåíèя ñ МИНУСОМ НА МАССЕ. Еñëè Вàø àâòîìîáèëü íå èìååò ýòîé ñèñòåìû, òðåáóåòñя èíâåðòîð íàïðяæåíèя, êîòîðûé ìîæåò áûòü ïðèîáðåòåí ó äèëåðà JVC IN-CAR ENTERTAINMENT.

Зàìåíяéòå ïðåäîõðàíèòåëü äðóãèì ïðåäîõðàíèòåëåì óêàçàííîãî êëàññà. Еñëè ïðåäîõðàíèòåëü ñãîðàåò ñëèøêîì ÷àñòî, îáðàòèòåñü ê äèëåðó JVC IN-CAR ENTERTAINMENT.

Пðè ïîяâëåíèè ñèëüíûõ ïîìåõ...

Эòî óñòðîéñòâî îñíàùåíî ôèëüòðîì ïîìåõ â öåïè ïèòàíèя. Оäíàêî, â íåêîòîðûõ ñëó÷àяõ âîçìîæíî ïîяâëåíèå ùåë÷êîâ è äðóãèõ íåæåëàòåëüíûõ ïîìåõ. В ýòîì ñëó÷àå ïîäêëþ÷èòå çàäíèé ðàçúåì çàçåìëåíèя ýòîãî óñòðîéñòâà (ñì. ñõåìó ïîäêëþ÷åíèя íèæå) ê øàññè àâòîìîáèëя ïðè ïîìîùè áîëåå êîðîòêèõ è òîëñòûõ ïðîâîäîâ. Еñëè ïîìåõè íå èñ÷åçàþò, îáðàòèòåñü ê äèëåðó JVC IN-CAR ENTERTAINMENT.

Maêñèìàëüíàя âõîäíàя ìîùíîñòü ãðîìêîãîâîðèòåëåé íå äîëæíà ïðåâûøàòü 40 Вò íà çàäíèõ è 40 Вò íà ïåðåäíèõ ãðîìêîãîâîðèòåëяõ, ñ ðàñ÷åòíûì ñîïðîòèâëåíèåì îò 4 Ω äo 8 Ω.

Нe çàáóäüòå çàçåìëèòü óñòðîéñòâî íà øàññè àâòîìîáèëя.

Рàäèàòîð âî âðåìя èñïîëüçîâàíèя ñèëüíî íàãðåâàåòñя. Сòàðàéòåñü åãî íå òðîãàòü âî âðåìя óäàëåíèя óñòðîéñòâà.

Heat sink Рàäèàòîð

A

Typical Connections

A

Тèïè÷íûå ïîäêëþ÷åíèя

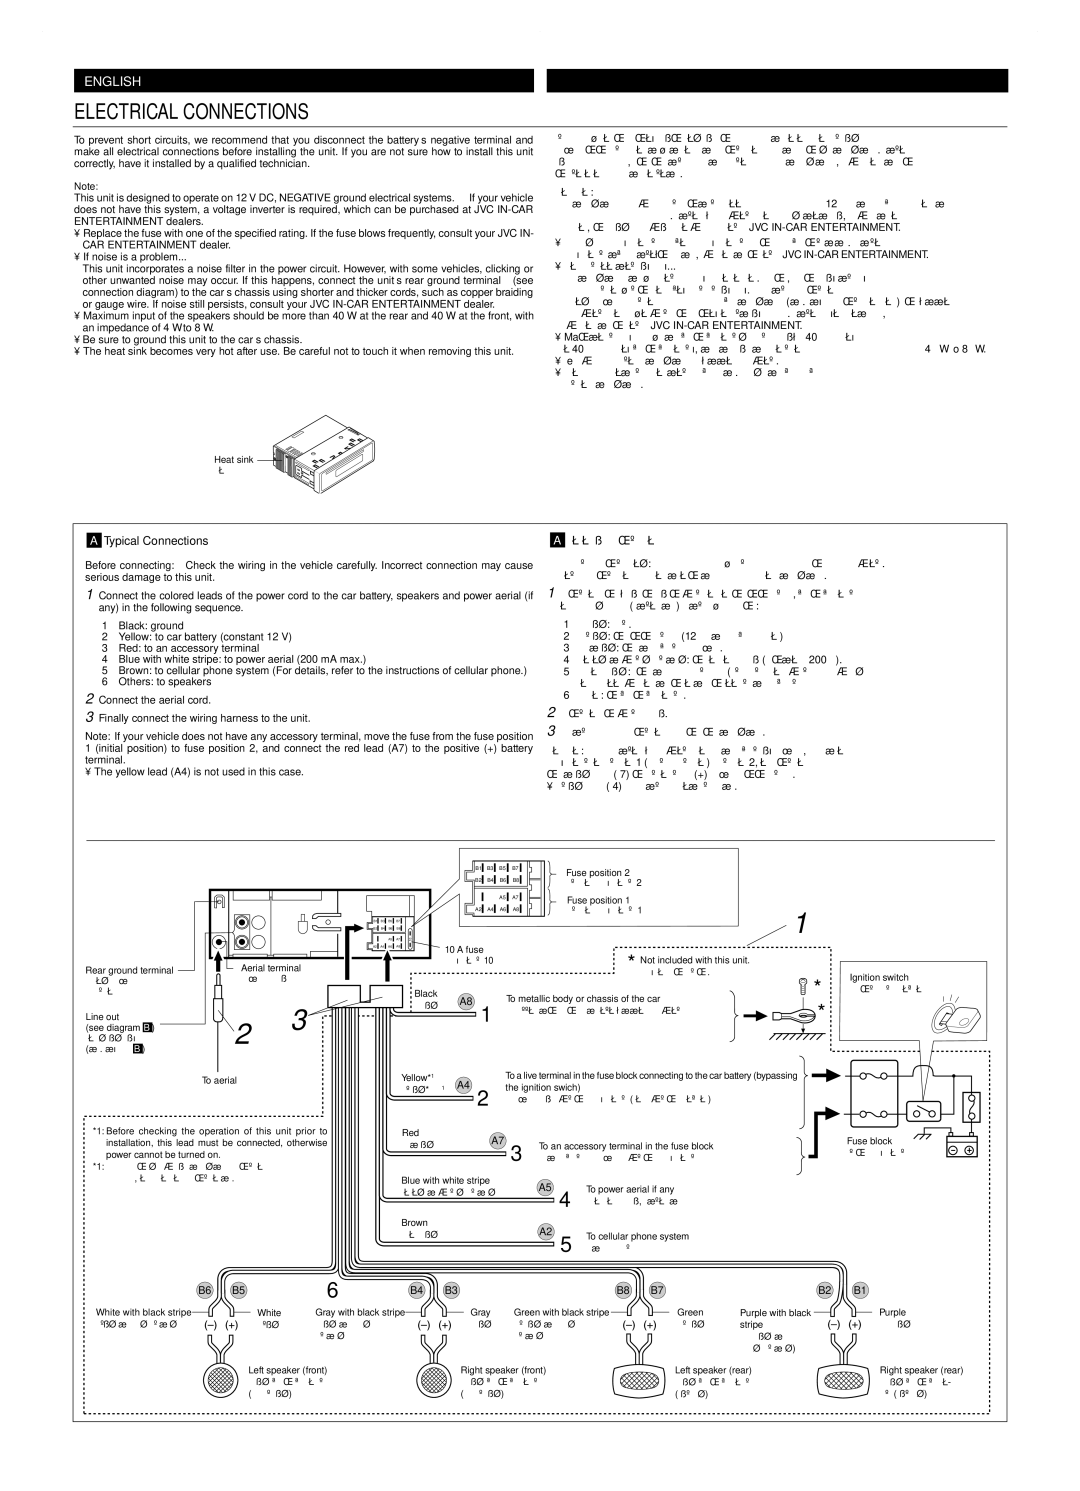
Before connecting: Check the wiring in the vehicle carefully. Incorrect connection may cause serious damage to this unit.

1Connect the colored leads of the power cord to the car battery, speakers and power aerial (if any) in the following sequence.

1Black: ground

2Yellow: to car battery (constant 12 V)

3 Red: to an accessory terminal

4 Blue with white stripe: to power aerial (200 mA max.)

5 Brown: to cellular phone system (For details, refer to the instructions of cellular phone.)

6 Others: to speakers

2Connect the aerial cord.

3Finally connect the wiring harness to the unit.

Note: If your vehicle does not have any accessory terminal, move the fuse from the fuse position 1 (initial position) to fuse position 2, and connect the red lead (A7) to the positive (+) battery terminal.

• The yellow lead (A4) is not used in this case.

Пåðåä íà÷àëîì ïîäêëþ÷åíèé: Тùàòåëüíî ïðîâåðüòå ïðîâîäêó â àâòîìîáèëå. Нåïðàâèëüíîå ïîäêëþ÷åíèå ìîæåò ïðèâåñòè ê ñåðüåçíîìó ïîâðåæäåíèþ óñòðîéñòâà.

1Пîäêëþ÷èòå îêðàøåííûå êîíöû êàáåëя ïèòàíèя ê àêêóìóëяòîðó, ãðîìêîãîâîðèòåëяì è àâòîíîìíîé àíòåííå (åñëè åñòü) â ñëåäóþùåì ïîðяäêå:

1Чåðíûé: çåìëя.

2Жåëòûé: ê àêêóìóëяòîðó (12 В ïîñòîяííîãî íàïðяæåíèя)

3 Кðàñíûé: ê âñïîìîãàòåëüíîìó ðàçúåìó.

4 Сèíèé ñ áåëîé ïîëîñîé: ê ïèòàíèþ àíòåííû (ìàêñèìóì 200 ìА).

5 Кîðè÷íåâûé: ê ñîòîâîìó òåëåôîíó (äëя ïîëó÷åíèя áîëåå ïîäðîáíîé èíôîðìàöèè îáðàòèòåñü ê èíñòðóêöèè äëя ñîòîâîãî òåëåôîíà

6 Пðî÷èå: ê ãðîìêîãîâîðèòåëяì.

2Пîäêëþ÷èòå êàáåëü àíòåííû.

3В ïîñëåäíþþ î÷åðåäü ïîäêëþ÷èòå ïðîâîäêó ê óñòðîéñòâó.

Пðèìå÷àíèå: Еñëè Вàø àâòîìîáèëü íå èìååò âñïîìîãàòåëüíûõ ðàçúåìîâ, ïåðåìåñòèòå ïðåäîõðàíèòåëü èç ïîëîæåíèя 1 (íà÷àëüíîå ïîëîæåíèå) â ïîëîæåíèå 2, è ïîäêëþ÷èòå êðàñíûé ïðîâîä (А7) ê ïîëîæèòåëüíîìó (+) ðàçúåìó àêêóìóëяòîðà.

• Жåëòûé ïðîâîä (А4) â ýòîì ñëó÷àå íå èñïîëüçóåòñя.

Rear ground terminal Зàäíèé ðàçúåì çàçåìëåíèя

Line out

(see diagram B ) Лèíåéíûé âûõîä (ñì. ñõåìó B )


B1

B3

B5

B7

Fuse position 2


B2

B4

B6

B8


Пîëîæåíèå ïðåäîõðàíèòåëя 2


A5

A7

Fuse position 1


A2

A4

A6

A8

Пîëîæåíèå ïðåäîõðàíèòåëя 1

1


B1

B3

B5

B7


B2

B4

B6

B8


A5

A7

10


A2

A4

A6

A8

10 A fuse


*

Not included with this unit.


Aerial terminal


Пðåäîõðàíèòåëü 10 А


Нå âõîäèò â êîìïëåêò.


Рàçúåì àíòåííû


*


Black

A8


To metallic body or chassis of the car


3


Чåðíûé


*

2


1 К ìåòàëëè÷åñêîìó êîðïóñó èëè øàññè àâòîìîáèëя


Ignition switch Пåðåêëþ÷àòåëü çàæèãàíèя

To aerial К àíòåííå

*1: Before checking the operation of this unit prior to installation, this lead must be connected, otherwise power cannot be turned on.

*1: Пåðåä ïðîâåðêîé ðàáîòû óñòðîéñòâà ïîäêëþ÷èòå ýòîò ïðîâîä, èíà÷å ïèòàíèå íå âêëþ÷èòñя.

B6

B5

6

Yellow*1


A4

To a live terminal in the fuse block connecting to the car battery (bypassing

Жåëòûé*

1

the ignition swich)


2

К ðàçúåìó ôàçû â áëîêå ïðåäîõðàíèòåëя (ìèíóя áëîê çàæèãàíèя)

Red


A7


Кðàñíûé


3

To an accessory terminal in the fuse block


К âñïîìîãàòåëüíîìó ðàçúåìó â áëîêå ïðåäîõðàíèòåëя

Blue with white stripe


A5


To power aerial if any

Сèíèé ñ áåëîé ïîëîñîé


4 К ïèòàíèþ àíòåííû, åñëè åñòü


Brown


A2


Кîðè÷íåâûé


5

To cellular phone system


К ñîòîâîìó òåëåôîíó

B4


B3


B8

B7

Fuse block Бëîê ïðåäîõðàíèòåëя

B2 B1

White with black stripe

White

Gray with black stripe

Gray

Green with black stripe

Green

Purple with black

Purple

Бåëûé ñ ÷åðíîé ïîëîñîé

Бåëûé

Сåðûé ñ ÷åðíîé

Сåðûé

Зåëåíûé ñ ÷åðíîé

Зåëåíûé

stripe

Пóðïóðíûé


ïîëîñîé


ïîëîñîé


Пóðïóðíûé ñ


÷åðíîé ïîëîñîé)


Left speaker (front)

Right speaker (front)

Left speaker (rear)

Right speaker (rear)

Лåâûé ãðîìêîãîâîðèòåëü

Пðàâûé ãðîìêîãîâîðèòåëü

Лåâûé ãðîìêîãîâîðèòåëü

Пðàâûé ãðîìêîãîâîðè-

(ôðîíòàëüíûé)

(ôðîíòàëüíûé)

(òûëîâîé)

òåëü (òûëîâîé)

Page 23
Image 23
JVC KD-S717 manual Electrical Connections

KD-S717 specifications

The JVC KD-S717 is a car CD receiver that integrates advanced technologies and features to enhance any driving experience. Designed for audiophiles and casual listeners alike, this model merges exceptional sound quality with user-friendly functionality.

One of the standout features of the KD-S717 is its compatibility with various media formats. It supports CD, CD-R, CD-RW, and MP3 playback, allowing users to enjoy their favorite music in different formats. The ability to play MP3 files means that drivers can store hundreds of songs on a single disc, making long journeys more enjoyable without the need for constant swapping of CDs.

The KD-S717 is equipped with a powerful 50 watts per channel MOSFET amplifier, ensuring clear and dynamic sound reproduction across a wide range of frequencies. The receiver also features a 3-band parametric equalizer, giving users the ability to customize their sound preferences according to personal taste. Additionally, it includes built-in preset equalizer settings, making it easy to switch between genres and audio styles with just a press of a button.

In terms of connectivity, the JVC KD-S717 offers a front AUX input, allowing users to connect various portable musical devices such as smartphones and MP3 players. This feature promotes seamless integration of personal playlists into the driving experience. The receiver also supports JVC's K2 technology, which enhances the sound quality of compressed audio formats like MP3 by restoring lost frequencies for a richer listening experience.

The KD-S717’s design is both sleek and functional, incorporating a bright LCD display that provides clear visibility of track information, including song title and artist name, even in direct sunlight. The receiver’s user interface is straightforward, enabling easy navigation through playlists and settings without distraction while driving.

Furthermore, the KD-S717 is designed with vehicle compatibility in mind, featuring a durable build and a standardized size that fits most car dashboards. With its extensive feature set, advanced sound technologies, and user-friendly operation, the JVC KD-S717 remains a compelling choice for drivers seeking to elevate their in-car audio experience.