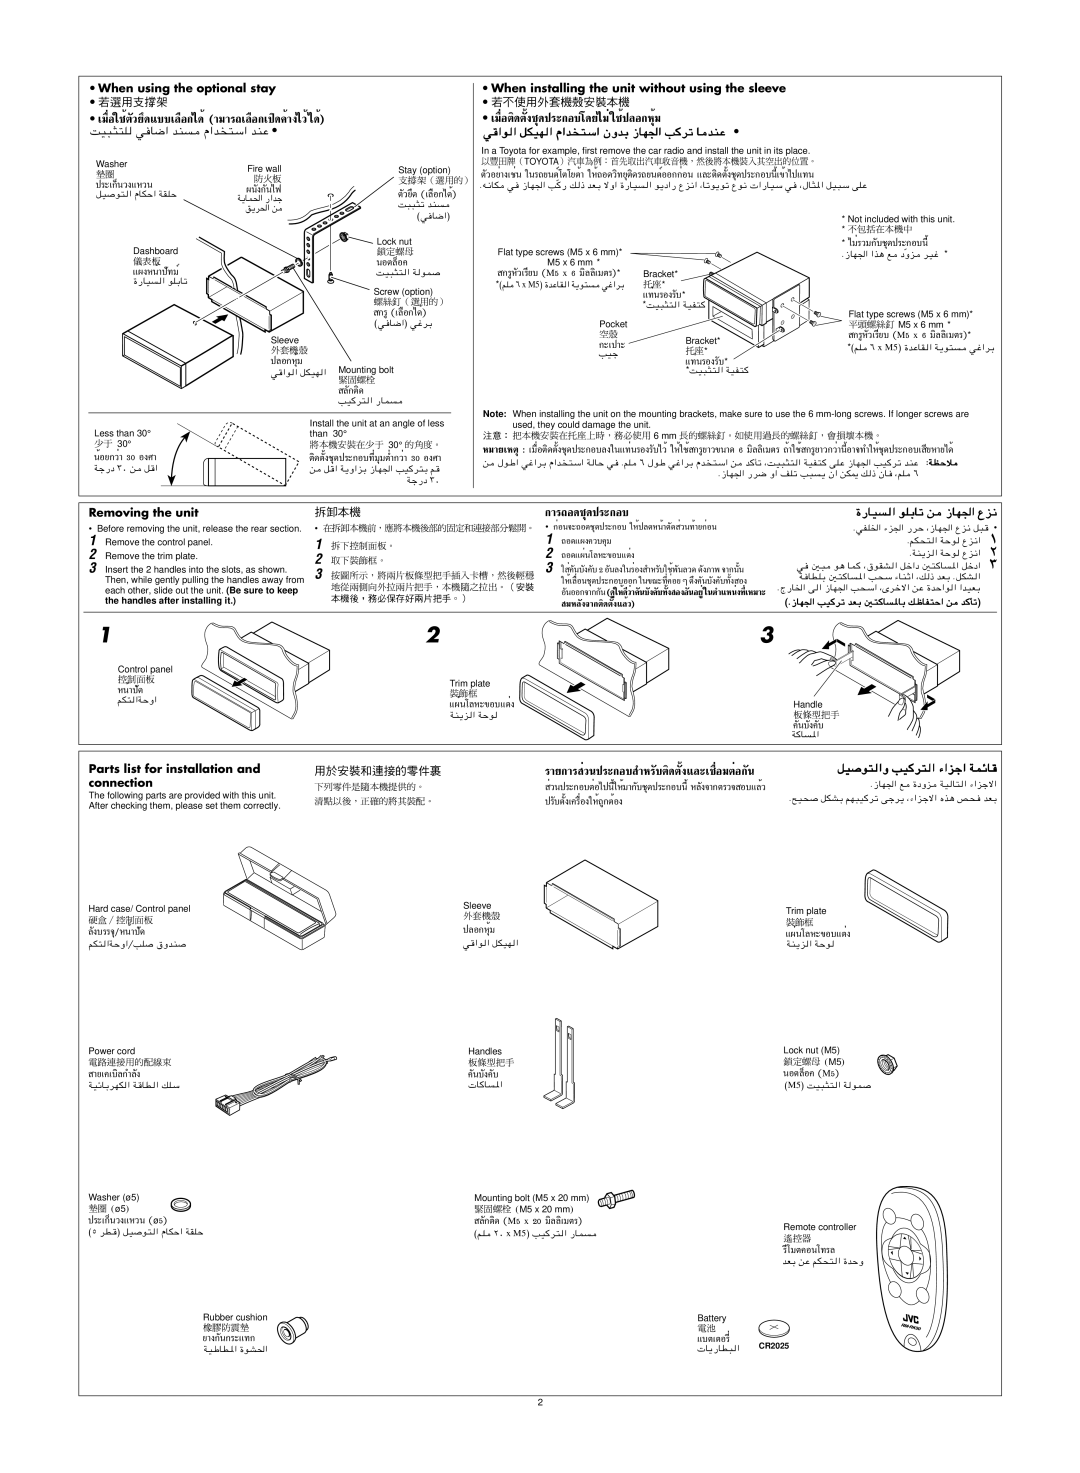
When using the optional stay

‡¡◊ËÕ„™Èµ«¬÷— ¥·∫∫‡≈◊Õ°‰¥È(“¡“√∂‡≈◊Õ°‡ª‘¥§È“߉«È‰¥È)

XO³¦²K

When installing the unit without using the sleeve

‡¡◊ËÕµ‘¥µß™ÿÈ— ¥ª√–°Õ∫‚¥¬‰¡Ë„™Èª≈Õ°ÀÿÈ¡

w

In a Toyota for example, first remove the car radio and install the unit in its place.

Washer

￿￿

ª√–‡°Áπ«ß·À«π

qO

Dashboard

·ºßÀπÈ“ª∑¡Ï—

…—UO

Fire wall

ºπß°—π‰ø—

W¹UL(« —«bł

o¹d(« s

Sleeve

ª≈Õ°ÀÿÈ¡

w

Stay (option)

µ«¬÷— ¥ (‡≈◊Õ°‰¥È)

X³³¦ð bM

©w

Lock nut

πÕµ≈ÁÕ§

XO³¦²

Screw (option)

°√Ÿ(‡≈◊Õ°‰¥È)

©w

Mounting bolt

≈°µ‘— ¥

VO

TOYOTA

µ«Õ¬Ë“߇™Ëπ— „π√∂¬πµÏ‚µ‚¬µÈ“ „ÀÈ∂Õ¥«‘∑¬ÿµ‘¥√∂¬πµÏÕÕ°°ËÕπ ·≈–µ‘¥µß™ÿÈ— ¥ª√–°Õ∫π’ȇ¢È“‰ª·∑π

Æt½UJ Ò

Flat type screws (M5 x 6 mm)*

EM5 x 6 mmF*

°√ŸÀ«‡√’¬∫— (M5 x 6 ¡‘≈≈‘‡¡µ√)*

Bracket*

*©rK∂ x M5® …bŽUIW¹u²wž«dÐ

￿￿*


·∑Ëπ√Õß√∫—*


*XO³¦²

Pocket


￿￿

Bracket*

°–‡ª“–

￿￿*

VOł


·∑Ëπ√Õß√∫—*

*XO³¦²

*Not included with this unit.

*‰¡Ë√«¡°∫™ÿ— ¥ª√–°Õ∫π’È

Æ“UN'« «c¼ l ÒËe

*

Flat type screws (M5 x 6 mm)* EM5 x 6 mmF*

°√ŸÀ«‡√’¬∫— (M5 x 6 ¡‘≈≈‘‡¡µ√)*

*©rK x M5® …bŽUI

Less than 30°


Install the unit at an angle of less


than 30°


￿￿=30°


￿

=30°

￿

πÈÕ¬°«Ë“ 30 Õß»“


µ‘¥µß™ÿ—È ¥ª√–°Õ∫∑’Ë¡ÿ¡µË”°«Ë“ 30 Õß»“

Wł—œ ≥∞ s


s


Wł—œ ≥∞


Note: When installing the unit on the mounting brackets, make sure to use the 6 mm-long screws. If longer screws are used, they could damage the unit.

6 mm

À¡“¬‡Àµÿ: ‡¡◊ËÕµ‘¥µß™ÿÈ— ¥ª√–°Õ∫≈ß„π·∑Ëπ√Õß√∫‰«È—„ÀÈ„™È°√Ÿ¬“«¢π“¥ 6 ¡‘≈≈‘‡¡µ√ ∂È“„™È°√Ÿ¬“«°«Ë“π’ÈÕ“®∑”„ÀÈ™ÿ¥ª√–°Õ∫‡ ¬À“¬‰’ ¥ô

s

∫WEŠö

Æ“UN'« —d{ Ë« nKð V³

Removing the unit

• Before removing the unit, release the rear section. 1 Remove the control panel.

2 Remove the trim plate.

3 Insert the 2 handles into the slots, as shown. Then, while gently pulling the handles away from each other, slide out the unit. (Be sure to keep the handles after installing it.)

1

2

3

°“√∂Õ¥™ÿ¥ª√–°Õ∫

￿°ËÕπ®–∂Õ¥™ÿ¥ª√–°Õ∫ „ÀȪ≈¥ÀπÈ“µ¥— «π∑È“¬°ËÕπË

1 ∂Õ¥·ºß§«∫§ÿ¡

2 ∂Õ¥·ºËπ‚≈À–¢Õ∫·µËß

3 §Ëπ∫—ߧ—∫— 2 Õπ≈ß„π√ËÕß— ”À√∫„™Èæ—π≈«— ¥ ¥ß¿“æ— ®“°ππÈ— „Àȇ≈◊ËÕπ™ÿ¥ª√–°Õ∫ÕÕ° „π¢≥–∑’˧ËÕ¬ Ê ¥÷ߧπ∫—ߧ—∫∑—ßÈ— Õß ÕπÕÕ°®“°°—π—(¥Ÿ„ÀÈ¥’«Ë“§π∫—ߧ—∫∑—ßÈ— ÕßÕπÕ¬ŸË„πµ”·ÀπËß∑’ˇÀ¡“—–

¡À≈ß®“°µ‘— ¥µß·≈È«)È—

…—UO

ÆwHK)« ¡e'« —dŠ ¨“UN'« Ÿe½ q³

ÆrJײ

±

ÆWM¹e

w

W


Æ×U)« v


©Æ“UN'« VO


1

2

3

Control panel


ÀπÈ“ª¥—

Trim plate


rJ²

·ºËπ‚≈À–¢Õ∫·µËß

Handle


WM¹e

§π∫—ߧ—∫—


W

Parts list for installation and connection

The following parts are provided with this unit. After checking them, please set them correctly.

Hard case/ Control panel

√“¬°“√ Ë«πª√–°Õ∫ ”À√∫µ‘— ¥µ—Èß·≈–‡™◊ËÕ¡µËÕ°π—

qO

«πª√Ë–°Õ∫µËÕ‰ªπ’È„ÀÈ¡“°∫™ÿ— ¥ª√–°Õ∫π’ÈÀ≈ß®“°µ√«®— Õ∫·≈È«

Æ“UN'« l

ª√∫µ—߇§√◊ËÕß„ÀÈ∂Ÿ°µÈÕßÈ—

Æ`O×

Sleeve

Trim plate

≈ß∫√√®ÿ/ÀπÈ“ª—¥—

rJ²

Power cord

“¬‡§‡∫‘≈°”≈ß—

WOzUÐdNJ

Washer (ø 5)

￿￿=Eø 5F

ª√–‡°Áπ«ß·À«π (ø 5)

©µ dD

Rubber cushion

¬“ß°π°√—–·∑°

WOÞUD*« …uA(«

ª≈Õ°ÀÿÈ¡

w

Handles

§π∫—ߧ—∫—

U

Mounting bolt (M5 x 20 mm) =EM5 x 20 mmF

≈°µ‘— ¥ (M5 x 20 ¡‘≈≈‘‡¡µ√)

©r?K≤∞ x M5® VO—UL

·ºËπ‚≈À–¢Õ∫·µËß

WM¹e

Lock nut (M5)

=EM5F

πÕµ≈ÁÕ§ (M5)

©M5® XO³¦²

Remote controller

√’‚¡µ§Õπ‚∑√≈

bFÐ sŽ rJײ

Battery

￿￿

·∫µ‡µÕ√’Ë

U¹—UD³ CR2025

2

Page 23
Image 23
JVC KD-S795 manual ‡¡ËÕµ‘¥µßÿÈ- ¥ª√-Õ‚¥¬‰¡Ë„Ȫ≈ÕÀÿÈ¡

KD-S795 specifications

The JVC KD-S795 is an outstanding car audio receiver designed for audiophiles who crave high-quality sound combined with intuitive features. This versatile unit boasts a sleek design, making it a stylish addition to any vehicle's dashboard.

One of the primary features of the KD-S795 is its compatibility with a wide array of audio sources. Users can enjoy their favorite music through USB ports, CD players, or even external devices via auxiliary inputs. The receiver supports MP3, WMA, and WAV file formats, ensuring versatility in playback options. Additionally, the built-in AM/FM tuner allows for dynamic and static-free radio listening.

The KD-S795 is equipped with a powerful 50 watts per channel amplification, which drives speakers efficiently, delivering a rich and robust sound profile. The unit’s high-quality DAC (Digital-to-Analog Converter) enhances audio fidelity while minimizing distortion. A built-in 13-band equalizer provides users with precise control over sound settings, ensuring a tailored audio experience suited to personal preferences.

Bluetooth connectivity is another standout feature of the KD-S795. This technology enables seamless wireless streaming of music from smartphones and other devices, providing the convenience of hands-free calls and music playback without the hassle of cords. The receiver also supports an intuitive smartphone interface, making it easily accessible for navigation and other applications while driving.

The receiver’s display is user-friendly and packed with features. A bright, easy-to-read LCD screen provides a clear view of playlists and settings, ensuring that you never miss a beat while driving. The customizable RGB display allows users to set colors according to their personal style or mood, adding a unique touch to the vehicle’s interior.

JVC also prioritizes safety with the KD-S795, integrating features such as front and rear non-fading pre-outs, allowing for easy installation of amplifiers or subwoofer systems. With compatibility for steering wheel control interfaces, users can operate their audio system without taking their hands off the wheel.

Overall, the JVC KD-S795 stands out as a feature-rich car audio receiver that combines quality sound, modern technology, and user-friendly controls, making it an excellent choice for anyone looking to enhance their in-car audio experience. Whether you're embarking on a long road trip or navigating through daily commutes, the KD-S795 offers an impressive audio solution that meets the demands of modern driving.