Heat sink

ENGLISH


￿￿


‰∑¬

wÐdŽ

ELECTRICAL CONNECTIONS

°“√‡™◊ËÕ¡‚¥¬„™È‰øøÈ“WOzUÐdNJ

To prevent short circuits, we recommend that you disconnect the battery’s negative terminal and make all electrical connections before installing the unit. If you are not sure how to install this unit correctly, have it installed by a qualified technician.

Note:

This unit is designed to operate on 12 V DC, NEGATIVE ground electrical systems. If your vehicle does not have this system, a voltage inverter is required, which can be purchased at JVC car audio dealers.

Replace the fuse with one of the specified rating. If the fuse blows frequently, consult your JVC car audio dealer.

If noise is a problem...

This unit incorporates a noise filter in the power circuit. However, with some vehicles, clicking or other unwanted noise may occur. If this happens, connect the unit’s rear ground terminal (see connection diagram) to the car’s chassis using shorter and thicker cords, such as copper braiding or gauge wire. If noise still persists, consult your JVC car audio dealer.

Maximum input of the speakers should be more than 50 W at the rear and 50 W at the front, with an

impedance of 4 to 8 .

Be sure to ground this unit to the car’s chassis.

The heat sink becomes very hot after use. Be careful not to touch it when removing this unit.

12V

￿￿JVC


JVC

KKK

￿￿ 4 – 8 ￿

‡æ◊ËÕªÈÕß°π‰øøÈ“≈—¥—«ß®√‡√“¢Õ·π–π”„Àȧÿ≥‡Õ“¢«È— ≈∫·∫µ‡µÕ√’ËÕÕ°°ËÕπ·≈–∑”°“√‡™◊ËÕ¡‚¥¬„™È‰øøÈ“∑ÿ°®ÿ¥°ËÕπ∑’Ë®–µ‘¥µßÈ— ™ÿ¥ª√–°Õ∫∂È“§ÿ≥‰¡Ë·πË„®«Ë“µ‘¥µß™ÿÈ— ¥ª√–°Õ∫π’È∂Ÿ°µÈÕßÀ√◊Õ‰¡Ë „ÀÈÀ“™Ë“ߺŸÈ‡™’ˬ«™“≠‡ªÁπºŸÈµ‘¥µßÈ—


À¡“¬‡Àµÿ:


™ÿ¥ª√–°Õ∫π’ȉ¥È√—∫°“√ÕÕ°·∫∫¡“‡æ◊ËÕ„™Èß“π°—∫√–∫∫


°√–· ‰øøÈ“ “¬¥‘π¢—È«≈∫°√–· µ√ß 12 ‚«≈∑Ï


À“°√∂¬πµÏ¢Õߧÿ≥‰¡Ë‰¥È„™È√–∫∫π’È


µÈÕß„™È‡§√◊ËÕß·ª≈ß°√–· ‰ø™Ë«¬


´÷Ëß “¡“√∂À“´◊ÈÕ‰¥È®“°√È“π¢“¬‡§√◊ËÕ߇ ’¬ß√∂¬πµÏJVC


„™Èæ‘°¥—®”‡æ“–·∑πø‘« ÏÀ“°ø‘« ¢Ï“¥∫ËÕ¬


„ÀȪ√÷°…“√È“π¢“¬‡§√◊ËÕ߇ ¬ß√∂¬πµÏ’JVC


JVC

À“°‡ ¬ß¡’ª’ ≠À“— ...


ß— լ˓߉√°Á¥’„π√∂¬πµ


™ÿ¥ª√–°Õ∫™ÿ¥π’È¡’‡§√◊ËÕß°√Õ߇ ¬ß„π«ß®√°”≈’

50 W ￿￿

∫“ߧπ°ÁÕ“®‡°‘— ¥‡ ¬ß∑’ˉ¡Ëæ÷ߪ√“√∂π“’

¢÷Èπ‰¥È


À“°ª≠À“π’ȇ°‘— ¥¢÷Èπ „ÀȵËÕ¢«È— “¬¥‘π¥È“πÀ≈ß—¢Õß™ÿ¥ª√–°Õ∫


(¥Ÿ·ºπ¿Ÿ¡‘°“√µËÕ‡™◊ËÕ¡¥È“π) ‡¢È“°∫—


‡™ ´‘¢Õß√∂¬πµÏ‚¥¬„™È“¬‡§‡∫‘≈∑’Ëπ·≈È— –Àπ“°«Ë“ ‡™Ëπ


“¬‰ø‡§√◊ËÕß«¥—À√◊Õ “¬ª√– “π∑Õß·¥ß ‡ªÁπµÈπ À“°¬ß—


¡’‡ ¬ßÕ¬ŸËÕ’°’

„ÀȪ√÷°…“√È“π¢“¬‡§√◊ËÕ߇ ¬ß√∂¬πµÏ’ JVC

√–¥∫Õ‘πæÿ∑∑’Ë— ¥ß∑’Ë—¥ÿ¢Õß≈”‚æߧ«√¥ß‡°‘π°«Ë“— 50 «µµ— ·≈– 50 «µµÏ— ∑ß≈”‚æßÀ≈È—ß·≈—–≈”‚æßÀπÈ“ ‚¥¬¡’Õ‘¡æ’·¥π´Ï„π√–¥∫— 4-8

µ√«® Õ∫„ÀÈ¥’«Ë“‰¥ÈµËÕ™ÿ¥ª√–°Õ∫™ÿ¥π’È≈ß„π‡™ ´‘√∂¬πµÏ·≈È«

·ºËπ√–∫“¬§«“¡√ÈÕπ®–√ÈÕπ¡“°À≈ß®“°„™È—√–¡¥—√–«ßլ˓‰ª—

qBHÐ w

WOzUÐdNJ

WOHOJÐ p²

VO

Ác¼ q¦


Æ…eNłô«

wzUÐdN —UOð WDÝ«uÐ jI

qLFO


∫WEŠö

“UN'« «c¼ rL

bI

ÆV UÝ i¹—Qð WOzUÐdN WLE½« ¨X u ±≤ ¨DC dýU³

V−¹ ¨pð—UOÝ w ÂUEM « «c¼ q¦

œułË ÂbŽ W UŠ w

¡ö Ë s

‰u;« «c¼ ¡«dý sJ1Ë ¨ÃU² u

‰u×

«b

²Ý«


ÆJVC W —U

«—UO

K

WOðuB « …eNłô«

ÆW u

u*«

UÝUOI « fH½ qL×¹ dšP Ð “uOH « ‰b³²Ý«

…eNłô« ¡ö Ë …—UA²Ý« vłd¹ ¨“uOH « ‚«d²Š« —dJð «–«


ÆJVC W —U

«—UO K

WOðuB «

W


ÆÆÆWKJA*« u¼ ZO−C


«—UO


Ê« sJ1 ¨


w


œułu*« i¹—Q²


“UN'« WOHKš w

qJO¼ l


ÂbŽ W


¡ö


ÆJVC W


vB


l


ÆÂË« ∏ v


WF½U2


Æ…—UO


·ºËπ√–∫“¬§«“¡√ÈÕπ

…—«d(« iHš W×OH

¡º— —‡¡◊ËÕ∂Õ¥™ÿ¥ª√–°Õ∫π’È

bFÐ «bł WMšUÝ …—«d(« iHš W×OH

Æ“UN'« Ÿe½ bMŽ UN²


ATypical Connections /

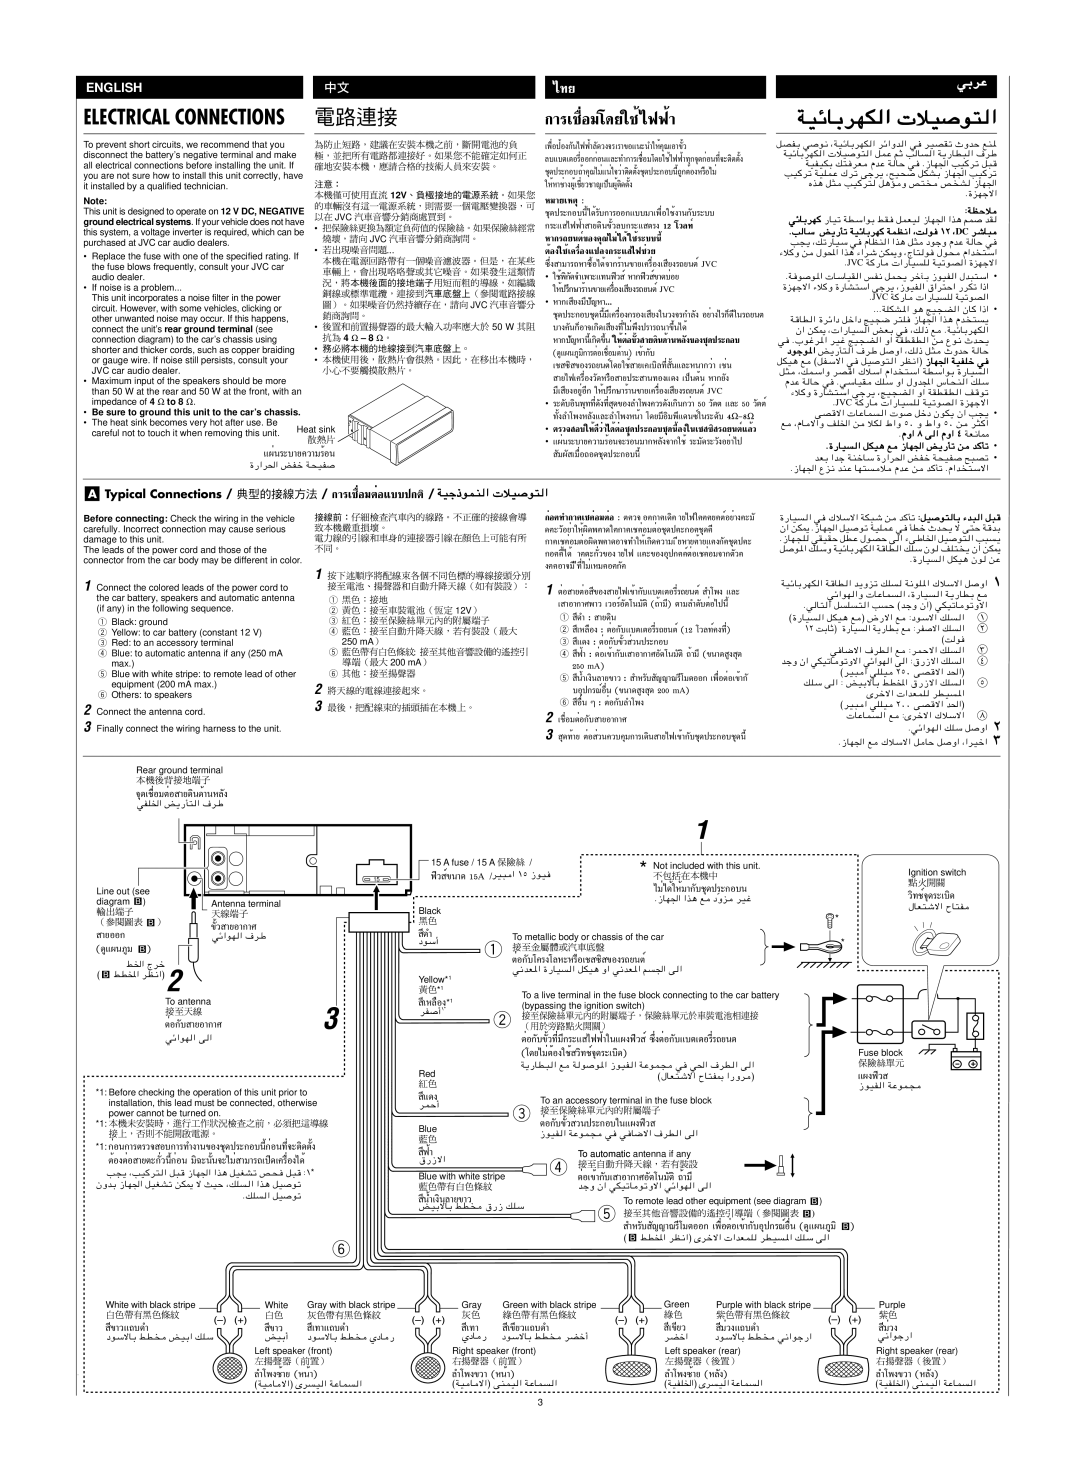
Before connecting: Check the wiring in the vehicle carefully. Incorrect connection may cause serious damage to this unit.

The leads of the power cord and those of the connector from the car body may be different in color.

1 Connect the colored leads of the power cord to the car battery, speakers and automatic antenna (if any) in the following sequence.

1Black: ground

2Yellow: to car battery (constant 12 V)

3 Red: to an accessory terminal

4 Blue: to automatic antenna if any (250 mA max.)

5 Blue with white stripe: to remote lead of other equipment (200 mA max.)

6 Others: to speakers

2 Connect the antenna cord.

3 Finally connect the wiring harness to the unit.

/°“√‡™◊ËÕ¡µËÕ·∫∫ª°µ/ WOł–uLM


°ËÕ•∑”°“•‡™•ËÕ¡µËÕ : µ•«®†Õ•°“•‡¥‘•†“¬‰ø„•••¬•µÏլ˓ߕ–¡—


¥•–«Õ¬Ë“„ÀȺ‘— ¥æ•“¥„•°“•‡™•ËÕ¡µËÕ™ÿ¥ª•–°Õ•™ÿ¥•’


°“•‡™•ËÕ¡µËÕº‘¥æ•“¥Õ“®∑”„Àȇ°‘¥§«“¡‡†’¬À“¬•È“¬·•ß°•™ÿ— ¥ª•–


°Õ••’ȉ¥È†“•µ–°«Ë—¢Õ߆“¬‰ø ·•–¢ÕßÕÿª°••ÏµËÕ‡™•ËÕ¡®“°µ«•—

1


ß••Õ“®¡’†’∑’ˉ¡Ë‡À¡•Õ•°•—


1 µËÕ


1


“¬µËÕ

¢’Õß

“¬‰ø‡¢È“°∫·∫µ‡µÕ√’Ë√∂¬πµÏ— ”‚æß ·≈–


‡ “Õ“°“»æ“« ‡«Õ√ÏÕµ‚π¡—µ‘—(∂È“¡’) µ“¡≈”¥∫µËÕ‰ªπ’È—

2


12V￿


1

¥’” : “¬¥‘π


3


4


2

‡À≈◊Õß’

: µËÕ°∫·∫µ‡µÕ√’Ë√∂¬πµÏ—(12 ‚«≈∑ϧß∑’Ë)

250 mA￿


3

·’¥ß : µËÕ°∫—¢«È— «πª√Ë –°Õ∫


5

W

￿

4 øÈ“’

: µËÕ‡¢È“°∫‡—

“Õ“°“»Õµ‚π¡—µ‘—∂È“¡’(¢π“¥ ߟ ¥ÿ

￿￿

200 mA￿


250 mA)


6


5

πÈ”‡ß‘π≈“¬’

¢“« :

”À√∫— ≠≠“≥√’‚¡µÕÕ°—

‡æ◊ËÕµËÕ‡¢È“°—

2


∫Õÿª°√≥ÏÕ◊Ëπ (¢π“¥ ߟ ¥ÿ 200 mA)


3


6

Õ◊Ëπ’ Ê : µËÕ°∫≈”‚æß—


2 ‡™◊ËÕ¡µËÕ°∫—

“¬Õ“°“»


3

¥ÿ∑È“¬ µËÕ

«π§«∫§ÿ¡°“√‡Ë

¥‘𠓬‰ø‡¢È“°∫™ÿ— ¥ª√–°Õ∫™ÿ¥π’È

…—UOw„öÝô« WJ³ý sb ∫qO¡b³q³

Ê« sJ1 Æ“UN'« qOWOKLŽ wQDš Àb×¹ ô v²Š W Æ“UN−KwIOIŠ qDŽ ‰uBŠ v¡vÞU)« qOV³ qpKÝË WOzUÐdNJWpKÝ ÊunK²Ê« sJ1

Æ…—UO

WOzUÐdNJ


±

wz«uN


Æw


±

©…—UO

…—UO

±≤ XÐUŁ®

w

©X

uðËô« wz«uN « v « ∫‚—“ô« pK «

błË Ê« wJOðU

¥

pKÝ v

©dO³

µ

Èdšô« «bFLK


©dO³


UŽUL


Æwz«uN


Æ“UN'« l

Rear ground terminal

®ÿ¥‡™◊ËÕ¡µËÕ “¬¥‘π¥È“πÀ≈ß—

wHK)« i¹—Q²

1


15 A fuse / 15 A

=/

* Not included with this unit.


ø‘« ¢Ïπ“¥ 15A=/dO³


‰¡Ë‰¥È„ÀÈ¡“°∫™ÿ— ¥ª√–°Õ∫π


Black


Æ“UN'« «c¼ l ÒËe


￿￿


’¥”


To metallic body or chassis of the car


œuÝ√

1


µËÕ°∫‚§√ß‚≈À—–À√◊Õ‡™ ´‘¢Õß√∂¬πµÏ


w½bF*« …—UO


Yellow*1


￿￿*1


To a live terminal in the fuse block connecting to the car battery

‡À≈◊Õß’

*1

(bypassing the ignition switch)

dH ±*


2


µËÕ°∫—¢«∑’Ë¡’°√È—

–· ‰øøÈ“„π·ºßø‘« Ï´÷ËßµËÕ°∫·∫µ‡µÕ√’Ë√∂¬πµ—


(‚¥¬‰¡ËµÈÕß„™È«‘∑™Ï®ÿ¥√–‡∫‘¥)

Red


W¹—UD³

©‰UF²ýô« ÕU²H0 «—Ëd


￿￿


·’¥ß


To an accessory terminal in the fuse block

dLŠ√


3 µËÕ°∫—¢«È— «πª√Ë –°Õ∫„π·ºßø‘«

Blue


￿￿

“uOH


*

*

Fuse block

·ºßø‘«

“uOH

Ignition switch

«‘∑™Ï®ÿ¥√–‡∫‘¥

‰UF²ýô« ÕU²H


15

Line out (see


diagram )

Antenna terminal

￿

¢—È« “¬Õ“°“»


“¬ÕÕ°wz«uN

(¥Ÿ·ºπ¿Ÿ¡ )

j)« Ãdš

© jD<« dE½«® 2

To antenna

3

µËÕ°∫— “¬Õ“°“»

wz«uN

*1: Before checking the operation of this unit prior to installation, this lead must be connected, otherwise power cannot be turned on.

*1:

*1: °ËÕπ°“√µ√«® Õ∫°“√∑”ß“π¢Õß™ÿ¥ª√–°Õ∫π’È°ËÕπ∑’Ë®–µ‘¥µßÈ—

µÈÕßµËÕ “¬µ–°«π’È°ËÕπË— ¡‘©–ππ®È—–‰¡Ë“¡“√∂‡ª‘¥‡§√◊ËÕ߉¥È

V−¹ ¨VO

∫±*

ÊËbÐ “UN'« qOGAð sJ1 ô YOŠ ¨pK

ÆpK

6

’øÈ“

To automatic antenna if any

‚—“ô«

4


Blue with white stripe

µËÕ‡¢È“°∫‡— “Õ“°“»Õµ‚π¡—µ‘—∂È“¡’


błË Ê« wJOðU

πÈ”‡ß‘π≈“¬’

¢“«


To remote lead other equipment (see diagram


)


iOÐôUÐ jD

5


F


”À√∫— ≠≠“≥√’‚¡µÕÕ°—

‡æ◊ËÕµËÕ‡¢È“°∫Õÿª°√≥ÏÕ◊Ëπ— (¥Ÿ·ºπ¿Ÿ¡‘


)


© jD<« dE½«® Èdšô« «bFLK

White with black stripe

White

Gray with black stripe

Gray

Green with black stripe

Green

Purple with black stripe

Purple


￿￿


￿￿


￿￿


￿￿

¢’“«·∂∫¥”

’¢“«

‡∑“·∂∫’

¥”

’‡∑“

’‡¢’¬«·∂∫¥”

‡’¢’¬«

¡Ë«ß·∂∫’

¥”

¡Ë«ß’

œuÝôUÐ jD

iOÐ√

œuÝôUÐ jD

ÍœU

œuÝôUÐ jD

dCš«

œuÝôUÐ jD

w½«uł—«


Left speaker (front)


Right speaker (front)

Left speaker (rear)


Right speaker (rear)


≈”‚æß´È“¬ (ÀπÈ“)


≈”‚æߢ«“ (ÀπÈ“)

≈”‚æß´È“¬ (À≈ß)—


≈”‚æߢ«“ (À≈ß)—


©WO


©WO


©WOHK)«® ÈdWŽUL


©WOHK)«® vMLO

3

Page 24
Image 24
JVC KD-S795 manual 12V, 8 Ω

KD-S795 specifications

The JVC KD-S795 is an outstanding car audio receiver designed for audiophiles who crave high-quality sound combined with intuitive features. This versatile unit boasts a sleek design, making it a stylish addition to any vehicle's dashboard.

One of the primary features of the KD-S795 is its compatibility with a wide array of audio sources. Users can enjoy their favorite music through USB ports, CD players, or even external devices via auxiliary inputs. The receiver supports MP3, WMA, and WAV file formats, ensuring versatility in playback options. Additionally, the built-in AM/FM tuner allows for dynamic and static-free radio listening.

The KD-S795 is equipped with a powerful 50 watts per channel amplification, which drives speakers efficiently, delivering a rich and robust sound profile. The unit’s high-quality DAC (Digital-to-Analog Converter) enhances audio fidelity while minimizing distortion. A built-in 13-band equalizer provides users with precise control over sound settings, ensuring a tailored audio experience suited to personal preferences.

Bluetooth connectivity is another standout feature of the KD-S795. This technology enables seamless wireless streaming of music from smartphones and other devices, providing the convenience of hands-free calls and music playback without the hassle of cords. The receiver also supports an intuitive smartphone interface, making it easily accessible for navigation and other applications while driving.

The receiver’s display is user-friendly and packed with features. A bright, easy-to-read LCD screen provides a clear view of playlists and settings, ensuring that you never miss a beat while driving. The customizable RGB display allows users to set colors according to their personal style or mood, adding a unique touch to the vehicle’s interior.

JVC also prioritizes safety with the KD-S795, integrating features such as front and rear non-fading pre-outs, allowing for easy installation of amplifiers or subwoofer systems. With compatibility for steering wheel control interfaces, users can operate their audio system without taking their hands off the wheel.

Overall, the JVC KD-S795 stands out as a feature-rich car audio receiver that combines quality sound, modern technology, and user-friendly controls, making it an excellent choice for anyone looking to enhance their in-car audio experience. Whether you're embarking on a long road trip or navigating through daily commutes, the KD-S795 offers an impressive audio solution that meets the demands of modern driving.