KD-S795

Installation/Connection Manual

°“√µ‘¥µß/§ŸË¡◊Õ°“√µ‘È— ¥µßÈ—

O²Ò

qO


GET0144-003A


[U]


ENGLISH


￿￿


• This unit is designed to operate on 12 V DC,


12V

NEGATIVE ground electrical systems.


‰∑¬

™ÿ¥ª√–°Õ∫™ÿ¥π’ȉ¥È√∫°“√ÕÕ°·∫∫¡“‡æ◊ËÕ„™Èß“π°—∫— √–∫∫°√–· ‰øøÈ“ “¬¥‘π¢«≈∫°√È— –· µ√ß 12 ‚«≈∑Ï


V

0103KKSMDTJEIN


J C

EN, CH, TH, AR


wÐdŽ

wzUÐdN


ÆV


DC dýU³

INSTALLATION (IN-DASH


MOUNTING)


°“√µ‘¥µßÈ— (°“√ª√–°Õ∫·ºßÀπÈ“ª∑¡Ï‡— ¢È“)

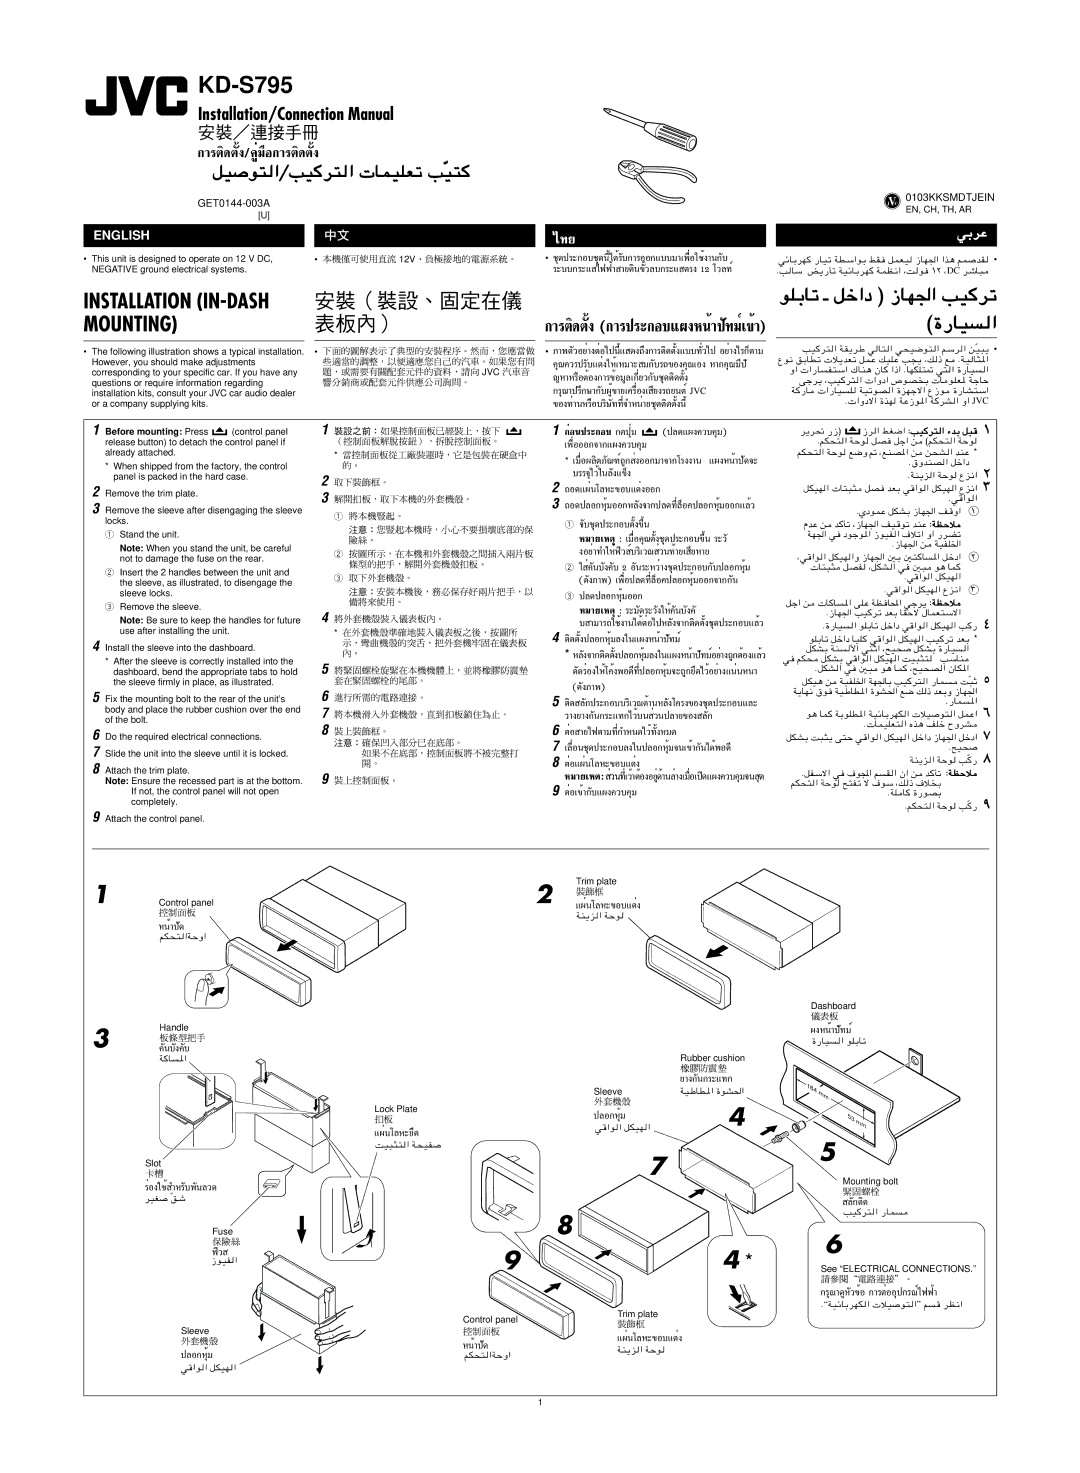
• The following illustration shows a typical installation.


¿“浫լ˓ߵËÕ‰ªπ’È·— ¥ß∂÷ß°“√µ‘¥µß·∫∫∑È—«‰ªË— լ˓߉√°Áµ“¡

However, you should make adjustments

JVC


§ÿ≥§«√ª√∫·µËß„ÀȇÀ¡“—– ¡°∫√∂— ¢Õߧÿ≥‡Õß À“°§ÿ≥¡’ª—

corresponding to your specific car. If you have any


≠À“À√◊ÕµÈÕß°“√¢ÈÕ¡Ÿ≈‡°’ˬ«°∫™ÿ— ¥µ‘¥µ—Èß

questions or require information regarding


installation kits, consult your JVC car audio dealer


°√ÿ≥“ª√÷°…“°∫ºŸÈ— ¢“¬‡§√◊ËÕ߇ ’¬ß√∂¬πµÏJVC

or a company supplying kits.


¢Õß∑Ë“πÀ√◊Õ∫√‘…∑∑’Ë®”ÀπË“¬™ÿ— ¥µ‘¥µ—Èßπ’È

uKÐUð ‡ qš«œ ® “UN'« VO

©…—UO


VO

ÒO³¹

Ÿu½ oÐUDð ö¹bFð qLŽ pOKŽ V−¹ ¨p


Ë« «—U


vłd¹ ¨VO


W


Æ «Ëœô« …cN

JVC

1 Before mounting: Press (control panel release button) to detach the control panel if already attached.

*When shipped from the factory, the control panel is packed in the hard case.

2 Remove the trim plate.

3 Remove the sleeve after disengaging the sleeve locks.

1Stand the unit.

Note: When you stand the unit, be careful not to damage the fuse on the rear.

2Insert the 2 handles between the unit and the sleeve, as illustrated, to disengage the sleeve locks.

3Remove the sleeve.

Note: Be sure to keep the handles for future use after installing the unit.

4 Install the sleeve into the dashboard.

*After the sleeve is correctly installed into the dashboard, bend the appropriate tabs to hold the sleeve firmly in place, as illustrated.

5 Fix the mounting bolt to the rear of the unit’s body and place the rubber cushion over the end of the bolt.

6 Do the required electrical connections.

7 Slide the unit into the sleeve until it is locked.

8 Attach the trim plate.

Note: Ensure the recessed part is at the bottom. If not, the control panel will not open completely.

9 Attach the control panel.

1

*

￿￿

2

3

1

2

3

4

*

￿￿

5

6

7

8

￿￿

9

=

1 °ËÕπª√–°Õ∫ °¥ªÿË¡

(ª≈¥·ºß§«∫§ÿ¡)


‡æ◊ËÕÕÕ°®“°·ºß§«∫§ÿ¡


* ‡¡◊ËÕº≈‘µ¿≥±Ï∂Ÿ°— ßÕÕ°¡“®“°‚√ßß“πË·ºßÀπÈ“ª¥—®– ∫√√®ÿ‰«È„π≈ß·— ¢Áß

2∂Õ¥·ºËπ‚≈À–¢Õ∫·µËßÕÕ°

3∂Õ¥ª≈Õ°ÀÿÈ¡ÕÕ°À≈ß®“°ª≈— ¥∑’Ë≈ÁÕ§ª≈Õ°ÀÿÈ¡ÕÕ°·≈È« 1 ®∫™ÿ— ¥ª√–°Õ∫µÈß—¢÷Èπ

À¡“¬‡Àµÿ: ‡¡◊ËÕ§ÿ≥µß™ÿÈ— ¥ª√–°Õ∫¢÷Èπ √–«—

ßլ˓∑”„ÀÈø‘« ∫√‘‡«≥Ï «π∑È“¬‡Ë ¬À“¬’

2§Ëπ∫—ߧ—∫— 2 Õπ√—–À«Ë“ß™ÿ¥ª√–°Õ∫°∫ª≈Õ°ÀÿÈ¡—

(¥ß¿“æ)— ‡æ◊ËÕª≈¥∑’Ë≈ÁÕ§ª≈Õ°ÀÿÈ¡ÕÕ°®“°°π—

3ª≈¥ª≈Õ°ÀÿÈ¡ÕÕ°

À¡“¬‡Àµÿ: √–¡¥—√–«ß„Àȧ—π∫—ߧ——

∫ “¡“√∂„™Èß“π‰¥ÈµËÕ‰ªÀ≈ß®“°µ‘— ¥µß™ÿÈ— ¥ª√–°Õ∫·≈È«

4µ‘¥µßª≈Õ°ÀÿÈ¡≈ß„π·ºßÀπÈ“ªÈ—∑¡Ï—

*À≈ß®“°µ‘— ¥µßª≈Õ°ÀÿÈ¡≈ß„π·ºßÀπÈ“ªÈ—∑¡Ïլ˓ß∂Ÿ°µÈÕß·≈È«— ¥¥—√ËÕß„ÀÈ‚§ÈßæÕ¥’∑’˪≈Õ°ÀÿÈ¡®–∂Ÿ°¬÷¥‰«Èլ˓߷πËπÀπ“ (¥ß¿“æ)—

5µ‘¥ ≈°ª√—–°Õ∫∫√‘‡«≥¥È“πÀ≈ß‚§√ß— ¢Õß™ÿ¥ª√–°Õ∫·≈–

«“߬“ß°π°√—–·∑°‰«È∫π «πª≈“¬Ë ¢Õß ≈°—

6µËÕ “¬‰øµ“¡∑’Ë°”À𥉫È∑ßÀ¡È— ¥

7‡≈◊ËÕπ™ÿ¥ª√–°Õ∫≈ß„πª≈Õ°ÀÿÈ¡®π‡¢È“°π‰— ¥ÈæÕ¥’

8µËÕ·ºËπ‚≈À–¢Õ∫·µËß

À¡“¬‡Àµ: «π∑’ˇ«È“µÈÕßÕ¬ŸËË ¥È“π≈˓߇¡◊ËÕ‡ª‘¥·ºß§«∫§ÿ¡®π ¥ÿ

9µËÕ‡¢È“°∫·ºß§«∫§ÿ¡—

d¹d% —“®

“d « jG{« ∫VO d² « ¡bÐ q³


ÆrJײ « WŠu qB qł« s

©rJײ « WŠu

rJײ « WŠu

l{Ë - ¨lMB*« s

s×A « bMŽ *


Æ‚ËbMB « qš«œ

qJON «


ÆWM¹e « WŠu

Ÿe½«

U²³¦ qB bFÐ w «u « qJON « Ÿe½«


Æw «u «

ÂbŽ s


ÆÍœuLŽ qJAÐ “UN'« n Ë«

±

b Q𠨓UN'« nO uð bMŽ ∫WEŠö


WN'« w

œułu*« “uOH « ·öð« Ë« —dCð


Æ“UN'« s

WOHK)«

¨w «u « qJON «Ë “UN'« 5Ð 5² U

*« qšœ«


U²³¦

qBH ¨qJA « w

u¼ UL


Æw «u « qJON «

qł« s

U U

Æw «u « qJON « Ÿe½«

*« vKŽ WE U;« włd¹ ∫WEŠö


Æ“UN'« VO dð bFÐ UIŠô ‰ULF²Ýô«


Æ…—UO

« uKÐUð qš«œ w «u « qJON « V —

uKÐUð qš«œ UOK w «u « qJON « VO dð bFÐ *

qJAÐ WM

_« wMŁ« ¨`O×

qJAÐ …—UO


«

w rJ×

qJAÐ w «u « qJON « XO³¦²

VÝUM


ÆqJA « w 5³ u¼ UL

¨`O×B « ÊUJ*«

qJO¼ s

WOHK)« WN'UÐ VO d² « —UL

X³ÒŁ

W¹UN½ ‚u

WOÞUD*« …uA(« l{ p – bFÐË “UN'«

u¼ UL

WÐuKD*« WOzUÐdNJ «


öO

Æ—UL


u² « qLŽ«


Æ ULOKF² « Ác¼ nKš ÕËdA

qJAÐ X³¦¹ v²Š w «u « qJON « qš«œ “UN'« qšœ« Æ`O×

WM¹e « WŠu VÒ—

ÆqHÝô« w ·u:« r I « Ê« s b Qð ∫WEŠö rJײ « WŠu `²Hð ô ·uÝ ¨p – ·ö Ð

ÆWK U …—uBÐ ÆrJײ « WŠu VÒ—

±

¥

µ

π

1


2

Trim plate

Control panel

·ºËπ‚≈À–¢Õ∫·µËß

WM¹e

ÀπÈ“ª—¥

rJײ

Dashboard

Handle

3 §π∫—ߧ—∫—

W


ºßÀπÈ“ª—∑¡Ï


…—UO


Rubber cushion


¬“ß°π°√—–·∑°

1


WOÞUD*« …uA(«


Sleeve

8


4

mm


Lock Plate

ª≈Õ°ÀÿÈ¡

4


53


￿￿


mm

·ºËπ‚≈À–¬÷¥

w


Slot

￿￿

√ËÕß„™È”À√∫æ—π≈«— ¥

dOG Òoý

Fuse

ø‘«

“uOH

XO³¦²

7

8

9

5

Mounting bolt

≈°µ‘— ¥

VO

4 *

6

See “ELECTRICAL CONNECTIONS.”

°√ÿ≥“¥ŸÀ«—¢ÈÕ °“√µËÕÕÿª°√≥ωøøÈ“

Sleeve

Control panel

ÆWOzUÐdNJ

r

Trim plate

ª≈Õ°ÀÿÈ¡

w

ÀπÈ“ª¥—

rJײ

·ºËπ‚≈À–¢Õ∫·µËß

WM¹e

1

Page 22
Image 22
JVC KD-S795 manual

KD-S795 specifications

The JVC KD-S795 is an outstanding car audio receiver designed for audiophiles who crave high-quality sound combined with intuitive features. This versatile unit boasts a sleek design, making it a stylish addition to any vehicle's dashboard.

One of the primary features of the KD-S795 is its compatibility with a wide array of audio sources. Users can enjoy their favorite music through USB ports, CD players, or even external devices via auxiliary inputs. The receiver supports MP3, WMA, and WAV file formats, ensuring versatility in playback options. Additionally, the built-in AM/FM tuner allows for dynamic and static-free radio listening.

The KD-S795 is equipped with a powerful 50 watts per channel amplification, which drives speakers efficiently, delivering a rich and robust sound profile. The unit’s high-quality DAC (Digital-to-Analog Converter) enhances audio fidelity while minimizing distortion. A built-in 13-band equalizer provides users with precise control over sound settings, ensuring a tailored audio experience suited to personal preferences.

Bluetooth connectivity is another standout feature of the KD-S795. This technology enables seamless wireless streaming of music from smartphones and other devices, providing the convenience of hands-free calls and music playback without the hassle of cords. The receiver also supports an intuitive smartphone interface, making it easily accessible for navigation and other applications while driving.

The receiver’s display is user-friendly and packed with features. A bright, easy-to-read LCD screen provides a clear view of playlists and settings, ensuring that you never miss a beat while driving. The customizable RGB display allows users to set colors according to their personal style or mood, adding a unique touch to the vehicle’s interior.

JVC also prioritizes safety with the KD-S795, integrating features such as front and rear non-fading pre-outs, allowing for easy installation of amplifiers or subwoofer systems. With compatibility for steering wheel control interfaces, users can operate their audio system without taking their hands off the wheel.

Overall, the JVC KD-S795 stands out as a feature-rich car audio receiver that combines quality sound, modern technology, and user-friendly controls, making it an excellent choice for anyone looking to enhance their in-car audio experience. Whether you're embarking on a long road trip or navigating through daily commutes, the KD-S795 offers an impressive audio solution that meets the demands of modern driving.