| INSTALLATION | | | EINBAU | | | INSTALLATION (MONTAGE | INSTALLATIE (INBOUW IN |
| (IN-DASH MOUNTING) | | | (IM ARMATURENBRETT) | DANS LE TABLEAU DE BORD) | HET DASHBOARD) |
| | | | | | | | | | | | | | | | | | | | | | | | | |
| • The following illustration shows a typical | • Die folgende Abbildung zeigt einen typischen | • L’illustration | suivante | est | un | exemple | • Op de volgende afbeelding kunt u zien hoe de |
| installation. However, you should make | Einbau. Dennoch müssen Sie entsprechend | d’installation typique. Cependant, vous devez | installatie, normaal gesproken, in zijn werk gaat. U |
| adjustments corresponding to your specific car. | Ihrem | jeweiligen Auto Anpassungen | faire les ajustements correspondant à votre | moet echter bij de installatie rekening houden met |
| If you have any questions or require information | vornehmen. Bei irgendwelchen Fragen oder | voiture particulière. Si vous avez des questions | de bijzonderheden van uw eigen auto. Neem bij |
| regarding installation kits, consult your JVC IN- | wenn Sie Informationen hinsichtlich des | ou avez besoin d’information sur des kits | vragen of voor meer bijzonderheden over |
| CAR ENTERTAINMENT dealer or a company | Einbausatzes brauchen, wenden Sie sich an | d’installation, | consulter | votre | revendeur | inbouwpakketten contact op met uw JVC car audio |
| ihren | JVC Autoradiohändler | oder ein | d’autoradios | JVC ou | une | compagnie | dealer of een dealer | of een bedrijf dat |
| supplying kits. | | |
| | | Unternehmen das diese Einbausätze vertreibt. | d’approvisionnement. | | | | | | | | | inbouwpakketten levert. | | | |
| | | | | | | | | | | | | | | | |
| | | | | | | | | | | | | | | | | | | | | | |
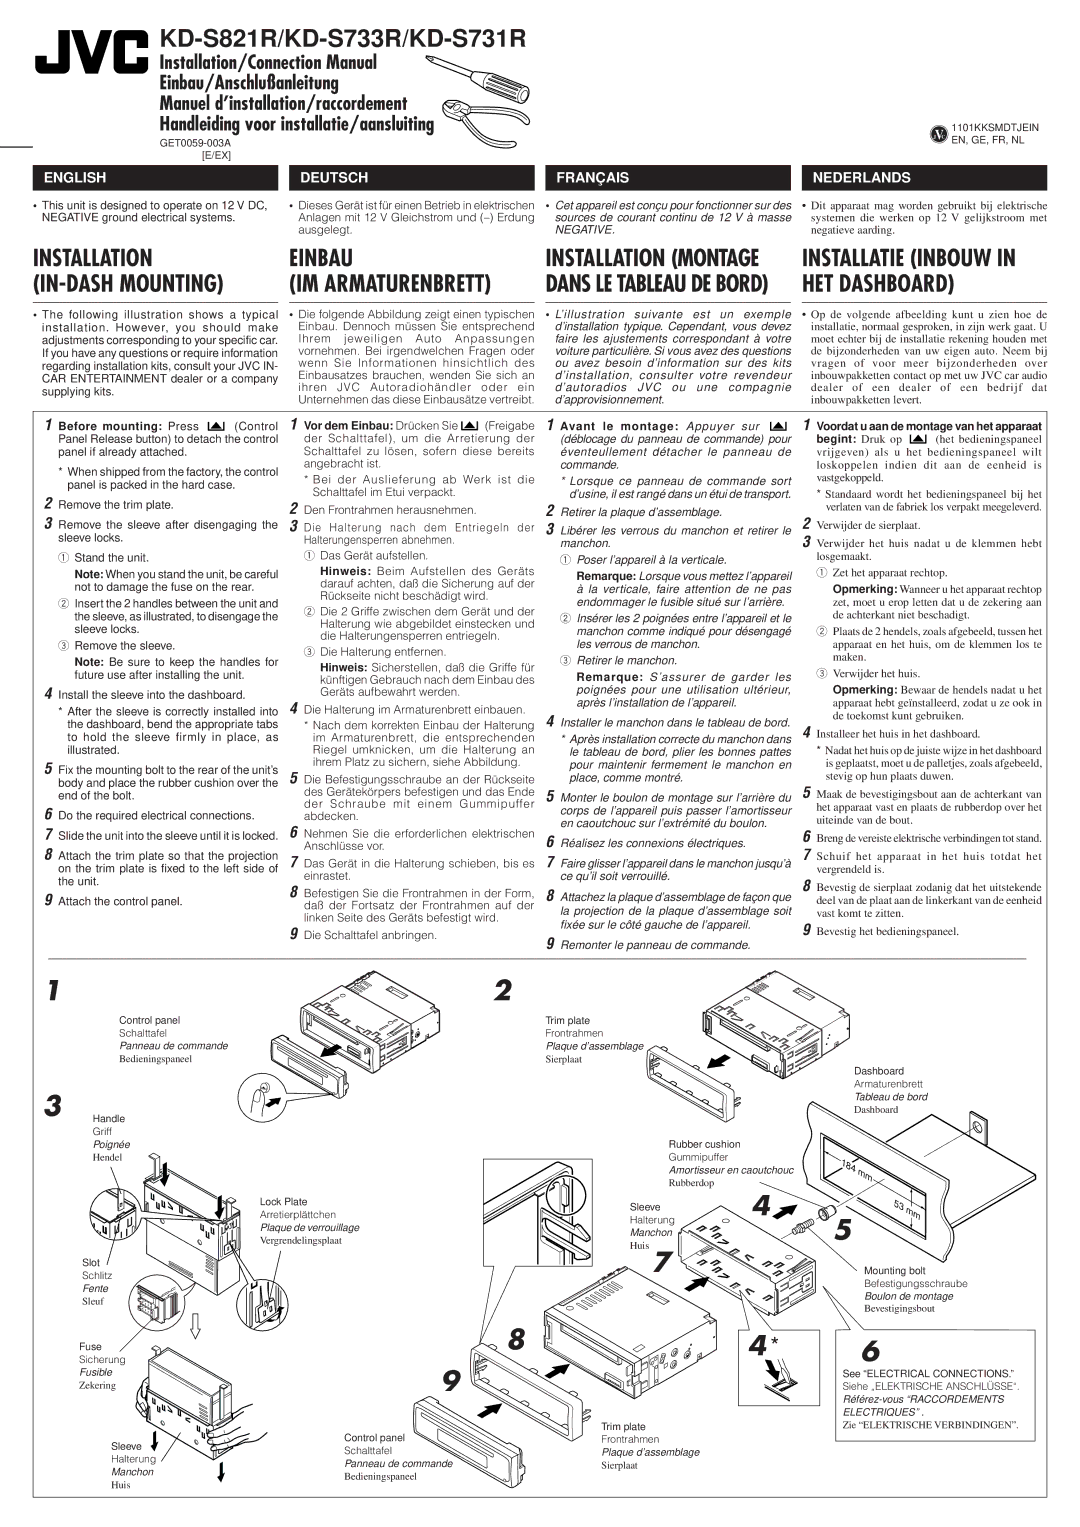
| 1 Before mounting: Press | | (Control | 1 Vor dem Einbau: Drücken Sie | | | | (Freigabe | 1 Avant le montage: Appuyer sur | | | | | 1 Voordat u aan de montage van het apparaat |
| | | |
| | | |
| | Panel Release button) to detach the control | der Schalttafel), um die Arretierung der | (déblocage du panneau de commande) pour | begint: Druk op | | | (het bedieningspaneel |
| | |
| | panel if already attached. | | | Schalttafel zu lösen, sofern diese bereits | éventeullement détacher le panneau de | vrijgeven) als u het bedieningspaneel wilt |
| | * When shipped from the factory, the control | angebracht ist. | | | commande. | | | | | | | | | | loskoppelen indien dit aan de eenheid is |
| | * Bei der Auslieferung ab Werk ist die | * Lorsque ce panneau de commande sort | vastgekoppeld. | | | |
| | panel is packed in the hard case. | | | |
| | Schalttafel im Etui verpackt. | | | d’usine, il est rangé dans un étui de transport. | * Standaard wordt het bedieningspaneel bij het |
| 2 Remove the trim plate. | | | | |
| | | 2 Den Frontrahmen herausnehmen. | | | 2 Retirer la plaque d’assemblage. | | | | | | | verlaten van de fabriek los verpakt meegeleverd. |
| 3 Remove the sleeve after disengaging the | | | | | | | | | 2 Verwijder de sierplaat. | | | |
| 3 Die Halterung nach dem Entriegeln der | 3 Libérer les verrous du manchon et retirer le | | | |
| | sleeve locks. | | | Halterungensperren abnehmen. | | | manchon. | | | | | | | | | | 3 Verwijder het huis nadat u de klemmen hebt |
| | 1 Stand the unit. | | | 1 Das Gerät aufstellen. | | | 1 Poser l’appareil à la verticale. | | | | | | | losgemaakt. | | | |
| | Note: When you stand the unit, be careful | Hinweis: Beim Aufstellen des Geräts | Remarque: Lorsque vous mettez l’appareil | 1 Zet het apparaat rechtop. |
| | not to damage the fuse on the rear. | darauf achten, daß die Sicherung auf der | à la verticale, faire attention de ne pas | Opmerking: Wanneer u het apparaat rechtop |
| | Rückseite nicht beschädigt wird. |
| | 2 Insert the 2 handles between the unit and | endommager le fusible situé sur l’arrière. | zet, moet u erop letten dat u de zekering aan |
| | 2 Die 2 Griffe zwischen dem Gerät und der |
| | the sleeve, as illustrated, to disengage the | 2 Insérer les 2 poignées entre l’appareil et le | de achterkant niet beschadigt. |
| | Halterung wie abgebildet einstecken und |
| | sleeve locks. | | | manchon comme indiqué pour désengagé | 2 Plaats de 2 hendels, zoals afgebeeld, tussen het |
| | | | die Halterungensperren entriegeln. |
| | 3 Remove the sleeve. | | | les verrous de manchon. | | | | | | | | apparaat en het huis, om de klemmen los te |
| | | | 3 Die Halterung entfernen. | | | | | | | | | |
| | Note: Be sure to keep the handles for | | | 3 Retirer le manchon. | | | | | | | | | maken. | | | |
| | Hinweis: Sicherstellen, daß die Griffe für | | | | | | | | | | | |
| | | | | | | | | | 3 Verwijder het huis. | | | |
| | future use after installing the unit. | Remarque: S’assurer de garder les | | | |
| | künftigen Gebrauch nach dem Einbau des | | | |
| | Opmerking: Bewaar de hendels nadat u het |
| 4 Install the sleeve into the dashboard. | Geräts aufbewahrt werden. | | | poignées pour une utilisation ultérieur, |
| | * After the sleeve is correctly installed into | 4 Die Halterung im Armaturenbrett einbauen. | après l’installation de l’appareil. | apparaat hebt geïnstalleerd, zodat u ze ook in |
| | 4 Installer le manchon dans le tableau de bord. | de toekomst kunt gebruiken. |
| | the dashboard, bend the appropriate tabs | * Nach dem korrekten Einbau der Halterung |
| | 4 Installeer het huis in het dashboard. |
| | to hold the sleeve firmly in place, as | im Armaturenbrett, die entsprechenden | * Après installation correcte du manchon dans |
| | illustrated. | | | Riegel umknicken, um die Halterung an | le tableau de bord, plier les bonnes pattes | * Nadat het huis op de juiste wijze in het dashboard |
| 5 Fix the mounting bolt to the rear of the unit’s | ihrem Platz zu sichern, siehe Abbildung. | pour maintenir fermement le manchon en | is geplaatst, moet u de palletjes, zoals afgebeeld, |
| 5 Die Befestigungsschraube an der Rückseite | stevig op hun plaats duwen. |
| | body and place the rubber cushion over the | place, comme montré. | | | | | | | | |
| | | | | | | | | | 5 Maak de bevestigingsbout aan de achterkant van |
| | end of the bolt. | | | des Gerätekörpers befestigen und das Ende | 5 Monter le boulon de montage sur l’arrière du |
| 6 Do the required electrical connections. | der Schraube mit einem Gummipuffer | corps de l’appareil puis passer l’amortisseur | het apparaat vast en plaats de rubberdop over het |
| abdecken. | | | uiteinde van de bout. | | | |
| 7 Slide the unit into the sleeve until it is locked. | 6 Nehmen Sie die erforderlichen elektrischen | en caoutchouc sur l’extrémité du boulon. | | | |
| 6 Réalisez les connexions électriques. | 6 Breng de vereiste elektrische verbindingen tot stand. |
| 8 Attach the trim plate so that the projection | Anschlüsse vor. | | | 7 Schuif het apparaat in het huis totdat het |
| 7 Das Gerät in die Halterung schieben, bis es | 7 Faire glisser l’appareil dans le manchon jusqu’à |
| | on the trim plate is fixed to the left side of | einrastet. | | | ce qu’il soit verrouillé. | | | | | | | | | vergrendeld is. | | | |
| | the unit. | | | | | | | | | | | | | 8 Bevestig de sierplaat zodanig dat het uitstekende |
| | | | 8 Befestigen Sie die Frontrahmen in der Form, | 8 Attachez la plaque d’assemblage de façon que |
| 9 Attach the control panel. | | |
| | | deel van de plaat aan de linkerkant van de eenheid |
| | | daß der Fortsatz der Frontrahmen auf der |
| | | | | | linken Seite des Geräts befestigt wird. | la projection de la plaque d’assemblage soit | vast komt te zitten. | | | |
| | | | | | fixée sur le côté gauche de l’appareil. | 9 Bevestig het bedieningspaneel. |
| | | | | | 9 Die Schalttafel anbringen. | | |
| | | | | | | | 9 Remonter le panneau de commande. |
| | | | | | | | | | | | | | | | | | |
| | | | | | | | | | | | | | | | | | | | | | | | | | | | |