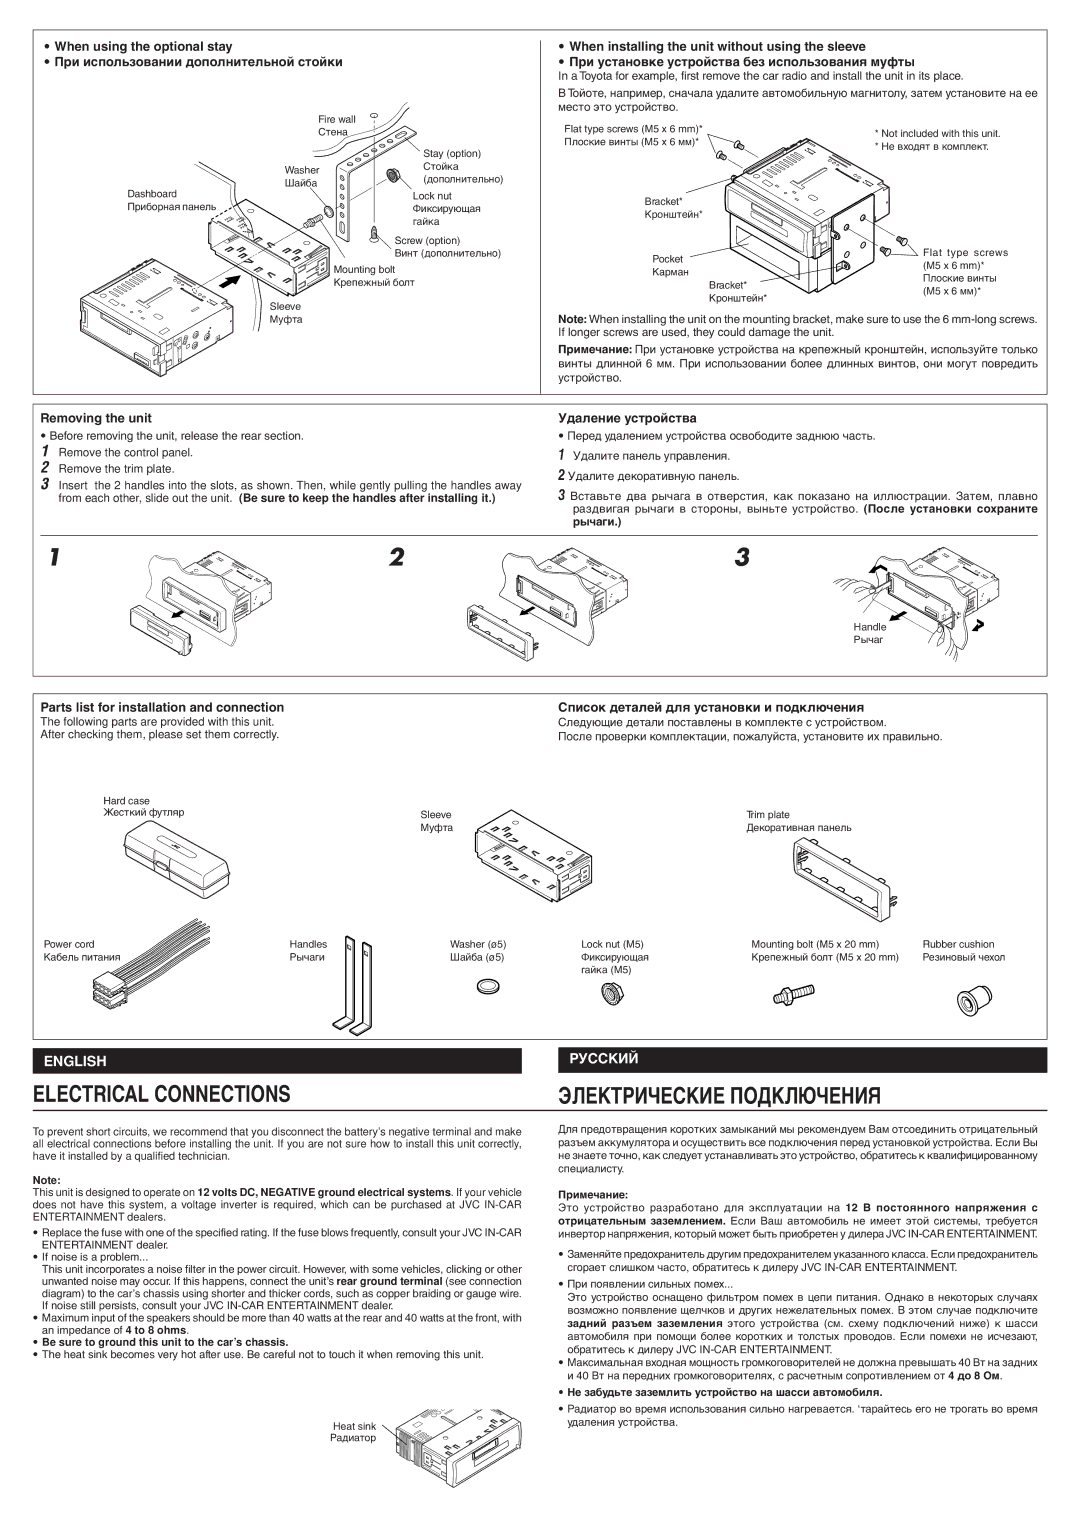
•When using the optional stay
•Пðè èñïîëüçîâàíèè äîïîëíèòåëüíîé ñòîéêè
| Fire wall |
|
| Сòåíà |
|
|
| Stay (option) |
| Washer | Сòîéêà |
| (äîïîëíèòåëüíî) | |
| Шàéáà | |
Dashboard |
| |
| Lock nut | |
Пðèáîðíàя ïàíåëü |
| Фèêñèðóþùàя |
|
| ãàéêà |
|
| Screw (option) |
•When installing the unit without using the sleeve
•Пðè óñòàíîâêå óñòðîéñòâà áåç èñïîëüçîâàíèя ìóôòû
In a Toyota for example, first remove the car radio and install the unit in its place.
ВТîéîòå, íàïðèìåð, ñíà÷àëà óäàëèòå àâòîìîáèëüíóþ ìàãíèòîëó, çàòåì óñòàíîâèòå íà åå ìåñòî ýòî óñòðîéñòâî.
Flat type screws (M5 x 6 mm)* | * Not included with this unit. | |
Пëîñêèå âèíòû (M5 x 6 ìì)* | ||
* Нå âõîäяò â êîìïëåêò. | ||
| ||
Bracket* | Scan | |
| Multi | |
| Music |
Кðîíøòåéí*
Вèíò (äîïîëíèòåëüíî) |
Flat type screws (M5 x 6 mm)*
Mounting bolt |
Кðåïåæíûé áîëò |
Sleeve |
Мóôòà |
Removing the unit
•Before removing the unit, release the rear section.
1 Remove the control panel.
2 Remove the trim plate.
3Insert the 2 handles into the slots, as shown. Then, while gently pulling the handles away from each other, slide out the unit. (Be sure to keep the handles after installing it.)
1 ![]() 2
2
Parts list for installation and connection
The following parts are provided with this unit.
After checking them, please set them correctly.
Hard case
Жåñòêèé ôóòëяðSleeve Мóôòà
Power cord | Handles | Washer (ø5) |
Кàáåëü ïèòàíèя | Рû÷àãè | Шàéáà (ø5) |
ENGLISH
ELECTRICAL CONNECTIONS
To prevent short circuits, we recommend that you disconnect the battery’s negative terminal and make all electrical connections before installing the unit. If you are not sure how to install this unit correctly, have it installed by a qualified technician.
Note:
This unit is designed to operate on 12 volts DC, NEGATIVE ground electrical systems. If your vehicle does not have this system, a voltage inverter is required, which can be purchased at JVC
•Replace the fuse with one of the specified rating. If the fuse blows frequently, consult your JVC
•If noise is a problem...
This unit incorporates a noise filter in the power circuit. However, with some vehicles, clicking or other unwanted noise may occur. If this happens, connect the unit’s rear ground terminal (see connection diagram) to the car’s chassis using shorter and thicker cords, such as copper braiding or gauge wire. If noise still persists, consult your JVC
•Maximum input of the speakers should be more than 40 watts at the rear and 40 watts at the front, with an impedance of 4 to 8 ohms.
•Be sure to ground this unit to the car’s chassis.
•The heat sink becomes very hot after use. Be careful not to touch it when removing this unit.
Heat sink Рàäèàòîð
Кàðìàí
Пëîñêèå âèíòû
Bracket*
(M5 x 6 ìì)*
Кðîíøòåéí*
Note: When installing the unit on the mounting bracket, make sure to use the 6
Пðèìå÷àíèå: Пðè óñòàíîâêå óñòðîéñòâà íà êðåïåæíûé êðîíøòåéí, èñïîëüçóéòå òîëüêî âèíòû äëèííîé 6 ìì. Пðè èñïîëüçîâàíèè áîëåå äëèííûõ âèíòîâ, îíè ìîãóò ïîâðåäèòü óñòðîéñòâî.
Уäàëåíèå óñòðîéñòâà
• Пåðåä óäàëåíèåì óñòðîéñòâà îñâîáîäèòå çàäíþþ ÷àñòü.
1Уäàëèòå ïàíåëü óïðàâëåíèя.
2 Уäàëèòå äåêîðàòèâíóþ ïàíåëü.
3 Вñòàâüòå äâà ðû÷àãà â îòâåðñòèя, êàê ïîêàçàíî íà èëëþñòðàöèè. Зàòåì, ïëàâíî ðàçäâèãàя ðû÷àãè â ñòîðîíû, âûíüòå óñòðîéñòâî. (Пîñëå óñòàíîâêè ñîõðàíèòå ðû÷àãè.)
3
Handle Рû÷àã
Рû÷àã
Сïèñîê äåòàëåé äëя óñòàíîâêè è ïîäêëþ÷åíèя
Сëåäóþùèå äåòàëè ïîñòàâëåíû â êîìïëåêòå ñ óñòðîéñòâîì.
Пîñëå ïðîâåðêè êîìïëåêòàöèè, ïîæàëóéñòà, óñòàíîâèòå èõ ïðàâèëüíî.
Trim plate Дåêîðàòèâíàя ïàíåëü
Lock nut (M5) | Mounting bolt (M5 x 20 mm) | Rubber cushion |
Фèêñèðóþùàя | Кðåïåæíûé áîëò (M5 x 20 mm) | Рåçèíîâûé ÷åõîë |
ãàéêà (M5) |
|
|
РУССКИЙ
ЭЛЕКТРИЧЕСКИЕ ПОДКЛЮЧЕНИЯ
Дëя ïðåäîòâðàùåíèя êîðîòêèõ çàìûêàíèé ìû ðåêîìåíäóåì Вàì îòñîåäèíèòü îòðèöàòåëüíûé ðàçúåì àêêóìóëяòîðà è îñóùåñòâèòü âñå ïîäêëþ÷åíèя ïåðåä óñòàíîâêîé óñòðîéñòâà. Еñëè Вû íå çíàåòå òî÷íî, êàê ñëåäóåò óñòàíàâëèâàòü ýòî óñòðîéñòâî, îáðàòèòåñü ê êâàëèôèöèðîâàííîìó ñïåöèàëèñòó.
Пðèìå÷àíèå:
Эòî óñòðîéñòâî ðàçðàáîòàíî äëя ýêñïëóàòàöèè íà 12 В ïîñòîяííîãî íàïðяæåíèя ñ îòðèöàòåëüíûì çàçåìëåíèåì. Еñëè Вàø àâòîìîáèëü íå èìååò ýòîé ñèñòåìû, òðåáóåòñя èíâåðòîð íàïðяæåíèя, êîòîðûé ìîæåò áûòü ïðèîáðåòåí ó äèëåðà JVC
•Зàìåíяéòå ïðåäîõðàíèòåëü äðóãèì ïðåäîõðàíèòåëåì óêàçàííîãî êëàññà. Еñëè ïðåäîõðàíèòåëü ñãîðàåò ñëèøêîì ÷àñòî, îáðàòèòåñü ê äèëåðó JVC
•Пðè ïîяâëåíèè ñèëüíûõ ïîìåõ...
Эòî óñòðîéñòâî îñíàùåíî ôèëüòðîì ïîìåõ â öåïè ïèòàíèя. Оäíàêî â íåêîòîðûõ ñëó÷àяõ âîçìîæíî ïîяâëåíèå ùåë÷êîâ è äðóãèõ íåæåëàòåëüíûõ ïîìåõ. В ýòîì ñëó÷àå ïîäêëþ÷èòå çàäíèé ðàçúåì çàçåìëåíèя ýòîãî óñòðîéñòâà (ñì. ñõåìó ïîäêëþ÷åíèé íèæå) ê øàññè àâòîìîáèëя ïðè ïîìîùè áîëåå êîðîòêèõ è òîëñòûõ ïðîâîäîâ. Еñëè ïîìåõè íå èñ÷åçàþò, îáðàòèòåñü ê äèëåðó JVC
•Мàêñèìàëüíàя âõîäíàя ìîùíîñòü ãðîìêîãîâîðèòåëåé íå äîëæíà ïðåâûøàòü 40 Вò íà çàäíèõ è 40 Вò íà ïåðåäíèõ ãðîìêîãîâîðèòåëяõ, ñ ðàñ÷åòíûì ñîïðîòèâëåíèåì îò 4 äî 8 Оì.
•Нå çàáóäüòå çàçåìëèòü óñòðîéñòâî íà øàññè àâòîìîáèëя.
•Рàäèàòîð âî âðåìя èñïîëüçîâàíèя ñèëüíî íàãðåâàåòñя. ‘òàðàéòåñü åãî íå òðîãàòü âî âðåìя
óäàëåíèя óñòðîéñòâà.
