When the attachment surface overlaps with a heating wire or glass antenna / Wenn die Befestigungsfläche über einem Heiz- oder Antennendraht liegt / Au cas où la surface de fixation chevauche un fil chauffant ou une antenne de vitre.

a.For the antenna base / Beim Antennenfuß / Pour la base d’antenne

Attach the antenna base to the location where it does not

Antenna base

overlap with a heating wire or glass antenna.

Antennenfuß

Befestigen Sie den Antennenfuß an einer Stelle, an der er

Base d’antenne

nicht über einem Heiz- oder Antennendraht liegt.

Take off the

Fixez la base d’antenne à un emplacement où elle ne

adhesive tape

chevauche pas un fil de chauffage ou d’antenne de vitre.

Klebefolie

abziehen


Peler le ruban


adhésif


b. For the loading section / Beim Ladeteil / Pour la section de charge


Attach the loading section to the location where it does not

Loading section


overlap with a heating wire or glass antenna.


Befestigen Sie den Ladeteil an einer Stelle, an der er nicht

Ladeteil


über einem Heiz- oder Antennendraht liegt.

Section de charge


Take off the

Fixez la section de charge à un emplacement où elle ne


chevauche pas un fil de chauffage ou d’antenne de vitre.


adhesive tape


Klebefolie


abziehen


Peler le ruban


adhésif


c. For the antenna element’s end / Beim Ende des Antennenteils / Pour l’extrémité d’élément d’antenne

Antenna element’s end

Attach the antenna element’s end to the location where it does

Ende des Antennenelements

not overlap with a heating wire or glass antenna.

Extrémité d’élément d’antenne

Befestigen Sie den Ende des Antennenelements an einer


Stelle, an der er nicht über einem Heiz- oder Antennendraht

Take off the

liegt.

Fixez l’extrémité d’élément d’antenne à un emplacement où

adhesive tape

elle ne chevauche pas un fil de chauffage ou d’antenne de

Klebefolie

vitre.

abziehen

Peler le ruban


adhésif


When the attachment surface overlaps with an electrode / Wenn die Befestigungsfläche über der Elektrode liegt / Au cas où la surface de fixation chevauche une électrode


Attach the antenna to either the left or right of the electrode.


Befestigen Sie die Antenne entweder links oder rechts von

Electrode

der Elektrode.

Elektrode

Fixer l’antenne soit à gauche, soit à droite de l’électrode.

Électrode

Heating wires


Heizdrähte


Fils chauffants

When the attachment surface interferes with a rear wiper motor or a high-mounted brake light / Wenn die Befestigungsfläche mit dem Heckscheibenwischermotor oder einer hoch installierten Bremsleuchte in Konflikt kommt / Au cas où la surface de fixation est gênée par un moteur d’essuie-glace ou un feu stop surélevé.

Move the antenna’s attachment position upwards to avoid interference.

Verschieben Sie die Befestigungsstelle der Antenne nach oben, um einen Konflikt zu vermeiden.

Remonter l’implantation d’antenne jusqu’à ce qu’elle ne gêne plus.

When the antenna is attached by bending the antenna element / Wenn die Antenne zur Montage gebogen wird / Au cas où l’implantation d’antenne oblige à plier l’élément d’antenne.


Secure the bent portion with the element holder


(sold separately).


Caution: Do not overbend the element.


Befestigen Sie den gebogenen Teil mit einem

Element holder

Antennenhalter (separate erhältlich).

(sold separately)

Vorsicht: Biegen Sie die Antenne nicht zu stark.

Antennenhalter

Fixer la section pliée à l’aide de la monture de élément

(separate erhältlich)

(vendu séparément).

Monture de élément

Avertissement: Ne pas courber excessivement le élément.

(vendu séparément)


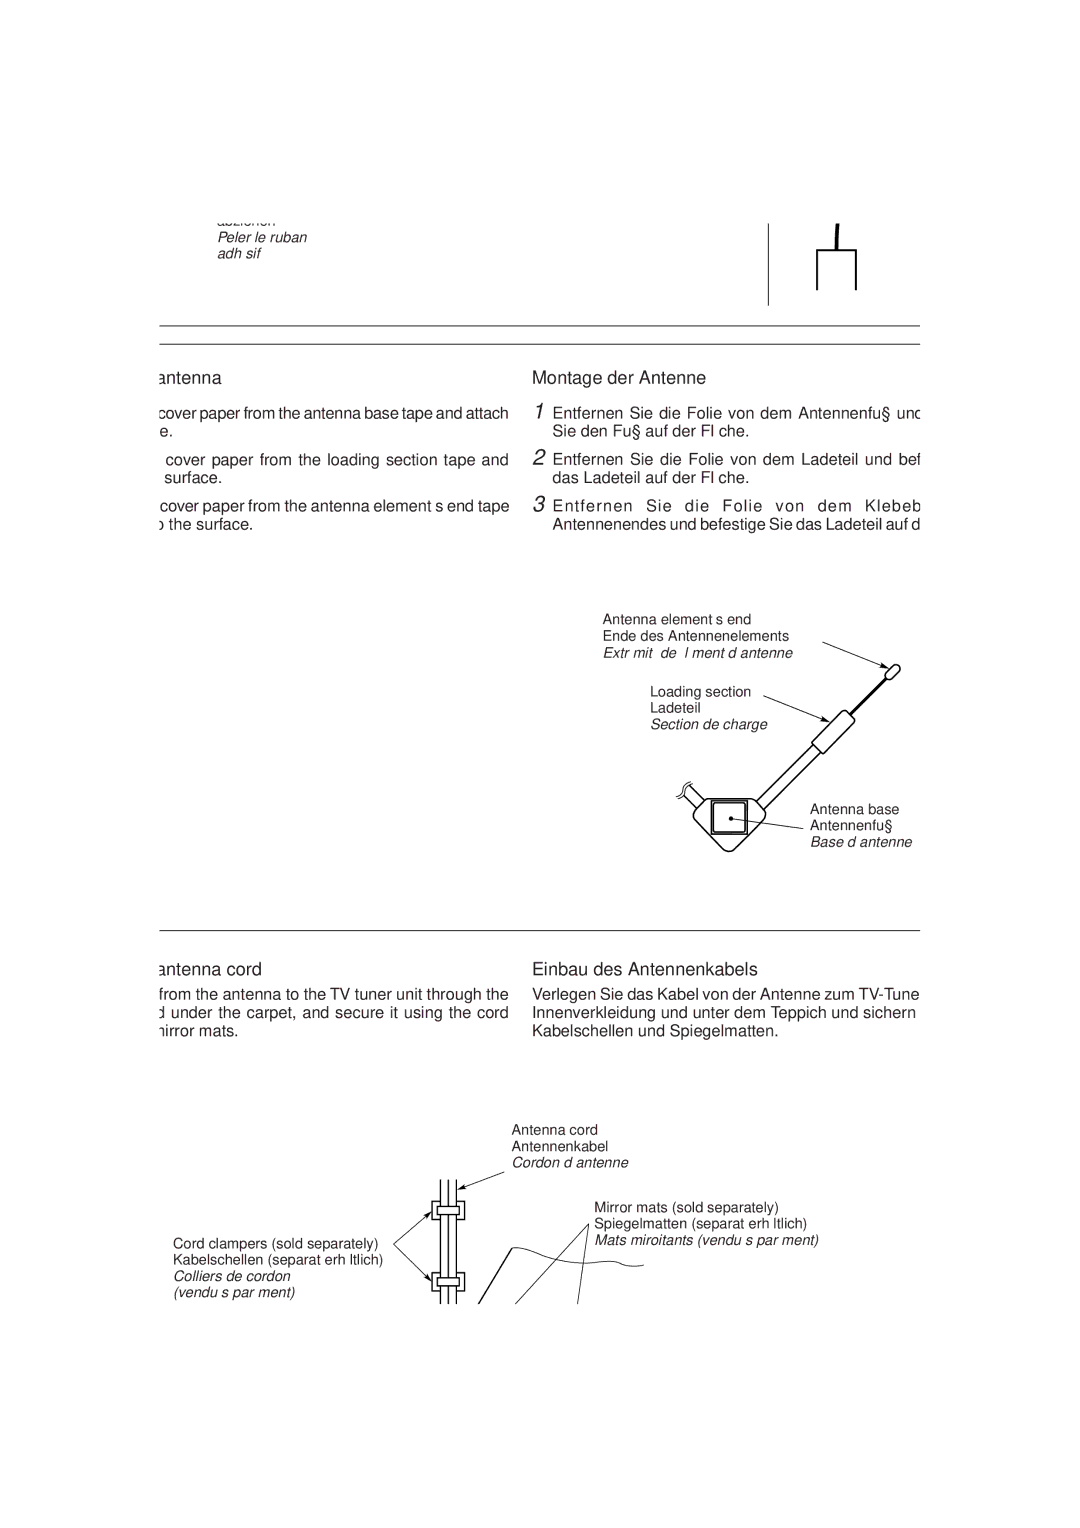
Installing the antenna

1Remove the cover paper from the antenna base tape and attach to the surface.

2Remove the cover paper from the loading section tape and attach to the surface.

3Remove the cover paper from the antenna element’s end tape and attach to the surface.

Montage der Antenne

1Entfernen Sie die Folie von dem Antennenfuß und befestige Sie den Fuß auf der Fläche.

2Entfernen Sie die Folie von dem Ladeteil und befestige Sie das Ladeteil auf der Fläche.

3Entfernen Sie die Folie von dem Klebeband des Antennenendes und befestige Sie das Ladeteil auf der Fläche.

Antenna element’s end

Ende des Antennenelements

Extrémité de élément d’antenne

Installation de l’antenne

1Retirez le papier protecteur du ruban adhésif de la base d’antenne et le coller à la surface.

2Retirez le papier protecteur du ruban adhésif de la section de charge et le coller sur la surface.

3Retirez le papier protecteur du ruban de l’extrémité d’élément d’antenneet et le coller sur la surface.

Loading section

Ladeteil

Section de charge

Antenna base

Antennenfuß

Base d’antenne

Installing the antenna cord

Install the cord from the antenna to the TV tuner unit through the interior trim and under the carpet, and secure it using the cord clampers and mirror mats.

Einbau des Antennenkabels

Verlegen Sie das Kabel von der Antenne zum TV-Tuner hinter der Innenverkleidung und unter dem Teppich und sichern sie es mit Kabelschellen und Spiegelmatten.

Pose du cordon d’antenne

Tirer le cordon de l’antenne à l’unité de tuner de télévision en le faisant passer par la garniture d’intérieur et sous le tapis de sol et le fixer en place à l’aide des mats miroitants.

Cord clampers (sold separately) Kabelschellen (separat erhältlich) Colliers de cordon

(vendu séparément)

Antenna cord

Antennenkabel

Cordon d’antenne

Mirror mats (sold separately)

Spiegelmatten (separat erhältlich)

Mats miroitants (vendu séparément)

To the TV tuner unit zum TV-Tuner

Vers l’unité de tuner de télévision

Attachment location / Montageposition / Enplacement de fixation

Example of installation on the side window Beispiel für die Installation am Seitenfenster Exemple illustrant une implantation sur la vitre latérale

Page 27
Image 27
JVC KV-C10 manual Installing the antenna

KV-C10 specifications

The JVC KV-C10 is a compact and versatile video camera that has gained popularity among both amateur and professional videographers. Known for its outstanding performance in various shooting conditions, this camera is designed to simplify the video creation process while delivering high-quality output. One of the main features of the KV-C10 is its advanced imaging technology. It incorporates a 1/3-inch CCD sensor that captures images with remarkable clarity and detail. This sensor allows for high-resolution recording, which is especially beneficial for those who want to produce content for platforms that prioritize sharp visuals.

Another significant feature of the KV-C10 is its ability to record in multiple formats. Users can choose between various resolutions and compression methods, giving them the flexibility to tailor their recording to fit specific project requirements. This adaptability makes the camera ideal for everything from professional projects to casual vlogs. The camera also boasts a robust optical zoom lens, enabling users to capture expansive scenes or focus on distant subjects without losing detail. This feature is particularly advantageous for event videography, such as weddings or sports events, where capturing every moment is crucial.

In addition to its impressive hardware, the JVC KV-C10 comes equipped with a range of user-friendly controls and settings. This includes customizable exposure settings and white balance adjustments, which allow videographers to achieve precise color grading in various lighting conditions. Furthermore, the camera’s built-in stabilization technology ensures smooth footage, reducing the impact of shaky hands or movement, which is essential for dynamic shooting scenarios.

The design of the KV-C10 is another noteworthy aspect. Its lightweight and portable construction make it easy to carry and operate, making it a favorite among on-the-go filmmakers. The intuitive interface and clearly labeled buttons make it accessible for users of all skill levels, while professional features such as manual focus and advanced audio controls cater to experienced videographers.

Overall, the JVC KV-C10 stands out as a reliable and versatile video camera that combines advanced technology, user-friendly features, and portability, making it a compelling choice for anyone looking to elevate their video production capabilities. Its blend of quality and usability makes it suitable for various applications, ensuring that creators can achieve their artistic vision without compromise.