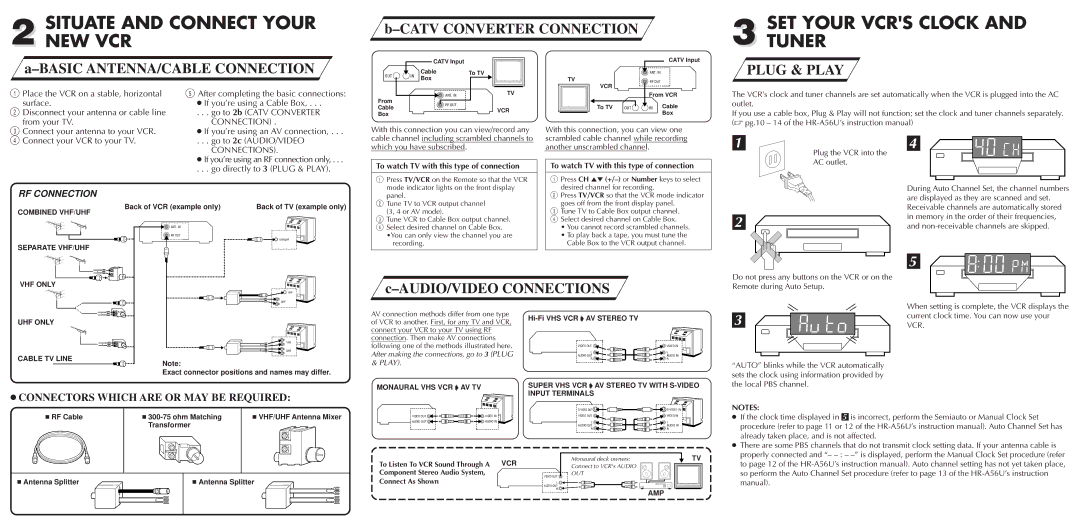
2 SITUATE AND CONNECT YOUR NEW VCR

b–CATV CONVERTER CONNECTION

3 SET YOUR VCR'S CLOCK AND TUNER

a–BASIC ANTENNA/CABLE CONNECTION

1 Place the VCR on a stable, horizontal

5 After completing the basic connections:

surface.

If you’re using a Cable Box, . . .

2 Disconnect your antenna or cable line

. . . go to 2b (CATV CONVERTER

from your TV.

CONNECTION) .


CATV Input


OUT

IN

Cable

To TV

Box


ANT. IN

TV


From

RF OUT

Cable

VCR

Box


CATV Input


ANT. IN


TV


RF OUT


VCR


From VCR

To TV

OUT

IN

Cable


Box

PLUG & PLAY

The VCR’s clock and tuner channels are set automatically when the VCR is plugged into the AC outlet.

If you use a cable box, Plug & Play will not function; set the clock and tuner channels separately. ( pg.10 – 14 of the HR-A56U’s instruction manual)

3 Connect your antenna to your VCR.

If you’re using an AV connection, . . .

4 Connect your VCR to your TV.

. . . go to 2c (AUDIO/VIDEO


CONNECTIONS).


If you’re using an RF connection only, . . .

With this connection you can view/record any cable channel including scrambled channels to which you have subscribed.

With this connection, you can view one scrambled cable channel while recording another unscrambled channel.

1

Plug the VCR into the

AC outlet.

4

. . . go directly to 3 (PLUG & PLAY).

RF CONNECTION


Back of VCR (example only)

Back of TV (example only)

COMBINED VHF/UHF


To watch TV with this type of connection

1Press TV/VCR on the Remote so that the VCR

mode indicator lights on the front display panel.

2Tune TV to VCR output channel

(3, 4 or AV mode).

To watch TV with this type of connection

1Press CH (+/–)or Number keys to select desired channel for recording.

2Press TV/VCR so that the VCR mode indicator goes off from the front display panel.

3 Tune TV to Cable Box output channel.

During Auto Channel Set, the channel numbers are displayed as they are scanned and set. Receivable channels are automatically stored

SEPARATE VHF/UHF

ANT. IN

RF OUT

VHF/UHF

3Tune VCR to Cable Box output channel.

4 Select desired channel on Cable Box. •You can only view the channel you are

recording.

4 Select desired channel on Cable Box.

• You cannot record scrambled channels.

• To play back a tape, you must tune the

Cable Box to the VCR output channel.

2

in memory in the order of their frequencies, and non-receivable channels are skipped.

5

VHF ONLY

VHF

UHF

c–AUDIO/VIDEO CONNECTIONS

Do not press any buttons on the VCR or on the

Remote during Auto Setup.

When setting is complete, the VCR displays the

UHF ONLY

CABLE TV LINE

VHF

UHF

Note:

Exact connector positions and names may differ.

AV connection methods differ from one type of VCR to another. First, for any TV and VCR, connect your VCR to your TV using RF connection. Then make AV connections following one of the methods illustrated here. After making the connections, go to 3 (PLUG

& PLAY).

Hi-Fi VHS VCR AV STEREO TV

VIDEO OUT

L

AUDIO OUT

R

VIDEO IN

L

AUDIO IN R

3

“AUTO” blinks while the VCR automatically sets the clock using information provided by

current clock time. You can now use your VCR.

MONAURAL VHS VCR AV TV

SUPER VHS VCR AV STEREO TV WITH S-VIDEO

INPUT TERMINALS

the local PBS channel.

CONNECTORS WHICH ARE OR MAY BE REQUIRED:

RF Cable

300-75 ohm Matching

VHF/UHF Antenna Mixer


Transformer


Antenna Splitter

Antenna Splitter

VIDEO OUT

VIDEO IN

AUDIO OUT

AUDIO IN

To Listen To VCR Sound Through A VCR

Component Stereo Audio System,

Connect As Shown

S-VIDEO OUT

S-VIDEO IN

VIDEO OUT

VIDEO IN

L

L

AUDIO OUT

AUDIO IN

R

R

Monaural deck owners:

TV

Connect to VCR's AUDIO


OUT


VIDEO OUT


L


AUDIO OUT


R


AMP

NOTES:

If the clock time displayed in 5 is incorrect, perform the Semiauto or Manual Clock Set procedure (refer to page 11 or 12 of the HR-A56U’s instruction manual). Auto Channel Set has already taken place, and is not affected.

There are some PBS channels that do not transmit clock setting data. If your antenna cable is properly connected and “– – :–” is displayed, perform the Manual Clock Set procedure (refer to page 12 of the HR-A56U’s instruction manual). Auto channel setting has not yet taken place, so perform the Auto Channel Set procedure (refer to page 13 of the HR-A56U’s instruction manual).

Page 2
Image 2
JVC LP20878-001 quick start Situate and Connect Your NEW VCR, SET Your Vcrs Clock and Tuner, Catv Converter Connection

LP20878-001 specifications

The JVC LP20878-001 is an impressive product that showcases the brand's commitment to innovation and quality in audio solutions. Designed with a multitude of features and technologies, this model caters to the needs of both casual listeners and audiophiles alike.

At the core of the LP20878-001 is its superior sound quality. JVC has equipped this model with advanced audio technologies that ensure clear, rich, and immersive sound. The speakers utilize a well-engineered driver system, allowing for an extended frequency response that brings music to life. With the ability to reproduce deep bass notes and crisp highs, the LP20878-001 is perfect for a variety of genres, from classical to modern pop.

One notable feature of the JVC LP20878-001 is its Bluetooth connectivity. This allows users to easily connect their smartphones, tablets, and other devices wirelessly, making it convenient to stream music or podcasts without the hassle of cords. This wireless capability is complemented by a stable and robust connection, ensuring that users can enjoy their audio without interruptions.

Additionally, the LP20878-001 comes with an intuitive interface. The user-friendly controls enable effortless navigation through different settings, including volume adjustments, equalizer presets, and Bluetooth pairing. The clear display provides essential information at a glance, making it easy to operate.

Durability is another characteristic that stands out in the LP20878-001. Constructed with high-quality materials, the product is built to withstand everyday use while maintaining a sleek and modern appearance. This durability does not compromise portability, as the design ensures easy handling and transport.

The product's versatility is further enhanced by multiple input options. In addition to Bluetooth, the LP20878-001 includes standard auxiliary inputs and USB connectivity, allowing users to connect a variety of devices. This flexibility makes it suitable for both home use and on-the-go scenarios, expanding its usability across different environments.

In summary, the JVC LP20878-001 is a feature-rich audio solution that prioritizes quality, connectivity, and user experience. With its advanced sound technologies, durable design, and versatile input options, it is a commendable choice for anyone looking to enhance their listening experience. It stands as a testament to JVC's dedication to delivering exceptional audio products that meet modern consumer demands.