LVT0900-003A
UX-Z7MDR-Consists of CA-UXZ7MDR and SP-UXZ7MD
If in Doubt Consult a Competent Electrician
UX-Z7MDR
Important for Laser Products
Above ALL
Introduction
Precautions
Contents
Main Unit
Location of the Buttons
Main unit
Display window
Display window on the electronic swing panel
When using the remote control
Remote Control
FM antenna
Connecting Antennas
Getting Started
Unpacking
To connect an outdoor AM MW/LW antenna
Connecting Speakers
You can connect the speakers using the speaker cords
AM MW/LW antenna
Speaker grilles are removable as illustrated below
Connecting External Equipment
To remove the speaker grilles
To connect external equipment
R6PSUM-3/AA15F
Putting the Batteries into the Remote Control
Basic and Common Operations
Remote control
Setting the Auto Power Off
Turning On the Power
Turning On/Off the Key-touch Tone
To turn off the clock indication power save mode
Setting the Clock
To check the clock time with tones
For private listening
To increase the volume, turn Volume + / control Clockwise
FM AM
If Cannot Listen appears in the main display
Reinforcing the Bass Sound
Bass OFF canceled
Flat Jazz canceled
To check the sound mode currently selected, press
To change the display brightness
Setting the Display Illumination
To select the illumination color
To create your favorite colors
Listening to FM and AM MW/LW Broadcasts
To change the information shown in the main display
Tuning in to a Station
Presetting Stations
To change the FM reception mode
Receiving FM Stations with RDS
Tuning in to a Preset Station
Release your finger from RDS Control Press PTY Search
Changing the RDS Information
Searching for Programs by PTY Codes PTY Search
PS PTY RT
TA News
Switching to a Program Type of Your Choice Temporarily
Info
Test function
Alarm function
Description of the PTY codes
Playing Back CDs CD-R/CD-RW
Playing Back the Entire CD-Normal Play
Precautions on CD Playback
To stop playback for a moment
To go to another track directly using the number buttons
Basic CD Operations
Program Play
To modify the program
To check the program contents
Playing at Random-Random Play
Repeating Tracks-Repeat Play
Playing Back MDs
To locate a particular point in a track during play
Basic MD Operations
On the main unit only To prohibit disc ejection
About MD indicator
While playing or pausing
Normal play MD Group
Tracks are played at random
On the remote control only Load an MD Press MD 3/8, then
To erase the entire program, press MD 0 to eject the MD
Tracks of the loaded MD will play at random
To go to another track in the same group, press ¢ or
MD Repeat OFF canceled
Playing Tracks in a Group-Group Play
Press Group Skip or Group Skip to select a group
Searching for Tracks to Play MD Title Search
Playing Back Tapes
Put a cassette in with the exposed part of the tape down
To play both sides-Reverse mode
Playing Back a Tape
Push Push Open
Listening to External Equipment
For how to apply sound effects, see
Adjusting the Audio Input Level
Listening to External Equipment
Recording
To put a track mark manually while recording an
Before You Start Recording on an MD
About the track marks
To avoid erasing important recordings
To check the remaining recording time
Precautions for performing long-hour stereo recording
Stereo Long-Hour Recording Mdlp
About High-Speed Recording
To set Group recording mode
Setting MD Recording Modes
To set the recording length mode
To set LP-prefix addition mode
To record a tape
On the remote control only Press DISP/CHARA
Recording Other Sources onto an MD
To record a single track during play or pause
To keep the best recording and playback sound quality
To clean the heads, capstans, and pinch rollers
Before You Start Recording on a Tape
To protect your recordings
To record an MD
Recording onto a Tape
To record a single track of a CD/MD during play
Prepare the source to record To record a disc
Press MD&TAPE REC
Press REV.MODE to select the reverse mode
When recording on an MD and a tape at the same time
For the tape
Editing MDs
Classifying the tracks on an MD
Using MD Group functions
How to make up Groups
Guidance-MD Group Functions
Introducing Group Editing Functions
Press ¢or 4to select the last track of the new group
Forming a Group-FORM GR
Press SET During playback
Press ¢or 4to select the first track of a new group
Or Group Skip
When Cannot ENTRY! appears in step
Adding a Track to a Group-ENTRY GR
Press ¢or 4to select the track
To join the divided groups again, see the Join GR
Dividing a Group-DIVIDE GR
Function on
Joining Two Groups-JOIN GR
When Cannot Join appears in step
To divide the group again, see the Divide GR function
Moving a Group-MOVE GR
Ungrouping Tracks-UNGROUP
To cancel the setting, press Cancel
Dissolving All Groups-UNGR ALL
Erasing Tracks in a Group-ERASE GR
Introducing Track Editing Functions
To join the divided tracks again, see the Join function
Press or to precisely adjust the dividing point
Dividing a Track-DIVIDE
Press ¢or 4to select the track you want to divide
If Cannot Join appears in step
When the track belongs to a group
Joining Two Tracks-JOIN
To divide the joined tracks, see the Divide function on
Press ¢or 4to select the track you want to move
Moving a Track-MOVE
Erasing All Tracks-ALL Erase
Erasing Tracks-ERASE
Press SET Press ¢or 4to select the track you want to erase
For the disc and track title
Press or to change the title entry mode
Assigning Titles to an MD
For the group title
Changing the Title
Using the Timers
FM AM AUX
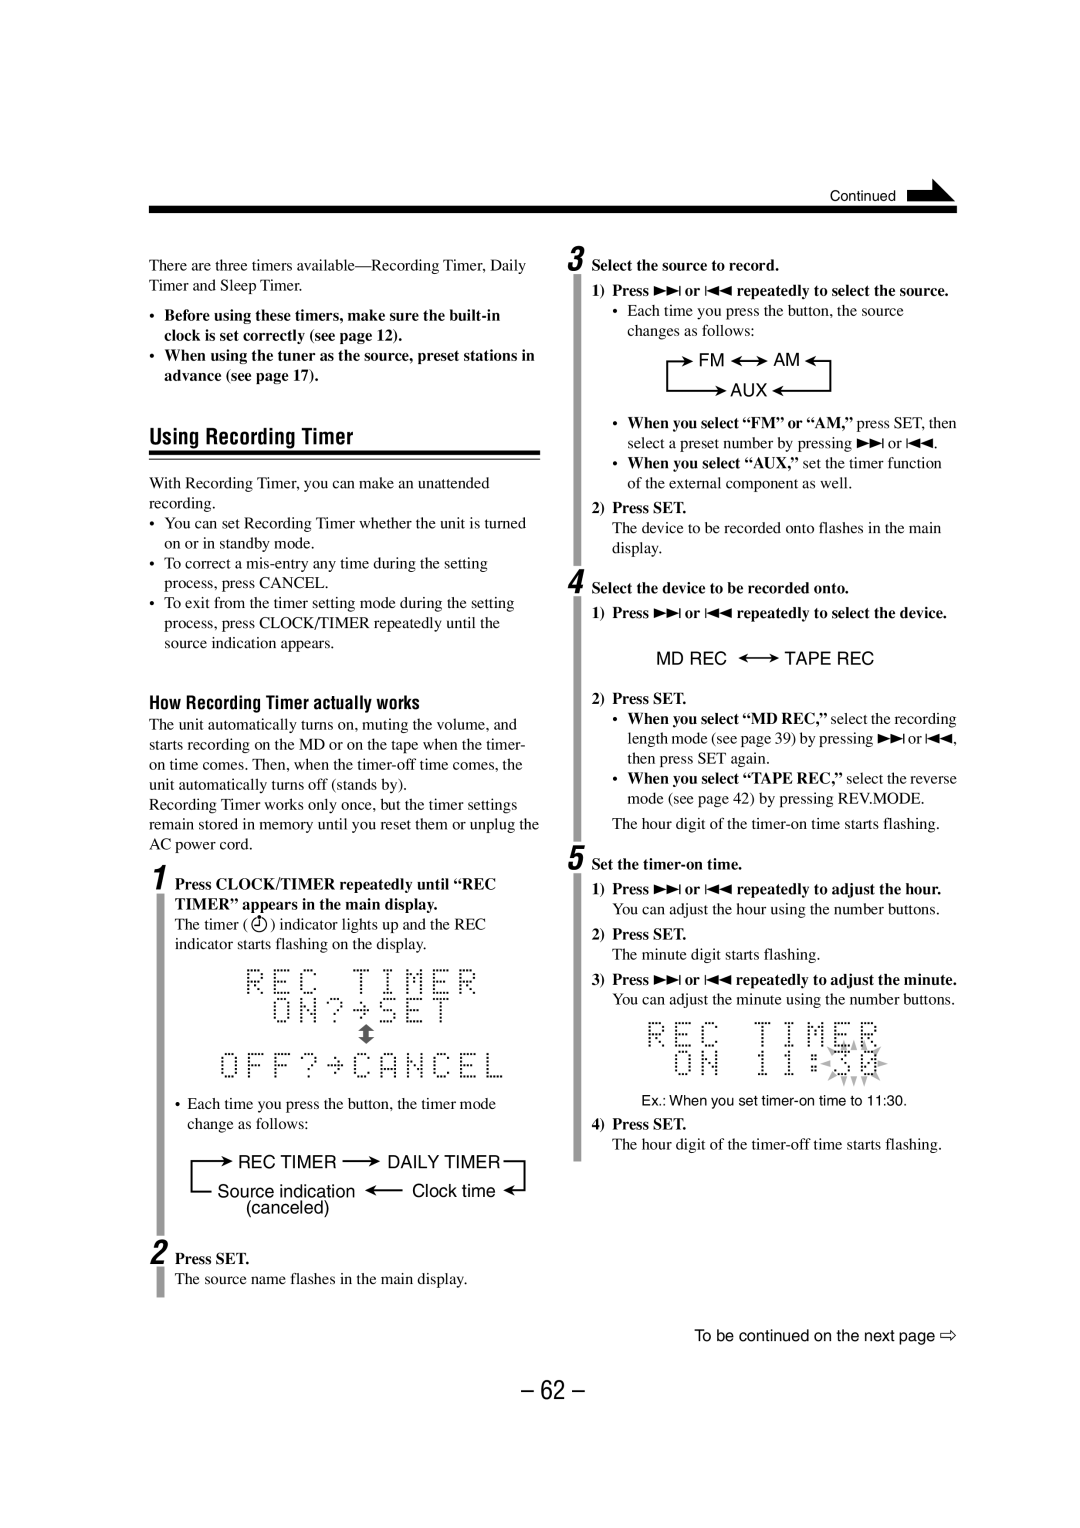
Using Recording Timer
How Recording Timer actually works
Source indication Clock time canceled
To turn on the Recording Timer again
Using Daily Timer
How Daily Timer actually works
To turn off the Recording Timer after its setting is done
FM AM CD AUX Tape MD
Volume setting appears in the main display
To turn off the Daily Timer after its setting is done
To turn on the Daily Timer again
Timer Priority
Using Sleep Timer
How Sleep Timer actually works
Maintenance
Atrac Adaptive TRansform Acoustic Coding/ATRAC3
Utoc User Table Of Contents
Additional Information
MD Disc Types
MD limitations
Symptoms Cause
Scms Serial Copy Management System
Hcms High-speed Copy Management System
Cannot REC x1 REC only
CD/MD Messages
Cannot REC x1 or x2 only
Message
Symptom
Troubleshooting
AUX/DVD
Specifications
0602MWMMDWJEM