Main
*
COMPACT VHS CAMCORDER
GR-SXM607
GR-SXM607 GR-SXM55
ENGLISH
CONTENTS
SAFETY PRECAUTIONS
WARNING: TO PREVENT FIRE OR SHOCK HAZARD, DO NOT EXPOSE THIS UNIT TO RAIN OR MOISTURE.
Dear Customer,
CAUTIONS:
Crossed Out Dust Bin Mark
SOME DOS AND DONTS ON THE SAFE USE OF EQUIPMENT
DO
DO DO
DO DONT
DONT DONT
AUTOMATIC DEMONSTRATION
Automatic Demonstration takes place when DEMO MODE is set to ON (factory-preset).
PROVIDED ACCESSORIES
How To Attach The Lens Cap
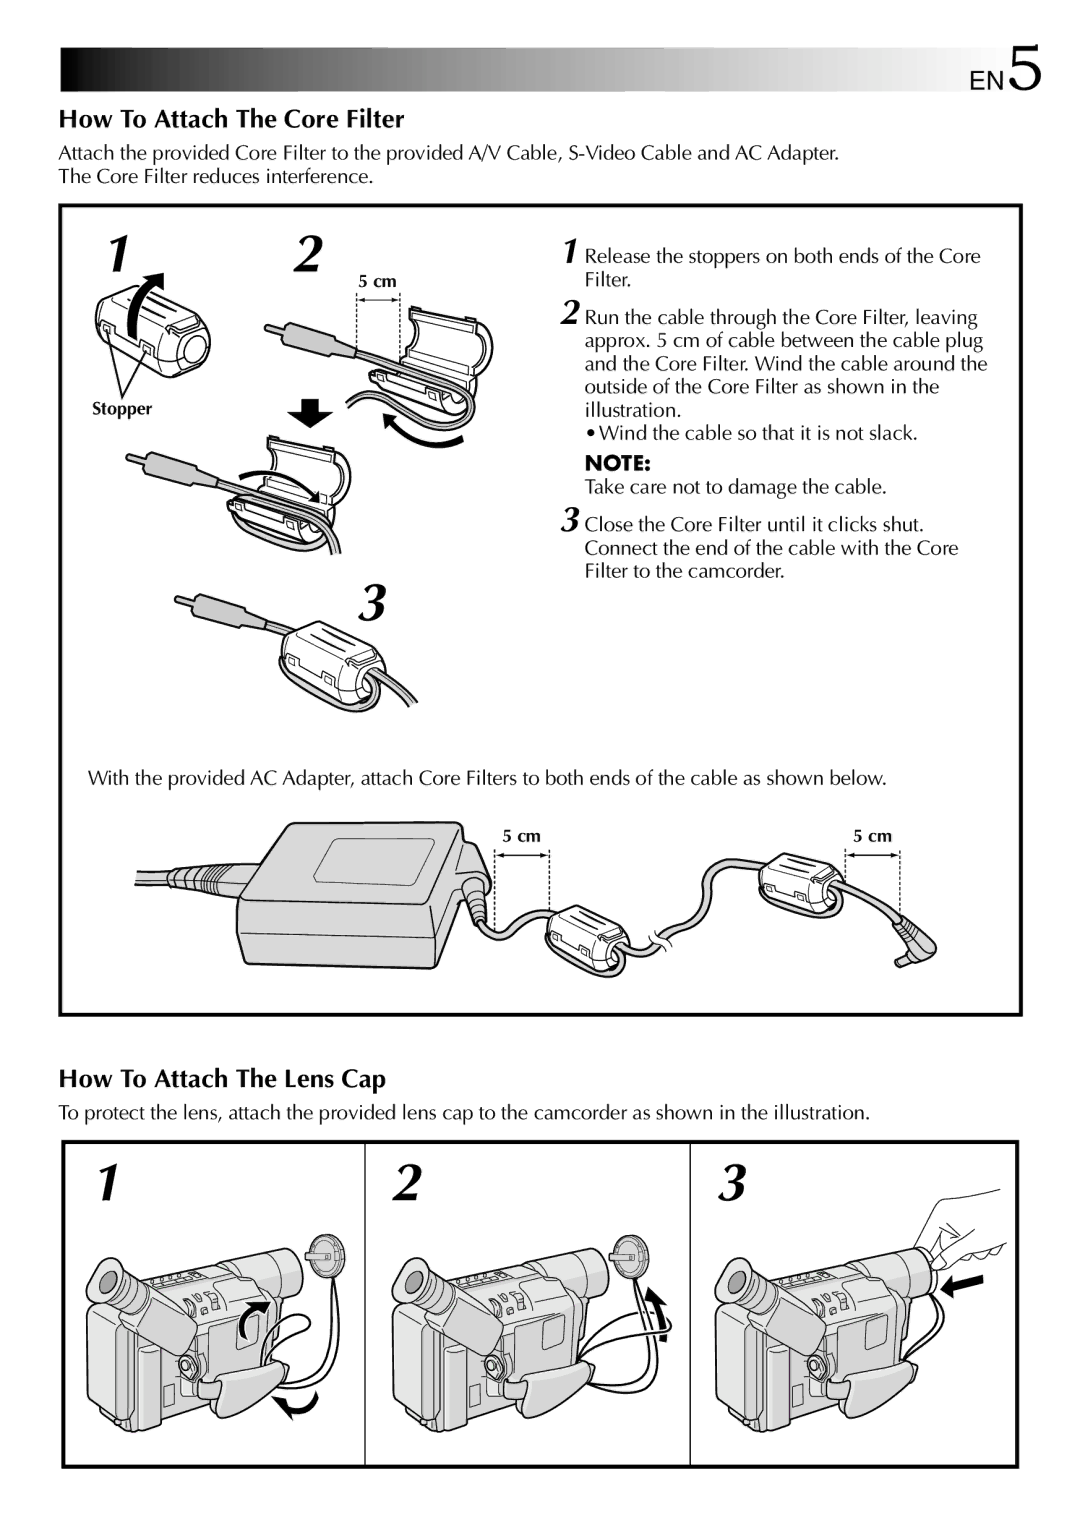
How To Attach The Core Filter
Power
CHARGING THE BATTERY PACK
4
2
To Detach The Battery Pack . . .
USING AC POWER
The provided AC Adapter features automatic voltage selection in the AC range from 110 V to 240 V.
pg. 44.
For other notes,
ATTENTION:
(cont.)
Shoulder Strap Attachment
CAUTION:
Tripod Mounting
Grip Adjustment
Date/Time Settings
Set the Power Switch to . The power lamp comes on.
For other notes, pg. 44
Rotate MENU to select DATE/TIME and press it. The DATE/TIME Menu appears.
Press MENU to close the Menu Screen.
Recording Format Setting
(cont.)
pg. 12).
Set the Power Switch to . The power lamp comes on.
Rotate MENU to select TO SYSTEM MENU and press it to display SYSTEM MENU.
NOTES about S-VHS and S-VHS ET
Compatibility Between S-VHS And VHS
Tape Length Setting
The tape remaining time (
pg. 14) is correct only if the correct tape length has been selected.
Recording Mode Setting
Loading/Unloading A Cassette
Shooting While Watching The Viewfinder
Basic Recording
Power Switch Position
Shooting While Watching The LCD Monitor
Page
Basic Features
Zooming:
Picture Stabiliser:
Quick Review:
Video Light
Retake:
DANGER
Advanced Features Snapshot
Night-Scope
ANIGHT AUTO
1 NIGHT 10X*
2NIGHT 50X* (GR-SXM55 only)
Fade/Wipe Effects
FADER
MOSAIC (Fader)
SHUTTER (Wipe)
SLIDE (Wipe)
Program AE With Special Effects
Advanced Features (cont.)
SPORTS
ND : ND EFFECT
Digital Effects
Using Menus For Detailed Adjustment
Normal Screen
Press MENU. The normal screen reappears.
Set the Power Switch to .
Press MENU to display the Setting Menu and rotate it to select the desired setting.
CAMERA MENU
SYSTEM MENU
MENU SCREEN EXPLANATIONS
SYSTEM MENU (cont.)
DISPLAY
The selected display can be recorded.
If you do not want to record the display, select the OFF mode before shooting. AUTO DATE
After changing the date.
Instant Titles
The selected title will remain until OFF is selected in the TITLE Menu.
Date/Time Insert
Advanced Features (cont.)
Animation
Animation and Time-Lapse are canceled when the power is shut off or when the cassette is ejected.
Before performing the following steps, make sure that:
The Power Switch is set to .
Exposure Control
When shooting using reverse lighting or when the background is too bright.
When shooting on a reflective natural background such as at the beach or when skiing.
When the background is overly dark or the subject light.
To return to the factory setting, select AUTO in step 4.
Advanced Features (cont.)
AUTO FOCUS
MANUAL FOCUS
White Balance Adjustment
Manual White Balance Operation
Basic Playback
LCD Monitor Brightness Adjustment:
Speaker Volume Control:
Still Playback:
Shuttle Search:
Features
Tracking:
For other notes, pg. 44
TBC (Time Base Corrector):
Counter Memory Function:
()
TV
[
()
[
VCR
To TV or VCR
If your TV/VCR has a 21-pin connector
Basic Connections
Tape Dubbing
Using The Cassette Adapter
Cassette Adapter (optional)
USING THE REMOTE CONTROL UNIT
A
B
Installing The Battery (RM-V700U, optional)
(cont.)
Installing The Batteries (RM-V715U, provided)
To End Zoom . . .
Zoom can also be used during still playback.
Animation and Time-Lapse
Animation
Time-Lapse
Also refer to pg. 26.
Insert Editing
(cont.)
Use the remote control unit to perform this procedure.
After step 5, Retake (
During Insert Editing, the original audio will be heard from the speaker.
Audio Dubbing
Random Assemble Editing [R.A.Edit]
(cont.)
SET REMOTE/VCR CODE
You are now ready to try Random Assemble Editing.
If the VCRs power does not come on in step 1, try another code from the VCR CODE LIST.
MAKE CONNECTIONS
JVC VCR EQUIPPED WITH REMOTE PAUSE TERMINAL
JVC VCR NOT EQUIPPED WITH REMOTE PAUSE TERMINAL BUT EQUIPPED WITH R.A. EDIT CONNECTOR
VCR OTHER THAN TYPE OR
SELECT SCENES
REW
PLAY
IN/OUT
Repeat steps 5 and 6 for each additional scene (as many as 8).
AUTOMATIC EDITING TO VCR
The on-screen display only appears while the camcorder searches for each scene.
There may be noise at in- or out-points on the edited tape with certain VCRs.
1 3 2 IN OUT IN OUT IN OUT
I T E M S N O T E S
DETAILS
( pg. 14, 15)
Settings ( pg. 9)
( pg. 6)
(Time Base Corrector) ( pg. 31)
CAUTIONS
Battery Packs
Recharging time is based on room temperature of 20
C.
The lower the temperature, the longer recharging takes.
CAUTIONS
Cassettes
Main Unit
For Your Maintenance
1
2
3
4 5
TROUBLESHOOTING
SYMPTOM POSSIBLE CAUSE(S)
TAPE TRANSPORT
POWER
RECORDING
OTHER
INDEX
Controls, Connectors And Indicators
Controls
Connectors
Indicators
Other Parts
INDEX
Indications
Indications During Recording
34
5
Warning Indications
Indications During Playback
9 8
+
2 7 3 5 1 4 6
TERMS
AC Adapter AP-V10EG
SPECIFICATIONS
Camcorder