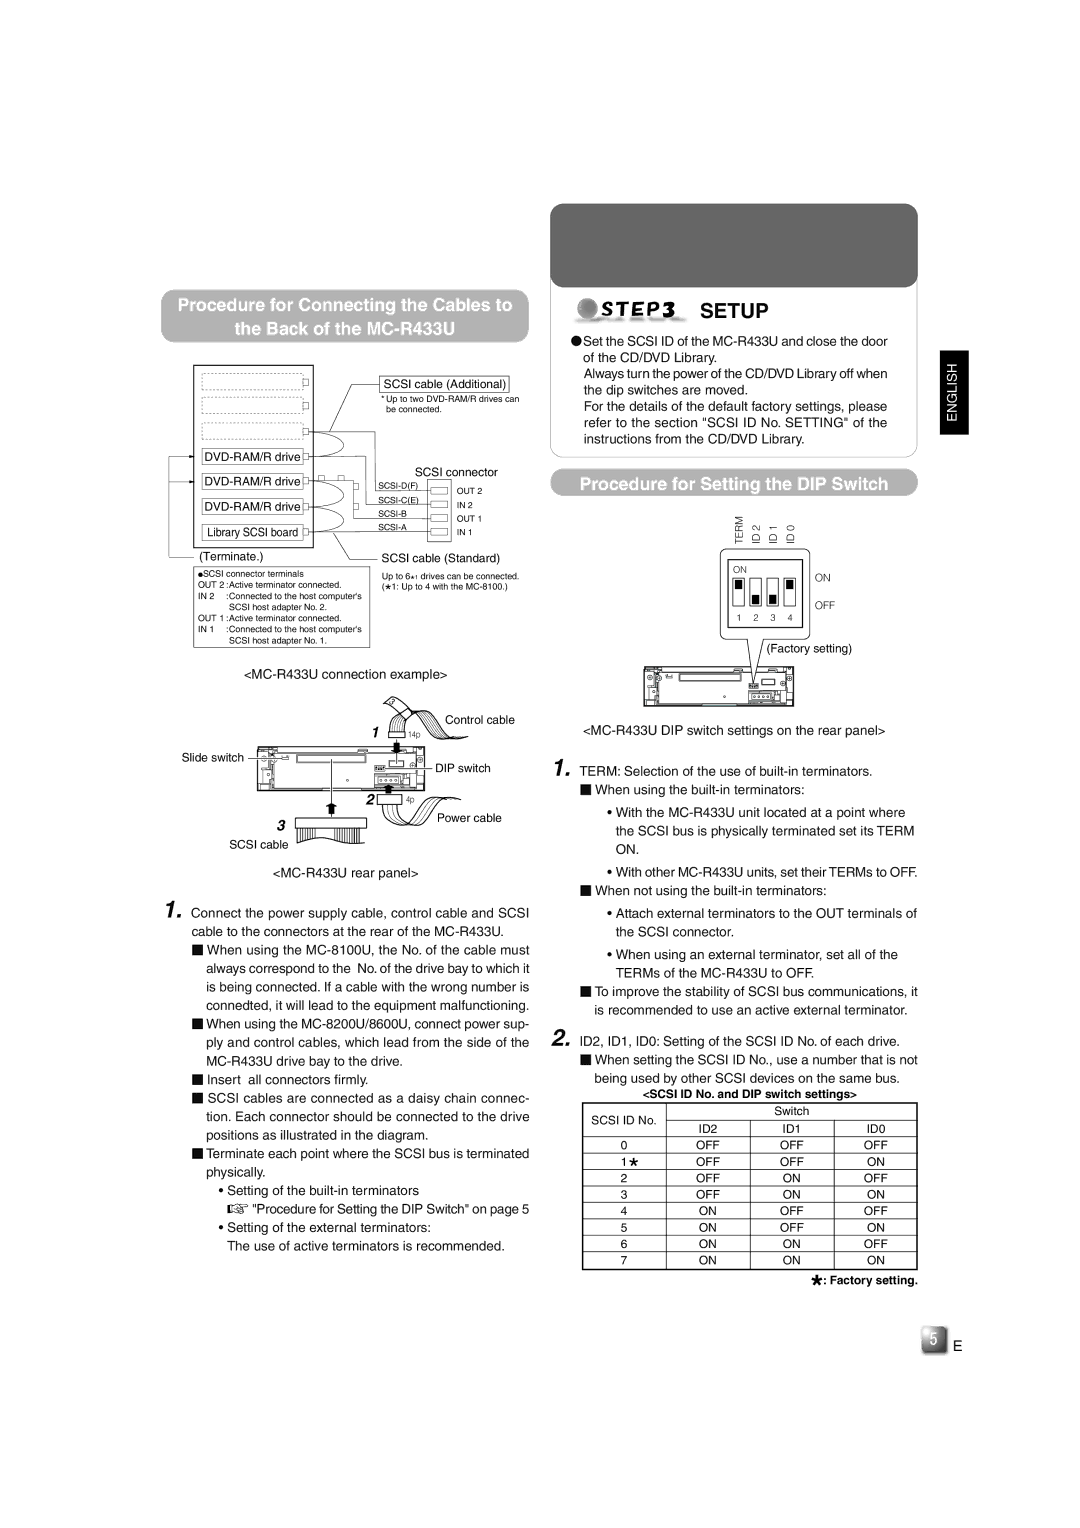
JVC manual Procedure for Connecting the Cables to Back of the MC-R433U

Models: MC-R433U

1 32
Download 32 pages 19.06 Kb
Page 5
Image 5

Procedure for Connecting the Cables to

the Back of the MC-R433U

SETUP

Set the SCSI ID of the MC-R433U and close the door

of the CD/DVD Library.

DVD-RAM/R drive

DVD-RAM/R drive

DVD-RAM/R drive

SCSI cable (Additional)

*Up to two DVD-RAM/R drives can be connected.

SCSI connector

SCSI-D(F)

OUT 2

SCSI-C(E)

IN 2

Always turn the power of the CD/DVD Library off when

the dip switches are moved.

For the details of the default factory settings, please

refer to the section "SCSI ID No. SETTING" of the

instructions from the CD/DVD Library.

Procedure for Setting the DIP Switch

ENGLISH

Library SCSI board

SCSI-B

SCSI-A

OUT 1

IN 1

TERM

ID 2

ID 1

ID 0

(Terminate.)

SCSI connector terminals

OUT 2 :Active terminator connected.

IN 2 :Connected to the host computer's SCSI host adapter No. 2.

OUT 1 :Active terminator connected.

IN 1 :Connected to the host computer's SCSI host adapter No. 1.

SCSI cable (Standard)

Up to 6*1 drives can be connected. (*1: Up to 4 with the MC-8100.)

ON

ON

OFF

1 2 3 4

(Factory setting)

<MC-R433U connection example>

Control cable


1

14p

Slide switch

W

N


DIP switch


2

4p


3


Power cable


SCSI cable

<MC-R433U rear panel>

1. Connect the power supply cable, control cable and SCSI cable to the connectors at the rear of the MC-R433U.

When using the MC-8100U, the No. of the cable must always correspond to the No. of the drive bay to which it is being connected. If a cable with the wrong number is connedted, it will lead to the equipment malfunctioning.

When using the MC-8200U/8600U, connect power sup- ply and control cables, which lead from the side of the MC-R433U drive bay to the drive.

Insert all connectors firmly.

SCSI cables are connected as a daisy chain connec- tion. Each connector should be connected to the drive positions as illustrated in the diagram.

Terminate each point where the SCSI bus is terminated physically.

¥Setting of the built-in terminators

"Procedure for Setting the DIP Switch" on page 5

¥Setting of the external terminators:

The use of active terminators is recommended.

N

W

<MC-R433U DIP switch settings on the rear panel>

1. TERM: Selection of the use of built-in terminators.

When using the built-in terminators:

¥With the MC-R433U unit located at a point where the SCSI bus is physically terminated set its TERM ON.

¥With other MC-R433U units, set their TERMs to OFF.

When not using the built-in terminators:

¥Attach external terminators to the OUT terminals of the SCSI connector.

¥When using an external terminator, set all of the TERMs of the MC-R433U to OFF.

To improve the stability of SCSI bus communications, it is recommended to use an active external terminator.

2.ID2, ID1, ID0: Setting of the SCSI ID No. of each drive.

When setting the SCSI ID No., use a number that is not being used by other SCSI devices on the same bus.

<SCSI ID No. and DIP switch settings>

SCSI ID No.


Switch


ID2

ID1

ID0


0


OFF

OFF

OFF

1

*

OFF

OFF

ON

2

OFF

ON

OFF

3


OFF

ON

ON

4


ON

OFF

OFF

5


ON

OFF

ON

6


ON

ON

OFF

7


ON

ON

ON


*: Factory setting.

E

Page 5
Image 5
JVC manual Procedure for Connecting the Cables to Back of the MC-R433U, Procedure for Setting the DIP Switch

MC-R433U specifications

The JVC MC-R433U is a versatile and innovative home audio system that combines sleek design with modern technology to deliver an outstanding music experience. This compact stereo system is designed for users who seek high-quality audio output without compromising on space or aesthetics.

One of the main features of the JVC MC-R433U is its powerful sound output, thanks to its dual speaker configuration that enhances clarity and bass. The system is equipped with a built-in amplifier that delivers robust performance, making it suitable for various music genres, from classical to contemporary pop. Additionally, the speakers are designed to provide a balanced sound profile, ensuring that every note is heard clearly and that the overall listening experience is immersive.

The system supports multiple audio sources, accommodating a wide range of listening preferences. It includes a CD player that supports CD-R, CD-RW, and MP3 playback, allowing users to enjoy their favorite albums and playlists effortlessly. Furthermore, the JVC MC-R433U features AM/FM radio capabilities, providing access to a variety of radio stations, as well as an auxiliary input, enabling users to connect external devices like smartphones or tablets easily.

In terms of connectivity, the JVC MC-R433U also offers Bluetooth functionality, allowing for wireless streaming from compatible devices. This feature caters to the growing demand for convenience and flexibility in how music is accessed and enjoyed. Users can play their favorite tracks directly from their smartphones or other Bluetooth-enabled devices without the hassles of detailed wiring.

The design of the JVC MC-R433U is both modern and elegant, with a compact footprint that fits comfortably in most spaces. The intuitive control panel and LCD display ensure that all functions are easy to navigate, while the remote control adds an extra layer of convenience for users who prefer to manage their audio experience from a distance.

Another notable characteristic of the JVC MC-R433U is its energy-efficient performance, adhering to modern sustainability standards while maintaining high audio quality. This dedication to energy efficiency not only contributes to lower electricity bills but also minimizes the system's environmental impact.

In summary, the JVC MC-R433U stands out as a well-rounded home audio system that combines excellent sound quality, versatile connectivity, and user-friendly design. It is a perfect choice for music lovers who want a compact yet powerful audio solution that enhances their listening experience in any setting.