Connecting Method Ç
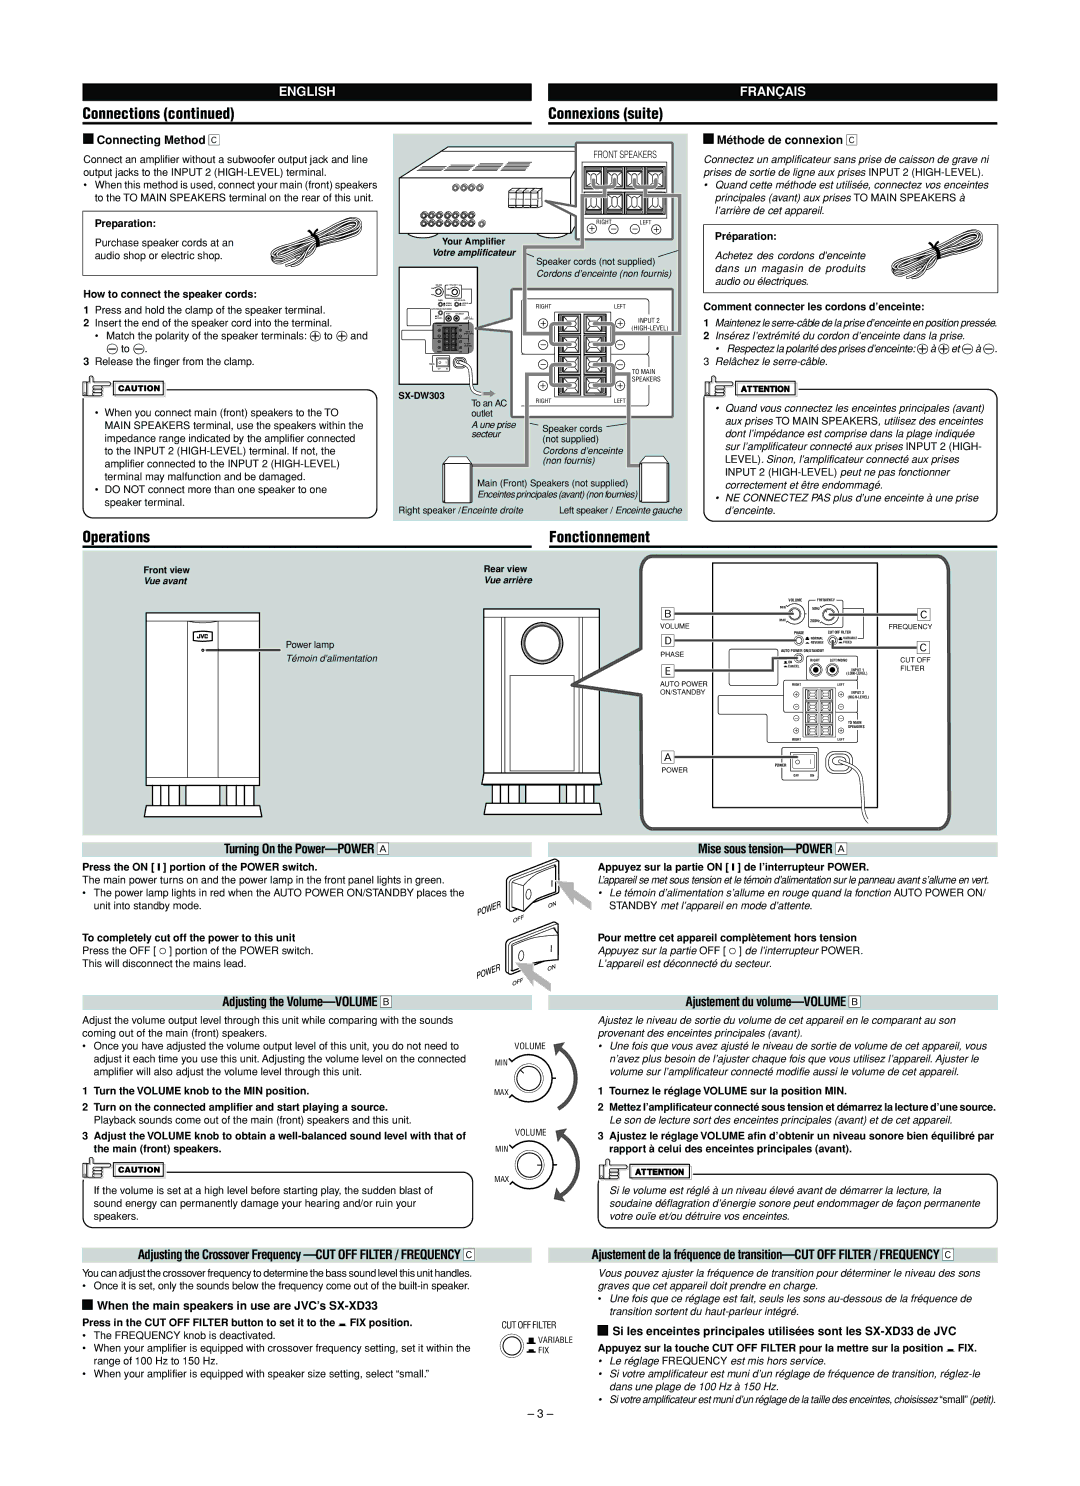
Connect an amplifier without a subwoofer output jack and line output jacks to the INPUT 2 (HIGH-LEVEL) terminal.
•When this method is used, connect your main (front) speakers to the TO MAIN SPEAKERS terminal on the rear of this unit.
Preparation:
Purchase speaker cords at an audio shop or electric shop.
How to connect the speaker cords:
1Press and hold the clamp of the speaker terminal.
2Insert the end of the speaker cord into the terminal.
•Match the polarity of the speaker terminals: ª to ª and
·to ·.
3Release the finger from the clamp.
•When you connect main (front) speakers to the TO MAIN SPEAKERS terminal, use the speakers within the impedance range indicated by the amplifier connected to the INPUT 2 (HIGH-LEVEL) terminal. If not, the amplifier connected to the INPUT 2 (HIGH-LEVEL) terminal may malfunction and be damaged.
•DO NOT connect more than one speaker to one speaker terminal.
FRONT SPEAKERS
| | | RIGHT | LEFT |
Your Amplifier | | |
Votre amplificateur | Speaker cords (not supplied) |
| | |
| | | Cordons d’enceinte (non fournis) |
VOLUME | FREQUENCY | | |
MIN | 50Hz | | | |
MAX | 200Hz | | | |
PHASE | | CUT OFF FILTER | | |
| NORMAL | VARIABLE | RIGHT | LEFT |
| REVERSE | FIXED |
AUTO POWER ON/STANDBY | |
| RIGHT | LEFT/MONO | | |
ON | | INPUT 1 | | INPUT 2 |
CANCEL | | (LOW-LEVEL) | |
| | | |
RIGHT | | LEFT | | (HIGH-LEVEL) |
| | INPUT 2 | |
| | (HIGH-LEVEL) | | |
| | TO MAIN | | |
| | SPEAKERS | | |
RIGHT | | LEFT | | |
POWER | | | | |
OFF | ON | | | TO MAIN |
| | | |
| | | | SPEAKERS |
SX-DW303 | | To an AC | RIGHT | LEFT |
| |
| | | |
| | outlet | | |
| | A une prise | Speaker cords | |
| | secteur | |
| | (not supplied) | |
| | | |
| | | Cordons d’enceinte |
| | | (non fournis) | |
Main (Front) Speakers (not supplied)
Enceintes principales (avant) (non fournies)
Right speaker /Enceinte droite | Left speaker / Enceinte gauche |
 Méthode de connexion Ç
Connectez un amplificateur sans prise de caisson de grave ni prises de sortie de ligne aux prises INPUT 2 (HIGH-LEVEL).
•Quand cette méthode est utilisée, connectez vos enceintes principales (avant) aux prises TO MAIN SPEAKERS à l’arrière de cet appareil.
Préparation:
Achetez des cordons d’enceinte dans un magasin de produits audio ou électriques.
Comment connecter les cordons d’enceinte:
1Maintenez le serre-câble de la prise d’enceinte en position pressée.
2Insérez l’extrémité du cordon d’enceinte dans la prise.
•Respectez la polarité des prises d’enceinte: ªà ªet ·à ·.
3Relâchez le serre-câble.
•Quand vous connectez les enceintes principales (avant) aux prises TO MAIN SPEAKERS, utilisez des enceintes dont l’impédance est comprise dans la plage indiquée sur l’amplificateur connecté aux prises INPUT 2 (HIGH- LEVEL). Sinon, l’amplificateur connecté aux prises INPUT 2 (HIGH-LEVEL)peut ne pas fonctionner correctement et être endommagé.
•NE CONNECTEZ PAS plus d’une enceinte à une prise d’enceinte.
Turning On the Power—POWER Å
Press the ON [ ❙ ] portion of the POWER switch.
The main power turns on and the power lamp in the front panel lights in green.
• The power lamp lights in red when the AUTO POWER ON/STANDBY places the unit into standby mode.
To completely cut off the power to this unit
Press the OFF [ ‡ ] portion of the POWER switch.
This will disconnect the mains lead.
Mise sous tension—POWER Å
Appuyez sur la partie ON [ ❙ ] de l’interrupteur POWER.
L’appareil se met sous tension et le témoin d’alimentation sur le panneau avant s’allume en vert.
•Le témoin d’alimentation s’allume en rouge quand la fonction AUTO POWER ON/ STANDBY met l’appareil en mode d’attente.
Pour mettre cet appareil complètement hors tension
Appuyez sur la partie OFF [ ‡ ] de l’interrupteur POWER.
L’appareil est déconnecté du secteur.
Adjusting the Volume—VOLUME ı
Adjust the volume output level through this unit while comparing with the sounds coming out of the main (front) speakers.
•Once you have adjusted the volume output level of this unit, you do not need to adjust it each time you use this unit. Adjusting the volume level on the connected amplifier will also adjust the volume level through this unit.
1Turn the VOLUME knob to the MIN position.
2Turn on the connected amplifier and start playing a source. Playback sounds come out of the main (front) speakers and this unit.
3Adjust the VOLUME knob to obtain a well-balanced sound level with that of the main (front) speakers.
If the volume is set at a high level before starting play, the sudden blast of sound energy can permanently damage your hearing and/or ruin your speakers.
Ajustement du volume—VOLUME ı
Ajustez le niveau de sortie du volume de cet appareil en le comparant au son provenant des enceintes principales (avant).
•Une fois que vous avez ajusté le niveau de sortie de volume de cet appareil, vous n’avez plus besoin de l’ajuster chaque fois que vous utilisez l’appareil. Ajuster le volume sur l’amplificateur connecté modifie aussi le volume de cet appareil.
1Tournez le réglage VOLUME sur la position MIN.
2Mettez l’amplificateur connecté sous tension et démarrez la lecture d’une source. Le son de lecture sort des enceintes principales (avant) et de cet appareil.
3Ajustez le réglage VOLUME afin d’obtenir un niveau sonore bien équilibré par rapport à celui des enceintes principales (avant).
Si le volume est réglé à un niveau élevé avant de démarrer la lecture, la soudaine déflagration d’énergie sonore peut endommager de façon permanente votre ouïe et/ou détruire vos enceintes.
Adjusting the Crossover Frequency —CUT OFF FILTER / FREQUENCY Ç
You can adjust the crossover frequency to determine the bass sound level this unit handles.
•Once it is set, only the sounds below the frequency come out of the built-in speaker.
 When the main speakers in use are JVC’s SX-XD33
Press in the CUT OFF FILTER button to set it to the _ FIX position.
•The FREQUENCY knob is deactivated.
•When your amplifier is equipped with crossover frequency setting, set it within the range of 100 Hz to 150 Hz.
•When your amplifier is equipped with speaker size setting, select “small.”
CUT OFF FILTER
VARIABLE
 FIX
FIX
Ajustement de la fréquence de transition—CUT OFF FILTER / FREQUENCY Ç
Vous pouvez ajuster la fréquence de transition pour déterminer le niveau des sons graves que cet appareil doit prendre en charge.
•Une fois que ce réglage est fait, seuls les sons au-dessous de la fréquence de transition sortent du haut-parleur intégré.
 Si les enceintes principales utilisées sont les SX-XD33 de JVC
Appuyez sur la touche CUT OFF FILTER pour la mettre sur la position _ FIX.
•Le réglage FREQUENCY est mis hors service.
•Si votre amplificateur est muni d’un réglage de fréquence de transition, réglez-le dans une plage de 100 Hz à 150 Hz.
•Si votre amplificateur est muni d’un réglage de la taille des enceintes, choisissez “small” (petit).