G |
|
|
|
|
|
|
|
|
|
|
|
|
|
|
|
|
| IRIS |
|
|
|
|
|
|
|
|
|
|
| VIDEO |
|
|
|
|
|
|
|
|
|
|
| DC |
|
|
|
|
|
|
|
|
|
|
|
| L | H |
|
|
|
|
|
|
|
|
|
| LEVEL |
|
|
| |
|
|
|
| LEVEL |
|
|
|
|
|
| |
|
|
|
|
|
|
| L H | LEVEL |
|
|
|
|
|
|
|
|
|
| Av Pk | ALC | BF LOCK |
|
|
|
|
|
|
|
|
|
|
|
| ||
|
|
|
|
| ALC |
|
|
|
|
|
|
H |
|
|
|
|
|
|
| I |
|
|
|
4 |
|
|
|
|
|
|
|
|
|
|
|
|
|
|
| 1,5 |
|
|
|
|
|
| |
J | 8 |
|
|
|
|
|
| 8 |
|
|
|
7 |
|
|
|
|
|
|
|
|
| ||
|
|
|
|
|
|
| 7 |
|
|
| |
| 6 |
|
|
|
|
|
|
|
|
| |
| OFF |
|
|
|
| 6 | OFF |
| |||
|
| OFF |
|
|
|
| OFF |
| |||
| 5 | OFF |
|
|
|
| OFF |
| |||
| AUTO | MAMU | DC12V |
|
|
|
| AUTO | MANU |
| |
|
|
|
|
| LL | INT |
| ||||
|
| LL | INT |
|
|
| 5 |
| |||
| 4 | AC24V | 1 | 2 |
| PHASE | WHT. |
| |||
| PHASE | WHT. |
|
| BAL |
| |||||
|
| BAL |
| CLASS 2 ONLY(U TYPE) |
|
|
|
|
| ||
| 3 | R | B |
| ISOLATED POWER ONLY |
| 4 | R | B |
| |
|
|
|
|
| (E TYPE) |
|
|
|
| ||
|
|
|
| VIDEO OUT |
|
|
| VIDEO OUT | |||
|
|
|
|
|
|
|
|
| |||
| 2 |
|
|
|
|
|
|
|
| ||
|
|
|
| SEE INSTRUCTION |
| 3 |
|
| SEE INSTRUCTION | ||
|
|
|
|
|
|
|
| ||||
|
| POWER RESET |
| MANUAL |
|
| POWER | RESET | MANUAL | ||
|
|
|
|
|
|
|
|
|
| ||
|
|
| 1 |
|
|
| 1 | ||||
K |
|
|
|
|
|
| 126 |
|
| ||
|
|
| 50 |
|
|
|
|
| 115 |
|
|
|
|
|
|
| 50 58 |
| BF LOCK |
|
|
| |
| 32.5 |
|
|
|
|
|
|
| COLOR VIDEO CAMERA | ||
|
|
| 51 |
|
|
|
|
|
|
|
|
|
|
|
| 30 |
|
| |||||
|
|
|
|
|
|
|
|
| |||
|
|
|
|
|
|
| 126 |
|
| ||
|
|
| 65 |
|
|
|
|
| 115 |
|
|
|
|
|
|
| 55 | 62.5 | BF LOCK |
|
|
| |
|
|
|
|
|
|
|
|
|
| ||
| 35 |
|
|
|
|
| DIGITAL | COLOR VIDEO CAMERA | |||
|
|
|
|
|
|
| |||||
|
|
| 42 |
|
|
|
| 30 |
| ||
|
|
|
|
|
|
|
|
| |||
|
|
|
|
|
|
|
|
| |||
|
|
| ® |
|
|
|
|
|
|
|
|
|
|
|
|
|
|
|
|
|
|
| Printed in Thailand |
|
|
|
|
|
|
|
|
|
|
| |
VICTOR COMPANY OF JAPAN, LIMITED |
|
| ©2004 VICTOR COMPANY OF JAPAN, LIMITED | ||||||||
® is a Registered Trademark owned by VICTOR COMPANY OF JAPAN, LTD. | |||||||||||
® is a Registrated Trademark in Japan,the U.S.A., the U.K. and many other countries. | |||||||||||
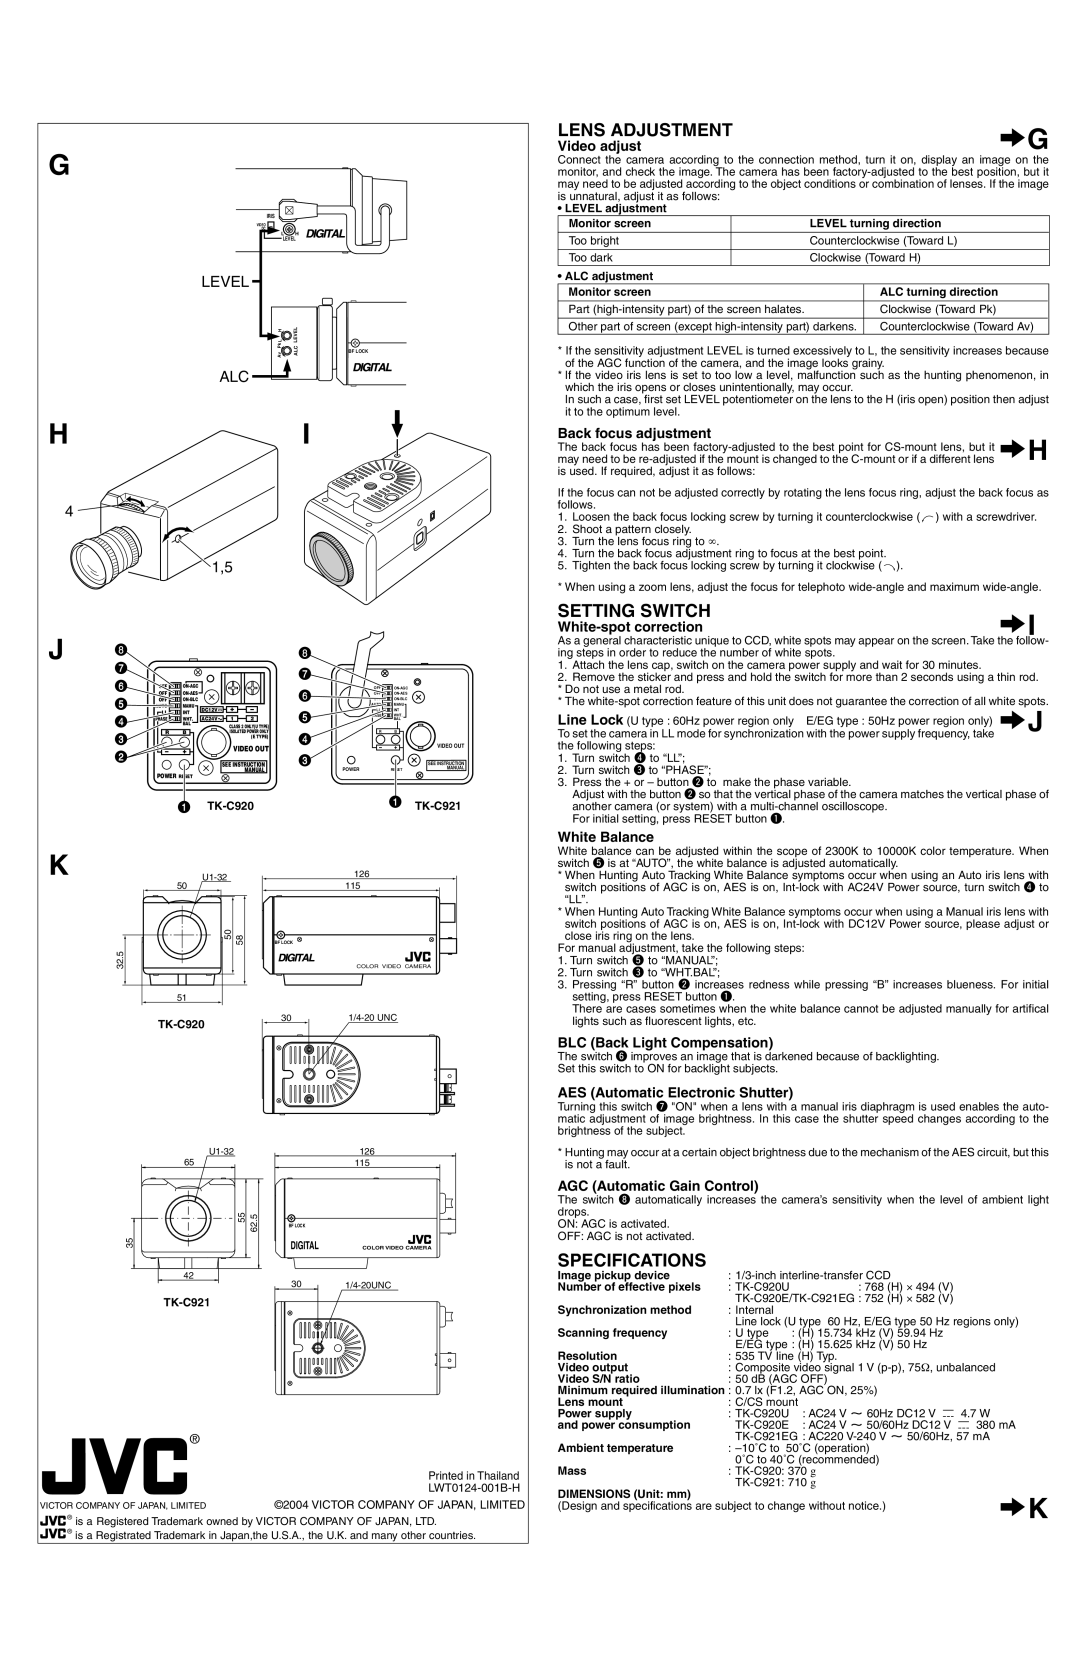
LENS ADJUSTMENT | ∆G |
Video adjust |
Connect the camera according to the connection method, turn it on, display an image on the monitor, and check the image. The camera has been
• LEVEL adjustment
Monitor screen | LEVEL turning direction |
Too bright | Counterclockwise (Toward L) |
|
|
Too dark | Clockwise (Toward H) |
• ALC adjustment
Monitor screen | ALC turning direction |
|
|
Part | Clockwise (Toward Pk) |
|
|
Other part of screen (except | Counterclockwise (Toward Av) |
*If the sensitivity adjustment LEVEL is turned excessively to L, the sensitivity increases because of the AGC function of the camera, and the image looks grainy.
*If the video iris lens is set to too low a level, malfunction such as the hunting phenomenon, in which the iris opens or closes unintentionally, may occur.
In such a case, first set LEVEL potentiometer on the lens to the H (iris open) position then adjust it to the optimum level.
Back focus adjustment
The back focus has been
is used. If required, adjust it as follows:
If the focus can not be adjusted correctly by rotating the lens focus ring, adjust the back focus as follows.
1.Loosen the back focus locking screw by turning it counterclockwise ( ![]() ) with a screwdriver.
) with a screwdriver.
2.Shoot a pattern closely.
3.Turn the lens focus ring to ∍.
4.Turn the back focus adjustment ring to focus at the best point.
5.Tighten the back focus locking screw by turning it clockwise ( ![]() ).
).
* When using a zoom lens, adjust the focus for telephoto
SETTING SWITCH | ∆I |
|
As a general characteristic unique to CCD, white spots may appear on the screen. Take the follow- ing steps in order to reduce the number of white spots.
1.Attach the lens cap, switch on the camera power supply and wait for 30 minutes.
2.Remove the sticker and press and hold the switch for more than 2 seconds using a thin rod. * Do not use a metal rod.
* The
Line Lock (U type : 60Hz power region only E/EG type : 50Hz power region only) | ∆J |
To set the camera in LL mode for synchronization with the power supply frequency, take | |
the following steps: |
|
1.Turn switch r to “LL”;
2.Turn switch e to “PHASE”;
3.Press the + or – button w to make the phase variable.
Adjust with the button w so that the vertical phase of the camera matches the vertical phase of
another camera (or system) with a
White Balance
White balance can be adjusted within the scope of 2300K to 10000K color temperature. When switch t is at “AUTO”, the white balance is adjusted automatically.
*When Hunting Auto Tracking White Balance symptoms occur when using an Auto iris lens with switch positions of AGC is on, AES is on,
*When Hunting Auto Tracking White Balance symptoms occur when using a Manual iris lens with switch positions of AGC is on, AES is on,
For manual adjustment, take the following steps:
1.Turn switch t to “MANUAL”;
2.Turn switch e to “WHT.BAL”;
3.Pressing “R” button w increases redness while pressing “B” increases blueness. For initial setting, press RESET button q.
There are cases sometimes when the white balance cannot be adjusted manually for artifical lights such as fluorescent lights, etc.
BLC (Back Light Compensation)
The switch y improves an image that is darkened because of backlighting. Set this switch to ON for backlight subjects.
AES (Automatic Electronic Shutter)
Turning this switch u "ON" when a lens with a manual iris diaphragm is used enables the auto- matic adjustment of image brightness. In this case the shutter speed changes according to the brightness of the subject.
*Hunting may occur at a certain object brightness due to the mechanism of the AES circuit, but this is not a fault.
AGC (Automatic Gain Control)
The switch i automatically increases the camera’s sensitivity when the level of ambient light drops.
ON: AGC is activated.
OFF: AGC is not activated.
SPECIFICATIONS
Image pickup device | : |
|
|
| ||
Number of effective pixels | : | : 768 (H) ⋅ 494 (V) |
|
|
| |
Synchronization method |
|
|
| |||
: Internal |
|
|
|
|
| |
Scanning frequency | Line lock (U type 60 Hz, E/EG type 50 Hz regions only) | |||||
: U type | : (H) 15.734 kHz (V) 59.94 Hz |
|
|
| ||
Resolution | E/EG type : (H) 15.625 kHz (V) 50 Hz |
|
|
| ||
: 535 TV line (H) Typ. |
|
|
| |||
Video output | : Composite video signal 1 V | |||||
Video S/N ratio | : 50 dB (AGC OFF) |
|
|
| ||
Minimum required illumination : 0.7 lx (F1.2, AGC ON, 25%) |
|
|
| |||
Lens mount | : C/CS mount |
|
|
| ||
Power supply | : | : AC24 V ~ 60Hz DC12 V |
|
| 4.7 W | |
| ||||||
and power consumption | : AC24 V ~ 50/60Hz DC12 V |
|
| 380 mA | ||
|
| |||||
Ambient temperature | ||||||
: |
|
|
| |||
Mass | 0˚C to 40˚C (recommended) |
|
|
| ||
: |
|
|
| |||
DIMENSIONS (Unit: mm) |
|
|
| |||
|
|
|
|
|
| |
(Design and specifications are subject to change without notice.) | ∆K |
|