HOW TO USE THE MENU

FUNCTIONS (cont'd)

DISPLAY AND SELECTIONS IN THE <SET-UP MENU> MODE (SETTING)

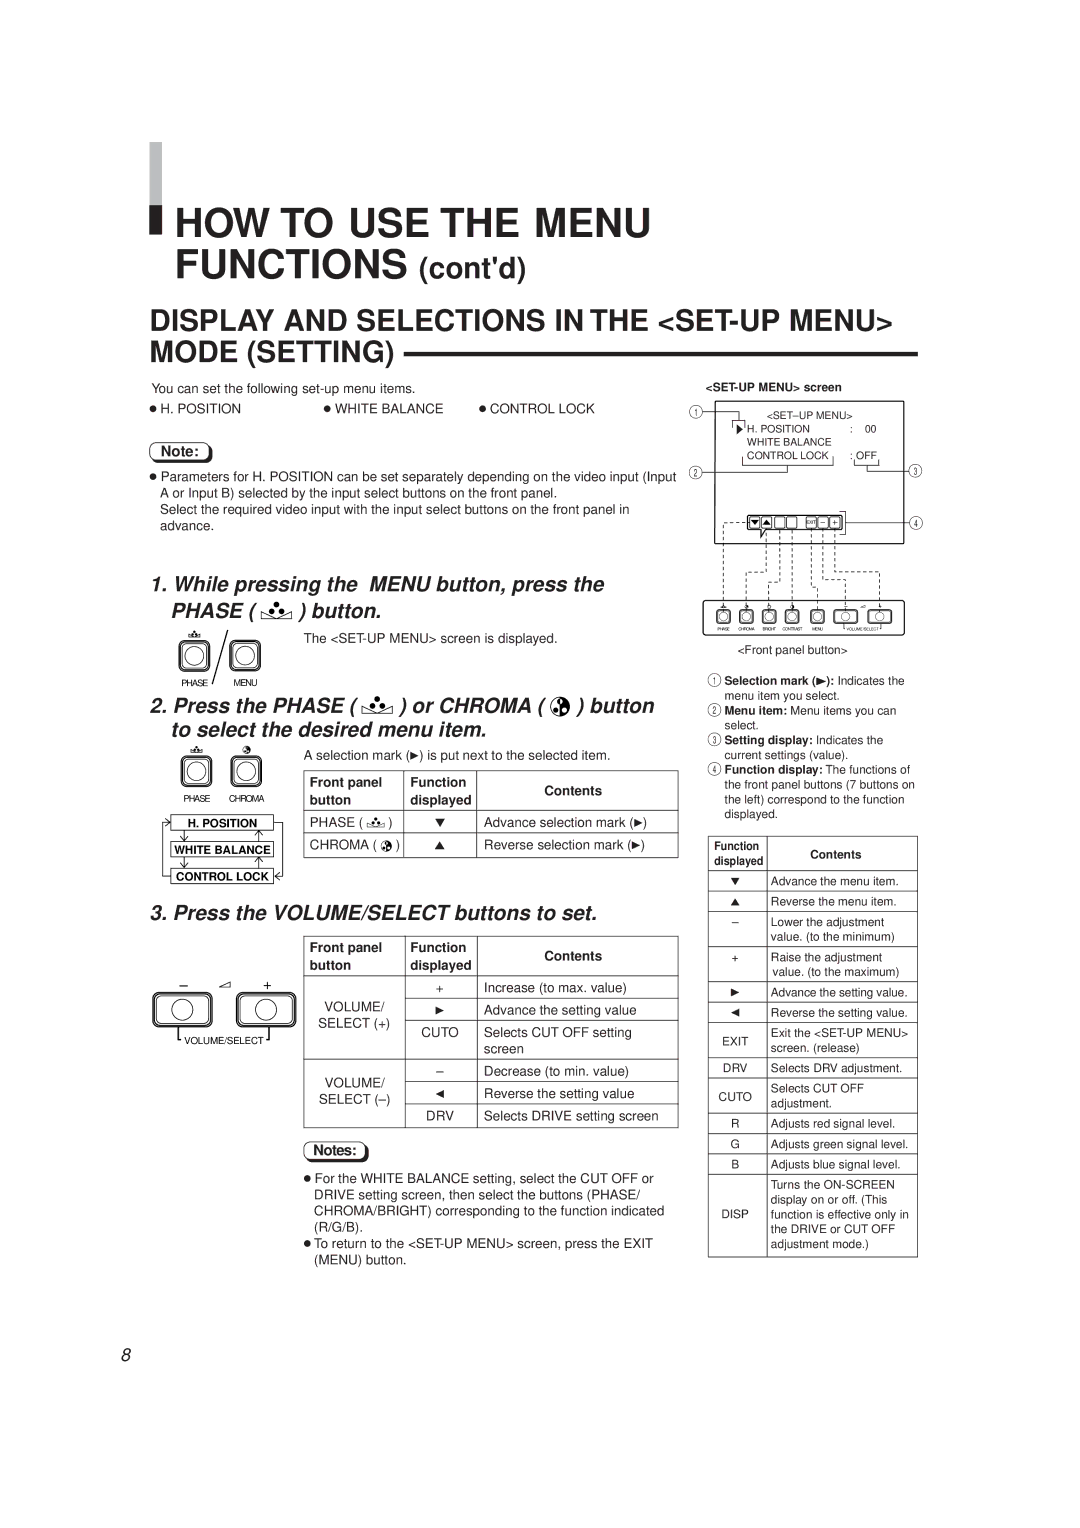
You can set the following set-up menu items.

H. POSITION

WHITE BALANCE

CONTROL LOCK

Note:

Parameters for H. POSITION can be set separately depending on the video input (Input A or Input B) selected by the input select buttons on the front panel.

Select the required video input with the input select buttons on the front panel in advance.

<SET-UP MENU> screen

1


<SET–UP MENU>


H. POSITION

:

00


WHITE BALANCE


2


CONTROL LOCK

: OFF


EXIT

3

4

1. While pressing the MENU button, press the

PHASE ( ) button.

The <SET-UP MENU> screen is displayed.

PHASE MENU

2. Press the PHASE ( ) or CHROMA ( ) button to select the desired menu item.


A selection mark (3) is put next to the selected item.


Front panel


Function

Contents

PHASE CHROMA

button


displayed


H. POSITION

PHASE (

)

Advance selection mark (3)

WHITE BALANCE

CHROMA (

)

5

Reverse selection mark (3)

CONTROL LOCK


3. Press the VOLUME/SELECT buttons to set.


Front panel

Function

Contents


button

displayed


+


+

Increase (to max. value)


VOLUME/


3

Advance the setting value


SELECT (+)


VOLUME/SELECT


CUTO

Selects CUT OFF setting


screen


VOLUME/

Decrease (to min. value)


2

Reverse the setting value


SELECT (–)


DRV

Selects DRIVE setting screen


Notes:

For the WHITE BALANCE setting, select the CUT OFF or DRIVE setting screen, then select the buttons (PHASE/ CHROMA/BRIGHT) corresponding to the function indicated (R/G/B).

To return to the <SET-UP MENU> screen, press the EXIT (MENU) button.

+

PHASE

CHROMA BRIGHT CONTRAST

MENU


VOLUME/SELECT

<Front panel button>

1Selection mark (3): Indicates the

menu item you select.

2Menu item: Menu items you can select.

3Setting display: Indicates the

current settings (value).

4Function display: The functions of the front panel buttons (7 buttons on the left) correspond to the function displayed.

Function

Contents

displayed


Advance the menu item.


5

Reverse the menu item.

Lower the adjustment


value. (to the minimum)


+

Raise the adjustment


value. (to the maximum)


3

Advance the setting value.

2

Reverse the setting value.

EXIT

Exit the <SET-UP MENU>

screen. (release)


DRV

Selects DRV adjustment.


CUTO

Selects CUT OFF

adjustment.


R

Adjusts red signal level.


G

Adjusts green signal level.


B

Adjusts blue signal level.


Turns the ON-SCREEN


display on or off. (This

DISP

function is effective only in


the DRIVE or CUT OFF


adjustment mode.)


8

Page 8
Image 8
JVC TM-A130SU HOW to USE the Menu, Display and Selections in the SET-UP Menu Mode Setting, Position White Balance, Cuto

TM-A130SU specifications

The JVC TM-A130SU is a professional-grade 13-inch LCD monitor that has established itself as a reliable solution for both broadcast and video production environments. Renowned for its compact size and impressive performance, this monitor is designed to meet the needs of video professionals who require portability without compromising on quality.

One of the main features of the TM-A130SU is its high-resolution display. With a native resolution of 1280 x 1024 pixels, the monitor delivers crisp and clear images, making it suitable for detailed video editing and monitoring tasks. The LCD technology provides excellent color reproduction, ensuring accurate color representation, which is crucial for color grading and post-production work.

The TM-A130SU is equipped with a wide range of input options, including composite, component, and HDMI inputs. This versatility allows the monitor to be integrated seamlessly into diverse setups, whether it’s for simple surveillance or complex multi-camera productions. The presence of multiple input types also facilitates easy switching between different video sources, making the TM-A130SU an adaptable choice for various applications.

Another noteworthy characteristic is the monitor’s ability to support various aspect ratios and display formats. It supports 4:3 and 16:9 formats, providing flexibility for users who need to monitor content in different formats without distortion. This feature is particularly advantageous for professionals working in different media formats, ensuring that they can evaluate their content accurately.

The TM-A130SU features built-in audio capabilities, allowing users to monitor audio levels directly from the monitor. This integration simplifies production workflows by reducing the need for additional audio monitoring equipment. Additionally, the monitor has a rugged and durable build, designed to withstand the rigors of professional environments, which is an important characteristic for on-location monitoring.

Moreover, the monitor’s ergonomic design includes tilt and pan capabilities, allowing users to adjust the viewing angle to suit their needs. This adaptability enhances user comfort and helps in achieving optimal viewing conditions regardless of the setup.

In summary, the JVC TM-A130SU stands out as a compact yet powerful tool for video professionals. With its high resolution, versatile input options, support for multiple aspect ratios, built-in audio capabilities, and durable design, it offers a comprehensive solution for monitoring and evaluating video content in a variety of production environments.