English

Common Operations

Turning On the Power

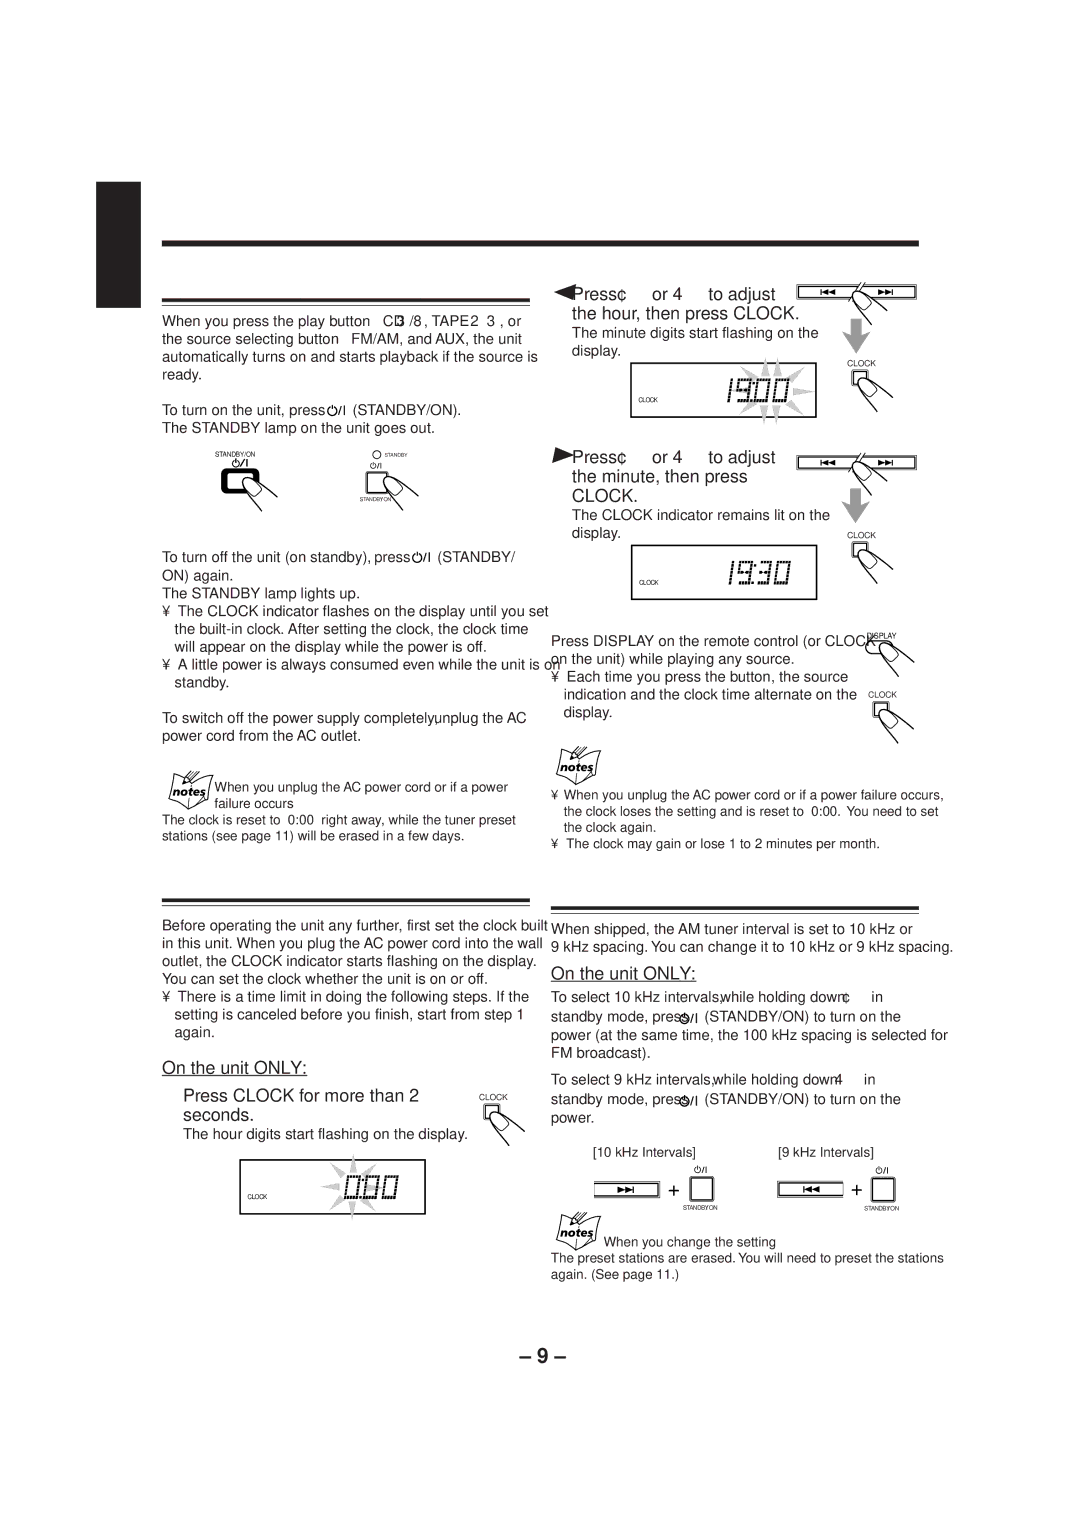
When you press the play button — CD 3/8, TAPE 23, or the source selecting button — FM/AM, and AUX, the unit automatically turns on and starts playback if the source is ready.

To turn on the unit, press

(STANDBY/ON).

The STANDBY lamp on the unit goes out.

STANDBY/ON

STANDBY

STANDBY/ON

To turn off the unit (on standby), press (STANDBY/

ON) again.

The STANDBY lamp lights up.

The CLOCK indicator flashes on the display until you set the built-in clock. After setting the clock, the clock time will appear on the display while the power is off.

A little power is always consumed even while the unit is on standby.

To switch off the power supply completely, unplug the AC

power cord from the AC outlet.

When you unplug the AC power cord or if a power failure occurs

The clock is reset to “0:00” right away, while the tuner preset stations (see page 11) will be erased in a few days.

2 Press ¢or 4to adjust the hour, then press CLOCK.

The minute digits start flashing on the display.

CLOCK

CLOCK

3 Press ¢or 4to adjust the minute, then press

CLOCK.

The CLOCK indicator remains lit on the

display.CLOCK

CLOCK

To check the clock time

Press DISPLAY on the remote control (or CLOCK

DISPLAY


on the unit) while playing any source.


• Each time you press the button, the source


indication and the clock time alternate on the

CLOCK

display.


When you unplug the AC power cord or if a power failure occurs, the clock loses the setting and is reset to “0:00.” You need to set the clock again.

The clock may gain or lose 1 to 2 minutes per month.

Setting the Clock

Before operating the unit any further, first set the clock built in this unit. When you plug the AC power cord into the wall outlet, the CLOCK indicator starts flashing on the display.

You can set the clock whether the unit is on or off.

There is a time limit in doing the following steps. If the setting is canceled before you finish, start from step 1 again.

On the unit ONLY:


1 Press CLOCK for more than 2

CLOCK

seconds.


The hour digits start flashing on the display.

CLOCK

Setting the AM Tuner Interval Spacing

When shipped, the AM tuner interval is set to 10 kHz or

9 kHz spacing. You can change it to 10 kHz or 9 kHz spacing.

On the unit ONLY:

To select 10 kHz intervals, while holding down ¢ in

standby mode, press (STANDBY/ON) to turn on the power (at the same time, the 100 kHz spacing is selected for FM broadcast).

To select 9 kHz intervals, while holding down 4in

standby mode, press (STANDBY/ON) to turn on the power.

[10 kHz Intervals]

[9 kHz Intervals]

STANDBY/ON

STANDBY/ON

When you change the setting

The preset stations are erased. You will need to preset the stations again. (See page 11.)

– 9 –

Page 14
Image 14
JVC UX-P3 manual Common Operations, Turning On the Power, Setting the Clock, Setting the AM Tuner Interval Spacing

UX-P3 specifications

The JVC UX-P3 is a compact yet powerful micro audio system that combines modern technology with a sleek design, catering to music enthusiasts who desire quality sound without sacrificing space. This model stands out with its array of features and functionalities, making it a great addition to any home or office setting.

One of the main highlights of the JVC UX-P3 is its ability to deliver high-fidelity audio performance. Equipped with a robust amplifier, this system produces clear, detailed sound across a variety of genres. The system supports various audio formats, including CD, FM/AM radio, and USB playback, providing versatile options for music enjoyment. The built-in CD player is compatible with CD-R/RW discs, allowing users to listen to their favorite compilations without any hassle.

The UX-P3 integrates Bluetooth technology, permitting wireless streaming of music from smartphones, tablets, and other Bluetooth-enabled devices. This feature adds convenience, allowing users to enjoy their favorite playlists and tracks without the need for cords and cables. The Bluetooth range is also commendable, enabling seamless connections from a distance.

Another notable characteristic of the JVC UX-P3 is its sleek design. The compact form factor fits comfortably on shelves, desks, or any limited space, making it an ideal choice for smaller rooms. The system features an intuitive interface, complete with a clear display and easy-to-use controls, which enhance user experience.

In addition, the UX-P3 offers a range of preset equalizer settings, enabling users to tailor sound profiles to their liking. Whether one prefers enhanced bass for electronic music or clearer vocals for spoken word, the equalizer presets help achieve that desired audio balance.

Furthermore, the system's headphone jack allows for personal listening, providing an option for late-night music sessions without disturbing others. The inclusion of a digital clock with a sleep timer also adds functionality to the system, ensuring users can enjoy their music while maintaining control over their listening routines.

The combination of these features establishes the JVC UX-P3 as a well-rounded audio system that satisfies the demands of modern music listeners. Whether it's for casual listening, creating a lively atmosphere for gatherings, or simply enjoying a quiet moment with a favorite album, the UX-P3 promises a fulfilling audio experience. Its technology, design, and versatility solidify its position in the market as an exceptional choice for compact audio solutions.