English

Getting Started

Installing the Equipment on the Wall

The Center Unit and Speakers can be attached to a wall.

CAUTIONS:

Attachment to a wall

The Center Unit weighs approximately 4.3 kg. When its buttons are operated, an additional force will be applied to it in the downward direction. Therefore, sufficient care must be taken when attaching to a wall to prevent any accidents caused by the Center Unit’s falling off the wall.

Before attaching the Center Unit to the wall, check the wall and other related aspects, and verify whether the strength of the wall will be sufficient not only to support the weight of the Center Unit itself but also to withstand the additional downward force which will be applied to it during operation. (Do not attach the Center Unit to a plywood or plasterboard wall. The Center Unit may fall and sustain damage as a re- sult.) If you do not know the strength of the wall and other aspects, consult a qualified service person (such as a qualified constructor).

The screws needed for attachment are not supplied. Use screws which are compatible with the strength and material of the pillar or wall.

When attaching the Center Unit, the screws must be secured tightly in all three locations. Attaching the Center Unit to the wall by making only one or two holes for the screws makes for an unstable attachment and causes a safety hazard as the Center Unit may fall down.

Location of attachment to a wall

Care is required in selecting a location for attaching the Center Unit to the wall. Injury to personnel, or damage to the Center Unit, may result if the Center Unit is attached in a location which interferes with daily activities or a location that the users are liable to knock their bodies or heads against.

Avoid a location above a bed, sofa, water tank, sink, etc. or in a passage.

Example of attachment (Center Unit)

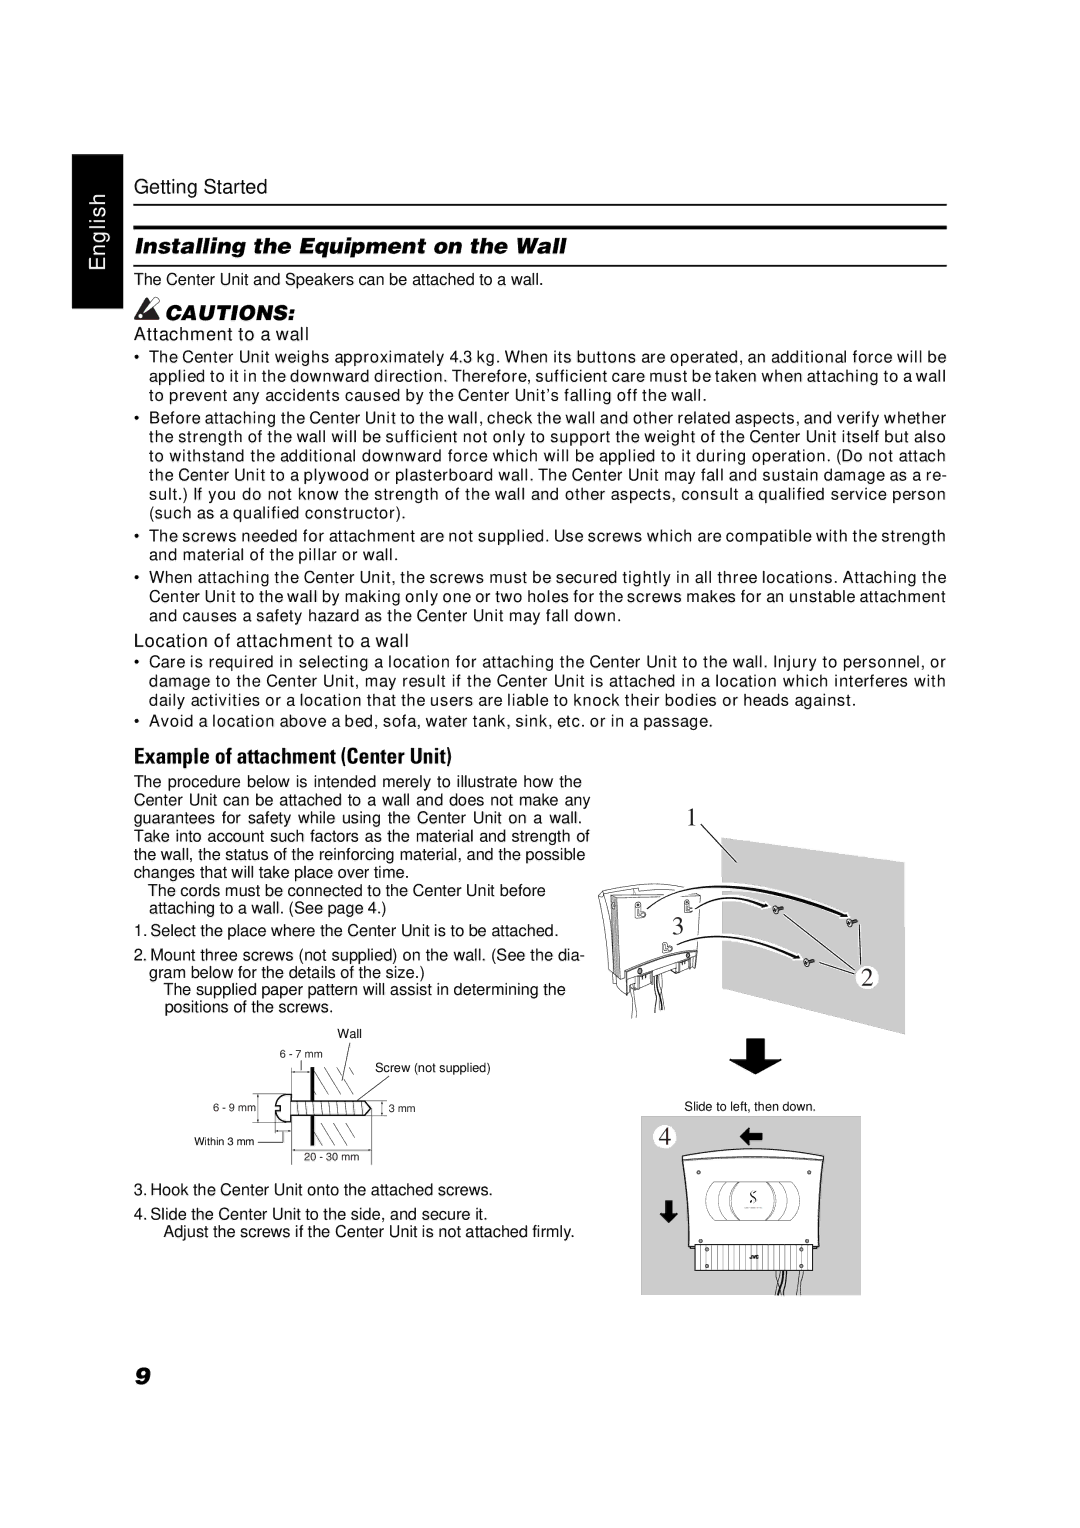
The procedure below is intended merely to illustrate how the Center Unit can be attached to a wall and does not make any guarantees for safety while using the Center Unit on a wall. Take into account such factors as the material and strength of the wall, the status of the reinforcing material, and the possible changes that will take place over time.

The cords must be connected to the Center Unit before attaching to a wall. (See page 4.)

1.Select the place where the Center Unit is to be attached.

2.Mount three screws (not supplied) on the wall. (See the dia- gram below for the details of the size.)

The supplied paper pattern will assist in determining the positions of the screws.

1

3

2

Wall

6 - 7 mm

6 - 9 mm

Within 3 mm

20 - 30 mm

Screw (not supplied)

3 mm

Slide to left, then down.

4

3.Hook the Center Unit onto the attached screws.

4.Slide the Center Unit to the side, and secure it.

• Adjust the screws if the Center Unit is not attached firmly.

9

Page 12
Image 12
JVC VS-DT68V, VS-DT88V manual Installing the Equipment on the Wall, Example of attachment Center Unit, Attachment to a wall

VS-DT88V, VS-DT68V specifications

The JVC VS-DT88V and VS-DT68V are two versatile video display models that cater to the needs of professionals in the broadcasting and production industry. Both models boast advanced features and cutting-edge technology, making them ideal for various applications including studio monitoring, post-production, and live event broadcasting.

The JVC VS-DT88V is equipped with an 88-inch diagonal display, while the VS-DT68V features a slightly smaller 68-inch screen. Both displays utilize LED backlighting for enhanced brightness and energy efficiency. The full HD resolution of 1920x1080 ensures that the images are sharp and vibrant, providing excellent detail and clarity essential for critical viewing tasks.

One of the standout features of both the VS-DT88V and VS-DT68V is their wide color gamut, which supports a broader range of colors and enhances overall image quality. This is particularly beneficial for color grading in post-production environments where accurate color reproduction is crucial. Additionally, the displays boast high contrast ratios, contributing to deeper blacks and brighter whites, which enhances the dynamic range of the visuals.

In terms of connectivity, both models come equipped with multiple input options including HDMI, SDI, and DisplayPort, allowing for seamless integration with various devices and equipment. This versatility ensures compatibility with different video formats and resolutions, providing flexibility for users who work with multiple sources.

Another key characteristic of these displays is their built-in calibration features. This function allows professionals to adjust the color settings and ensure that the display performance meets specific standards. The ability to calibrate accurately is vital in environments where precision is paramount, such as film editing and high-end broadcast applications.

Both models also prioritize user convenience, featuring intuitive on-screen menus that streamline navigation and adjustments. Furthermore, their sleek design makes them suitable for any studio environment, enhancing both aesthetics and functionality.

In conclusion, the JVC VS-DT88V and VS-DT68V are powerful video displays that combine impressive technology with practical features essential for professionals. With their large screens, high-resolution output, superior color accuracy, and robust connectivity options, these monitors stand out as compelling choices for anyone seeking reliable performance in demanding visual environments.