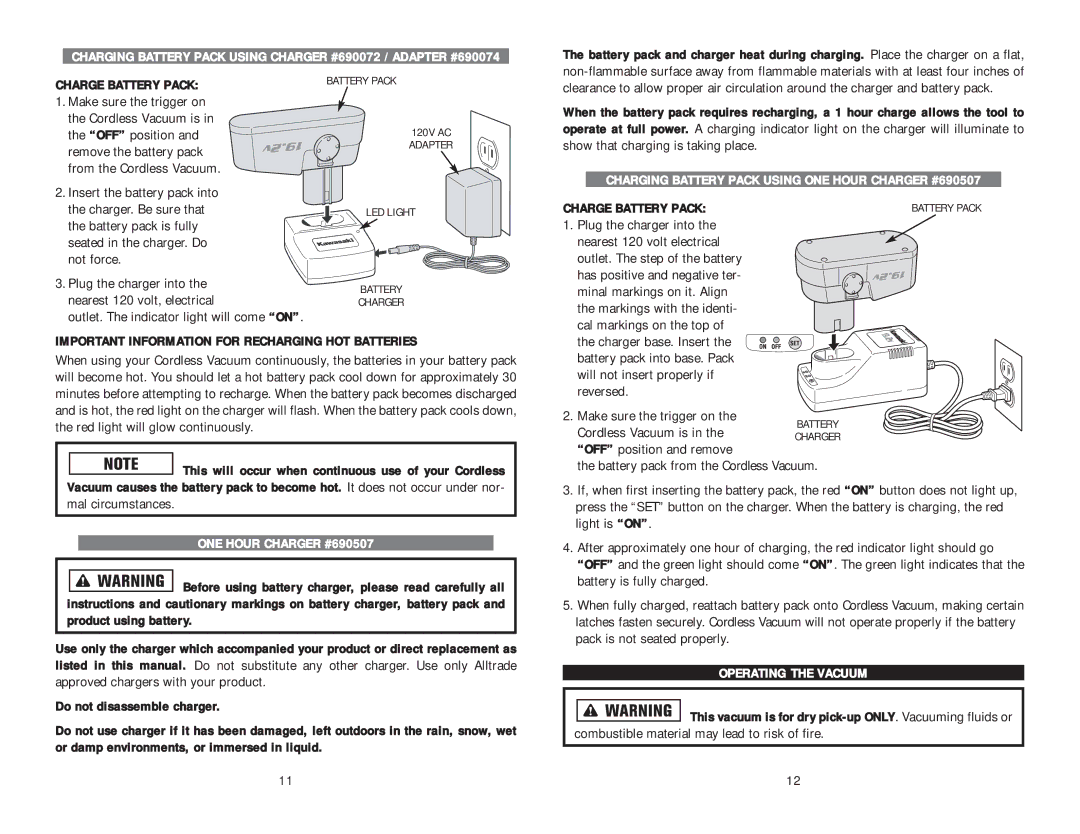
CHARGING BATTERY PACK USING CHARGER #690072 / ADAPTER #690074
The battery pack and charger heat during charging. Place the charger on a flat,
CHARGE BATTERY PACK:
1.Make sure the trigger on the Cordless Vacuum is in
the “OFF” position and remove the battery pack from the Cordless Vacuum.
2. Insert the battery pack into
the charger. Be sure that the battery pack is fully seated in the charger. Do not force.
3.Plug the charger into the nearest 120 volt, electrical
outlet. The indicator light will come “ON”.
BATTERY PACK
120V AC
ADAPTER
LED LIGHT
BATTERY
CHARGER
clearance to allow proper air circulation around the charger and battery pack.
When the battery pack requires recharging, a 1 hour charge allows the tool to operate at full power. A charging indicator light on the charger will illuminate to show that charging is taking place.
CHARGING BATTERY PACK USING ONE HOUR CHARGER #690507
CHARGE BATTERY PACK: | BATTERY PACK |
1. Plug the charger into the nearest 120 volt electrical outlet. The step of the battery has positive and negative ter- minal markings on it. Align the markings with the identi- cal markings on the top of
IMPORTANT INFORMATION FOR RECHARGING HOT BATTERIES
When using your Cordless Vacuum continuously, the batteries in your battery pack will become hot. You should let a hot battery pack cool down for approximately 30 minutes before attempting to recharge. When the battery pack becomes discharged and is hot, the red light on the charger will flash. When the battery pack cools down, the red light will glow continuously.
![]() This will occur when continuous use of your Cordless Vacuum causes the battery pack to become hot. It does not occur under nor-
This will occur when continuous use of your Cordless Vacuum causes the battery pack to become hot. It does not occur under nor-
mal circumstances.
ONE HOUR CHARGER #690507
![]()
![]()
![]()
![]()
![]()
![]()
![]() Before using battery charger, please read carefully all instructions and cautionary markings on battery charger, battery pack and product using battery.
Before using battery charger, please read carefully all instructions and cautionary markings on battery charger, battery pack and product using battery.
Use only the charger which accompanied your product or direct replacement as listed in this manual. Do not substitute any other charger. Use only Alltrade approved chargers with your product.
Do not disassemble charger.
Do not use charger if it has been damaged, left outdoors in the rain, snow, wet or damp environments, or immersed in liquid.
the charger base. Insert the battery pack into base. Pack will not insert properly if reversed.
2. Make sure the trigger on the Cordless Vacuum is in the “OFF” position and remove
the battery pack from the Cordless Vacuum.
3.If, when first inserting the battery pack, the red “ON” button does not light up, press the “SET” button on the charger. When the battery is charging, the red light is “ON”.
4.After approximately one hour of charging, the red indicator light should go “OFF” and the green light should come “ON”. The green light indicates that the battery is fully charged.
5.When fully charged, reattach battery pack onto Cordless Vacuum, making certain latches fasten securely. Cordless Vacuum will not operate properly if the battery pack is not seated properly.
OPERATING THE VACUUM
This vacuum is for dry
combustible material may lead to risk of fire.
11 | 12 |