Cleaning The Burner Tubes and Burner Ports

To reduce the chance of FLASHBACK the procedure below should be followed at least once a month in late

summer or early fall when spiders are most active or when your grill has not been used for a period of time.

1.Turn all Burner Valves to the full OFF position.

2.Turn the LP gas tank valve to the full OFF position.

3.Detach the LP gas regulator assembly from your gas grill.

4.Remove the Cooking Grids, Flame tamers, and Grease Trays from your grill.

5.Remove the Cotter Pin from the rear underside of each Burner using a pair of long nose pliers.

Regardtessof which Burner cteaning procedure you use, we recommend you also complete the following steps to help prolong Burner life.

1.Use a fiber pad or nylon brush to clean the entire outer surface of each Burner until free of food residue and dirt.

2.Clean any clogged Ports with a stiff wire, such as an open paper clip.

. Inspect each Burner for damage (cracks or holes) and if such damage is found, order and install a new Burner. After installation, check to ensure

that the Gas Valve Orifices are correctly placed inside the ends of the Burner Tubes. Also check

the position of your Spark Electrode.

6.Carefully lift each Burner up and away from the Gas ValveOrifice.

7.Check and clean burner/venturi tubes for insects and insect nests. A clogged tube can lead to a fire beneath the grill.

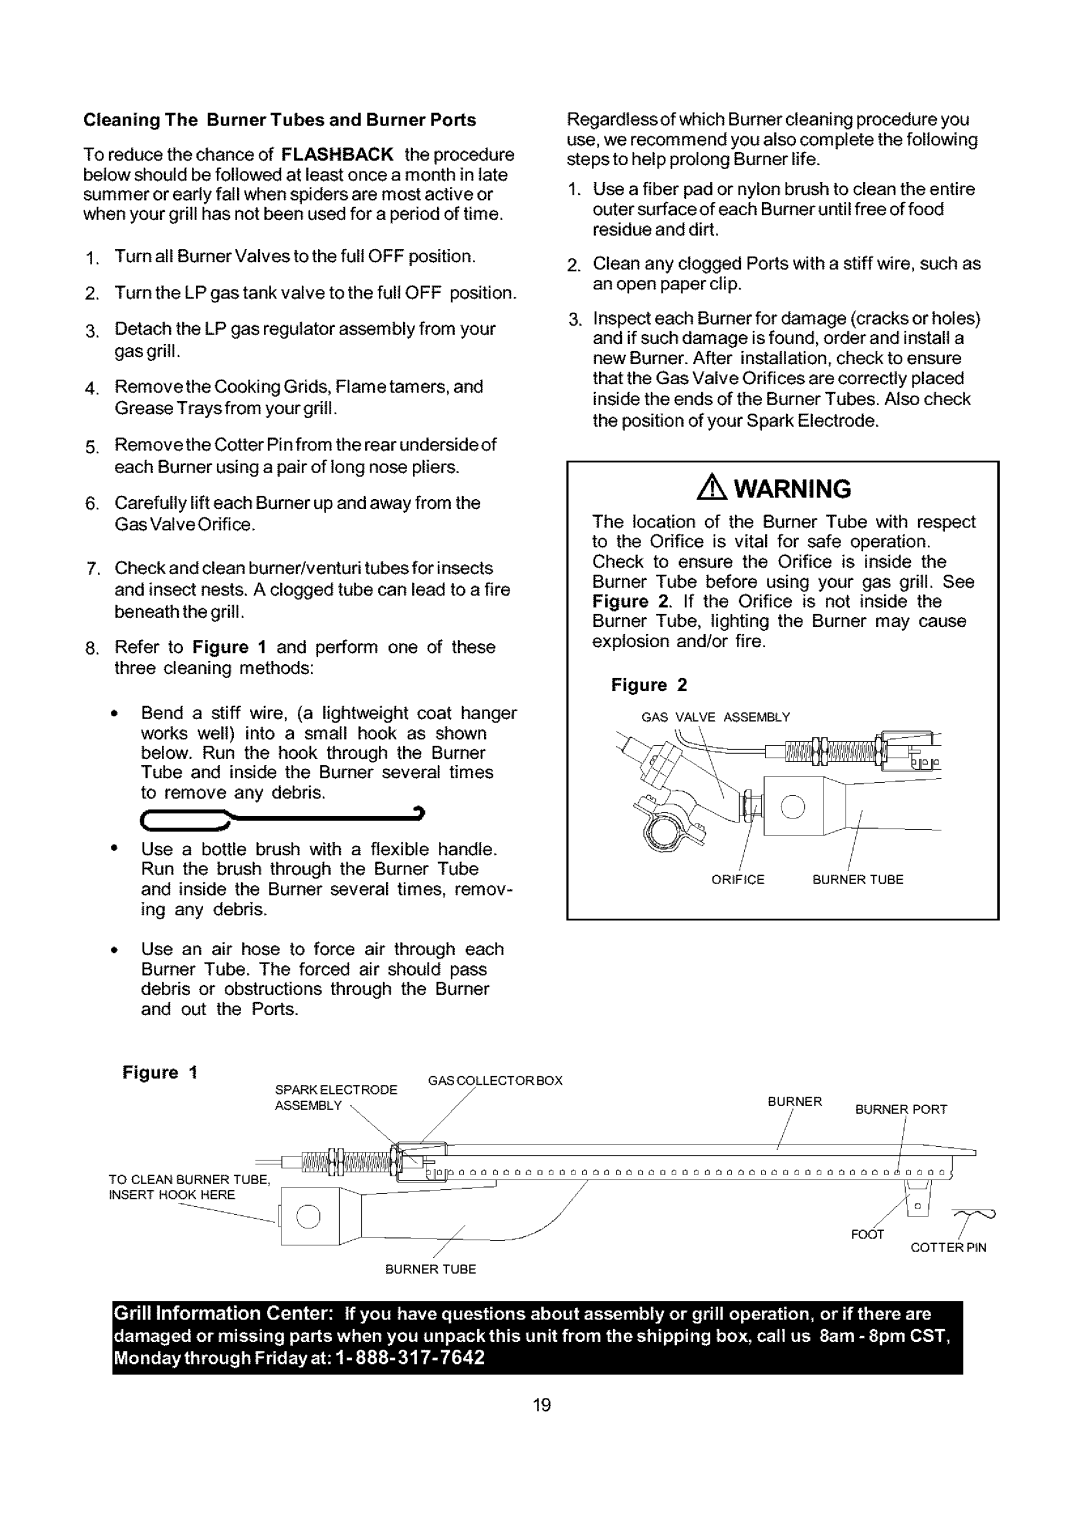
8.Refer to Figure 1 and perform one of these three cleaning methods:

Bend a stiff wire, (a lightweight coat hanger works well) into a small hook as shown below. Run the hook through the Burner Tube and inside the Burner several times to remove any debris.

,)

Use a bottle brush with a flexible handle. Run the brush through the Burner Tube and inside the Burner several times, remov- ing any debris.

Use an air hose to force air through each Burner Tube. The forced air should pass

debris or obstructions through the Burner and out the Ports.

WARNING

The location of the Burner Tube with respect

to the Orifice is vital for safe operation. Check to ensure the Orifice is inside the

Burner Tube before using your gas grill. See Figure 2. If the Orifice is not inside the Burner Tube, lighting the Burner may cause explosion and/or fire.

Figure 2

GAS VALVE ASSEMBLY

/


ORiFiCE

BURNER TUBE

Figure 1

GASCOLLECTORBOX

SPARKELECTRODE

BURNER

ASSEMBLY

\\

BURNER PORT

\\\


\

ooooooooooooooooo_ooooooooo_oooooooooo_oo

TO CLEAN BURNER TUBE,

,NSBRTNOFOOT

COTTER PIN

BURNER TUBE

19

Page 19
Image 19
Kenmore 141.16691, 141.17691 owner manual Cleaning The Burner Tubes and Burner Ports, Gascollectorbox

141.17691, 141.16691 specifications

The Kenmore 141.16691 and 141.17691 are notable creations in the realm of home appliances, particularly recognized for their advanced dishwashing capabilities. Kenmore has long been synonymous with quality and reliability, and these two models exemplify the brand's commitment to innovative technology and efficient performance.

One of the standout features of both the 141.16691 and 141.17691 is their impressive capacity. Designed to accommodate large loads, these dishwashers can effortlessly handle the needs of a busy household. The spacious interior allows for the placement of many dishes, pots, and utensils, making post-meal clean-up a breeze.

Energy efficiency is a cornerstone of modern appliance design, and both models excel in this area. They are built to exceed Energy Star standards, which means they use significantly less water and electricity compared to older or less efficient models. This not only translates to lower utility bills but also makes them environmentally friendly options for consumers concerned about their ecological footprint.

The smart wash technology integrated into these dishwashers adds a layer of sophistication. This feature intelligently assesses the level of soil on dishes and adjusts the wash cycle accordingly. This ensures optimal cleaning performance while conserving water and energy, showcasing a blend of efficiency with effectiveness.

Moreover, the silent operation of both models is a significant advantage. With noise-reduction technology, users can enjoy a quieter home environment without the disruptive sounds typical of traditional dishwashers. This is particularly advantageous for open-concept living spaces where kitchen noises can easily permeate other areas of the home.

Ease of use is also highlighted in the design of the Kenmore 141.16691 and 141.17691. User-friendly controls and multiple wash cycle options allow for customization based on the specific needs of each load. The delay start feature is an added convenience, enabling users to set the machine to run at a more suitable time.

Overall, the Kenmore 141.16691 and 141.17691 dishwashers stand out for their capacity, energy efficiency, advanced cleaning technologies, quiet operation, and ease of use. These models not only make dishwashing simpler and more effective but also reflect Kenmore's dedication to providing high-quality kitchen appliances that enrich the daily lives of their users.