General Care & Cleaning (cont'd)

Cleaning the Contoured Well Areas, Burner Cap, Burner Head and Burner Drip Pans (some models)

The contoured well areas, burner cap, burner head and burner drip pans (some models) should be routinely cleaned. Keeping the burner ports clean will prevent improper ignition and an uneven flame. Refer to the following instructions:

Surface

Burner

VSur_naeC

Cap

Sudace

Burner

Head

To Clean the Recessed & Contoured Areas of the Cooktop - If a spill occurs on or in the recessed or contoured areas, blot up spill with an absorbent cloth. Rinse with a clean, damp cloth and wipe dry.

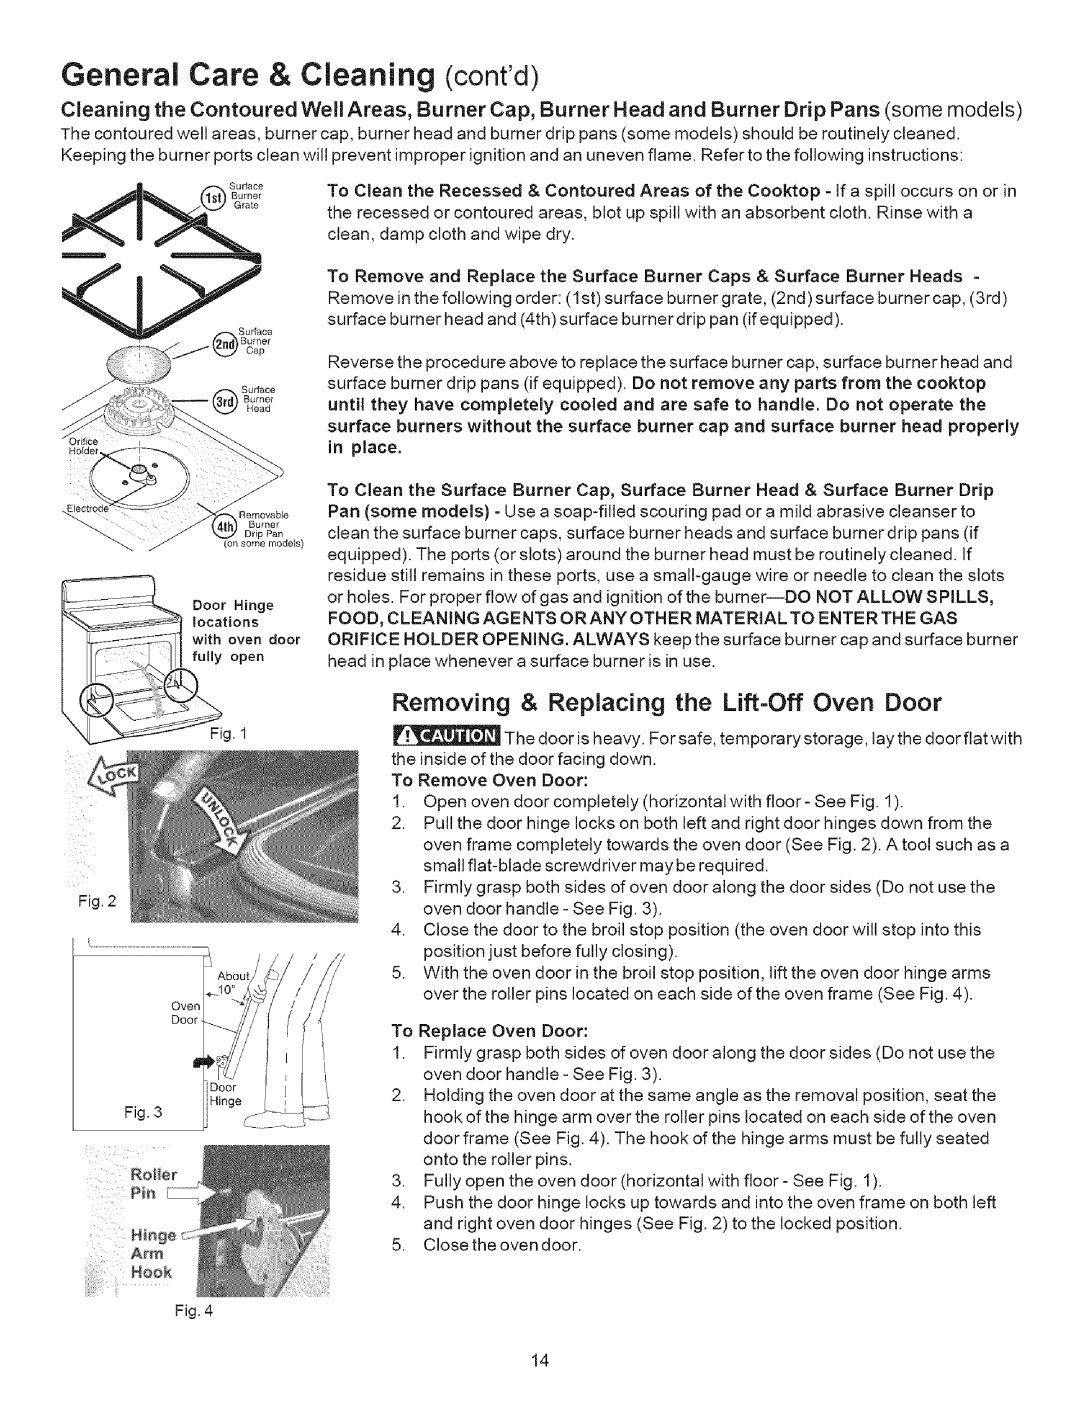
To Remove and Replace the Surface Burner Caps & Surface Burner Heads - Remove in the following order: (1st) surface burner grate, (2nd) surface burner cap, (3rd) surface burner head and (4th) surface burner drip pan (if equipped).

Reverse the procedure above to replace the surface burner cap, surface burner head and surface burner drip pans (if equipped). Do not remove any parts from the cooktop until they have completely cooled and are safe to handle. Do not operate the surface burners without the surface burner cap and surface burner head properly in place.

Removable

Burner

Pan

Door Hinge locations

with oven door

fully open

To Clean the Surface Burner Cap, Surface Burner Head & Surface Burner Drip Pan (some models) - Use a soap-filled scouring pad or a mild abrasive cleanser to clean the surface burner caps, surface burner heads and surface burner drip pans (if equipped). The ports (or slots) around the burner head must be routinely cleaned. If residue still remains in these ports, use a small-gauge wire or needle to clean the slots or holes. For proper flow of gas and ignition of the burner--DO NOT ALLOW SPILLS, FOOD, CLEANING AGENTS OR ANY OTHER MATERIAL TO ENTER THE GAS ORIFICE HOLDER OPENING, ALWAYS keep the surface burner cap and surface burner head in place whenever a surface burner is in use.

Fig. 1

Fig. 2

Oven

Door

Fig. 3

Removing & Replacing the Lift=Off Oven Door

The door is heavy. For safe, temporary storage, lay the door flat with the inside of the door facing down.

To Remove Oven Door:

1.Open oven door completely (horizontal with floor- See Fig. 1).

2.Pull the door hinge locks on both left and right door hinges down from the oven frame completely towards the oven door (See Fig. 2). A tool such as a small flat-blade screwdriver may be required.

3.Firmly grasp both sides of oven door along the door sides (Do not use the oven door handle - See Fig. 3).

4.Close the door to the broil stop position (the oven door will stop into this position just before fully closing).

5.With the oven door in the broil stop position, lift the oven door hinge arms over the roller pins located on each side of the oven frame (See Fig. 4).

To Replace Oven Door:

1.Firmly grasp both sides of oven door along the door sides (Do not use the oven door handle - See Fig. 3).

2.Holding the oven door at the same angle as the removal position, seat the hook of the hinge arm over the roller pins located on each side of the oven door frame (See Fig. 4). The hook of the hinge arms must be fully seated onto the roller pins.

3.Fully open the oven door (horizontal with floor- See Fig. 1).

4.Push the door hinge locks up towards and into the oven frame on both left and right oven door hinges (See Fig. 2) to the locked position.

5.CIose the oven door.

Fig. 4

14

Page 14
Image 14
Kenmore 7858*, 7852*, 7853*, 7862*, 7857*, 7863* General Care & Cleaning contd, Removing & Replacing the Lift=Off Oven Door

7861*, 7858*, 7859*, 7863*, 7857* specifications

Kenmore has long been recognized for its commitment to quality and performance in the world of home appliances. The Kenmore 7852, 7853, 7862, 7857, and 7863 models are no exception, offering a range of features and technologies that cater to the needs of modern households.

One of the standout features of these models is their advanced cooling and heating capabilities, ensuring that food remains fresh for longer durations. With varying capacities, these models are designed to meet the storage requirements of any family size. Their energy-efficient performance not only helps reduce utility bills but also contributes to a more sustainable household environment.

The Kenmore 7852 and 7853 models incorporate innovative temperature management systems, featuring multi-air flow technology which helps maintain consistent cooling throughout the refrigerator while minimizing temperature fluctuations. This ensures optimal preservation of perishable food items.

For those who value convenience, models like the Kenmore 7862 and 7857 offer smart technology integration. These refrigerators can connect to Wi-Fi, allowing users to monitor and control settings via a smartphone app. This can include adjustments to temperature settings, alerts for door openings, or reminders to check expiration dates on items.

Another key characteristic of these Kenmore models is their ergonomic design. The shelves are adjustable, allowing for customizable storage options to accommodate larger items. They often come equipped with specialized compartments for different types of food, such as humidity-controlled crispers for fruits and vegetables, and dedicated deli drawers for meats and cheeses, ensuring that every item is stored under ideal conditions.

From an aesthetic standpoint, the sleek finishes of these models, including stainless steel options, enhance the look of any kitchen. They are designed not only for efficiency but also to complement modern home decor.

In terms of durability, Kenmore appliances are built with high-quality materials and have undergone rigorous testing to ensure long-lasting performance. Their quiet operation is another plus, allowing families to enjoy a peaceful home environment without the distraction of noisy appliances.

In conclusion, the Kenmore 7852, 7853, 7862, 7857, and 7863 models embody a perfect blend of innovation, efficiency, and design. They have been engineered to enhance food preservation, provide convenience, and enrich the overall kitchen experience, making them a valuable investment for any home.