General Care & Cleaning (cont'd)

To Raise and Lower the Top for Cleaning

1.Remove burner grates and spillover bowls. Set aside.

2.Grasp the sides of the cooktop and then lift from the front.

3.Lift the top high enough to allow the support rods to snap into place. The Lift=up rods will support the top in its raised position.

4.Clean underneath using hot, soapy water and a clean cloth; then, dry.

5.To lower the range top, grasp the front corner of each side of the top while pushing back on each rod with the heel of your hand. This will release the notched support. Hold the range top and gently slide the range top down to the range.

When lowering the top, grasp the sides with fingertips only. Be careful not to pinch fingers. Also, DO NOT drop or bend the rangetop when raising or lowering. This could

Main Top

Removing and Replacing Burners for Cleaning

To Remove Burners

1.Remove shipping screws with a Phillips Head screwdriver. See illustration for screw locations.

2.Tilt the burner at the end closest to the support bar until the Iocator tab is released (front burners tilt right, rear burners tilt left). Move the burner toward the back of the range. This will separate it from the gas valve at the front of the range.

To Replace Burners

1.Slide the burner tube over the gas valve at the front of the range (front burners fit over the right valve, rear burners fit over the left valve on each side of the range).

2.Tilt burner so that the locating tab will slide into the slot on the support bar. Make sure burners are properly seated on support bar and are level.

3.Replace shipping screws if desired.

DO NOT turn the burners on when the cooktop is raised for cleaning. Be sure


that the top is completely lowered and securely in place before turning on the burners.

Support


Bar

i 0¢

or

use

a Nail

Removing & Replacing the Oven Door

The door is heavy. For safe, temporary storage, lay the door flat with the inside of the door facing down.

To Remove Oven Door:

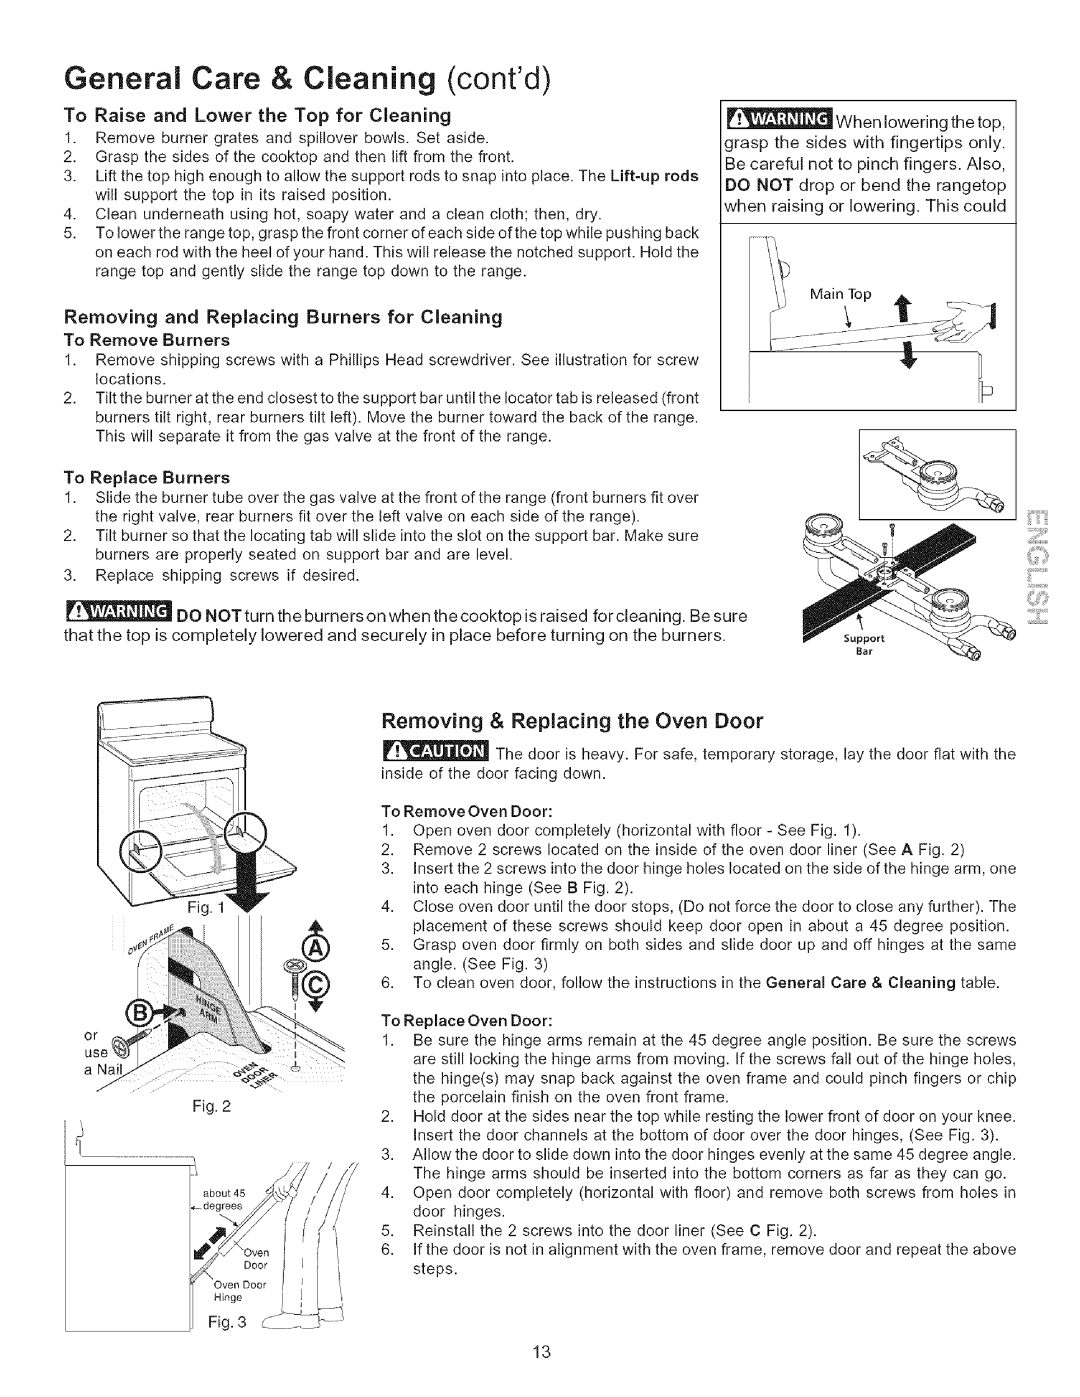
1.Open oven door completely (horizontal with floor - See Fig. 1).

2.Remove 2 screws located on the inside of the oven door liner (See A Fig. 2)

3.Insert the 2 screws into the door hinge holes located on the side of the hinge arm, one into each hinge (See B Fig. 2).

4.Close oven door until the door stops, (Do not force the door to close any further). The placement of these screws should keep door open in about a 45 degree position.

5.Grasp oven door firmly on both sides and slide door up and off hinges at the same angle. (See Fig. 3)

6.To clean oven door, follow the instructions in the General Care & Cleaning table.

To Replace Oven Door:

1. Be sure the hinge arms remain at the 45 degree angle position. Be sure the screws are still locking the hinge arms from moving. If the screws fall out of the hinge holes, the hinge(s) may snap back against the oven frame and could pinch fingers or chip

Fig. 2

the porcelain finish on the oven front frame.

2.Hold door at the sides near the top while resting the lower front of door on your knee. Insert the door channels at the bottom of door over the door hinges, (See Fig. 3).

3.Allow the door to slide down into the door hinges evenly at the same 45 degree angle. The hinge arms should be inserted into the bottom corners as far as they can go.

about 45

4.

Open

door completely

(horizontal

with floor) and

remove

both screws from holes in


door

hinges.


5.

Reinstall

the 2 screws

into the door liner (See C Fig. 2).


6.

If the door

is not in alignment with

the oven frame,

remove

door and repeat the above


steps.


Oven Door

Hinge

Fig. 3

13

Page 13
Image 13
Kenmore 790.7115, 790.7116 manual Removing & Replacing the Oven Door, To Raise and Lower the Top for Cleaning

790.7115, 790.7116 specifications

The Kenmore 790.7116 and 790.7115 are two versatile and dependable models from the renowned Kenmore brand, known for their quality appliances. These models stand out in the realm of stoves and ranges, providing users with advanced features designed to enhance cooking experiences.

One of the notable aspects of the 790.7116 and 790.7115 is their powerful cooking performance. Both models are equipped with a variety of burners, including high-output burners that can quickly bring pots of water to a boil or sear meats to perfection. The consistent heat distribution across the cooking surface ensures that meals are cooked evenly, reducing the chances of hot spots that can lead to undercooked or overcooked food.

The design of these models is not only functional but also aesthetically pleasing. With a sleek stainless-steel finish, they can seamlessly fit into both modern and traditional kitchens. The intuitive control panel makes it easy for users to select their desired settings, whether they are adjusting cooking temperatures or setting timers.

An important technology feature is the convection oven system. This feature circulates hot air throughout the oven cavity, promoting uniform cooking results and reducing cooking times. The ovens in these models also come with multiple cooking modes, such as bake, broil, and roast, enabling users to prepare a wide range of dishes with ease.

Another significant characteristic is the presence of self-cleaning functions. This feature saves time and effort in maintaining the oven's cleanliness, allowing users to focus more on cooking rather than cleaning. The self-clean cycle utilizes high temperatures to burn off food residue, leaving the oven ready for the next cooking adventure.

Safety is also a priority in the design of the 790.7116 and 790.7115. These models are equipped with child safety locks and automatic shut-off features, providing peace of mind for families with young children.

Overall, the Kenmore 790.7116 and 790.7115 models epitomize a blend of efficiency, style, and user-friendly features, making them excellent choices for avid home cooks. These ranges continue to earn high marks for their reliable performance and modern conveniences that elevate everyday cooking tasks.