General Care & Cleaning (cont'd)

Cleaning the Contoured WellAreas, Burner Cap, Burner Head and Burner Drip Pans (some models)

The contoured well areas, burner cap, burner head and burner drip pans (some models) should be routinely cleaned. Keeping the burner ports clean will prevent improper ignition and an uneven flame. Refer to the following instructions:

Surface Burner

To Clean the Recessed & Contoured Areas of the Cooktop - If a spill occurs on or in the recessed or contoured areas, blot up spill with an absorbent cloth. Rinse with a clean, damp cloth and wipe dry.

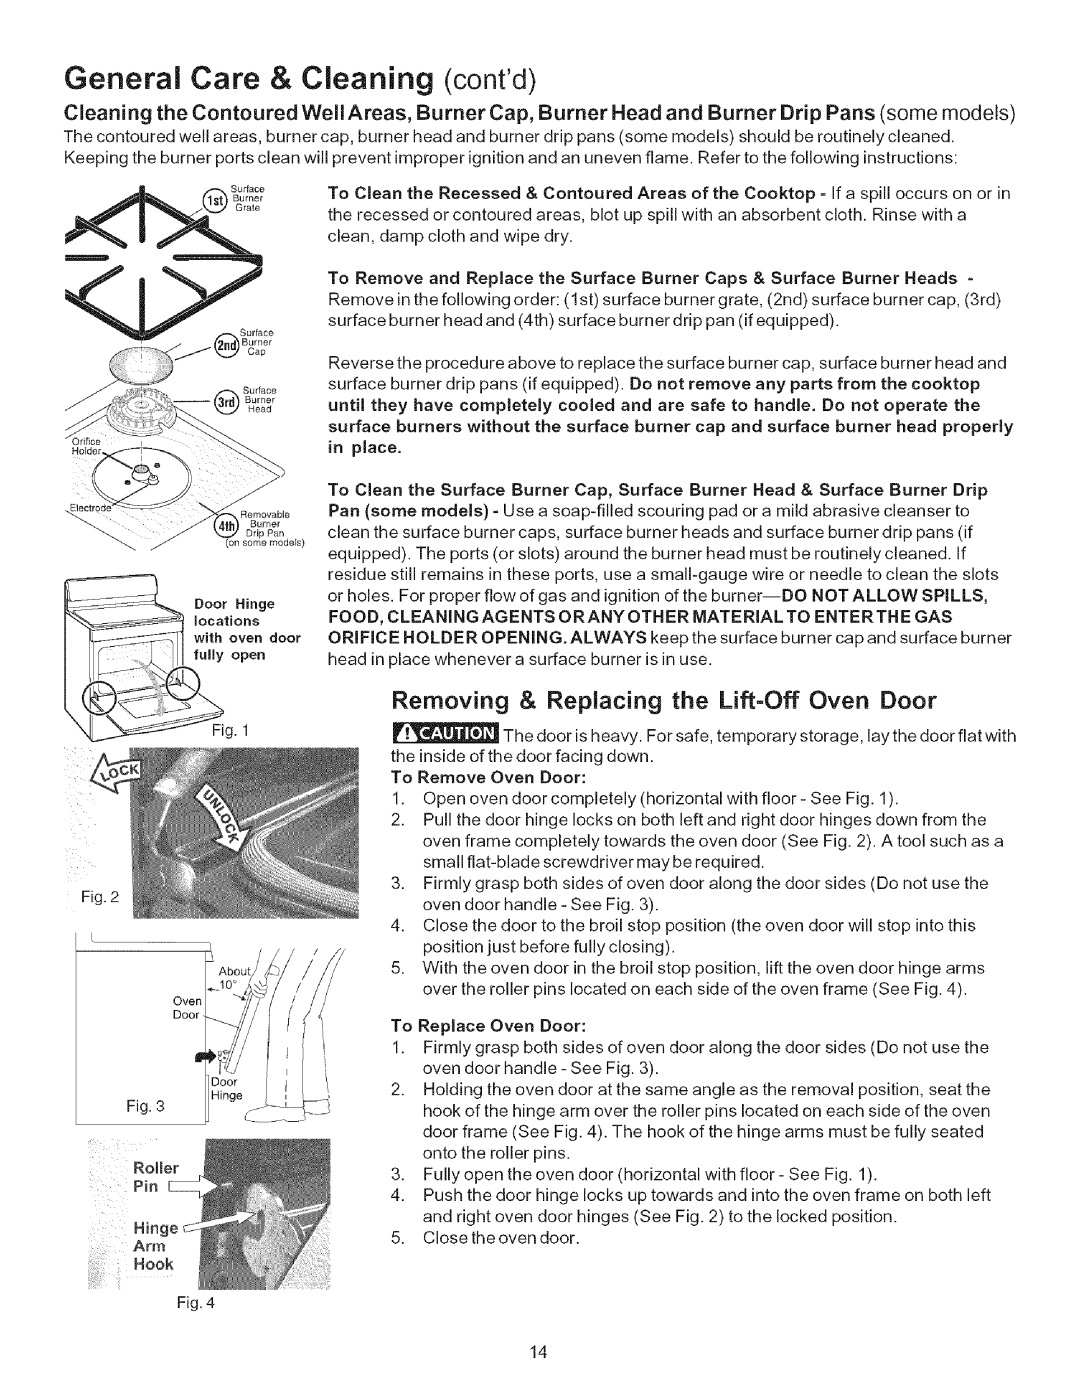
To Remove and Replace the Surface Burner Caps & Surface Burner Heads - Remove in the following order: (1st) surface burner grate, (2nd) surface burner cap, (3rd) surface burner head and (4th) surface burner drip pan (if equipped).

Cap

Surface

Burner

Head

Holder

Removable

Burner

3 Pan

Door Hinge

locations

with oven door

fully open

Reverse the procedure above to replace the surface burner cap, surface burner head and surface burner drip pans (if equipped). Do not remove any parts from the cooktop until they have completely cooled and are safe to handle. Do not operate the surface burners without the surface burner cap and surface burner head properly

in place.

To Clean the Surface Burner Cap, Surface Burner Head & Surface Burner Drip Pan (some models) - Use a soap-filled scouring pad or a mild abrasive cleanser to clean the surface burner caps, surface burner heads and surface burner drip pans (if equipped). The ports (or slots) around the burner head must be routinely cleaned. If residue still remains in these ports, use a small-gauge wire or needle to clean the slots or holes. For proper flow of gas and ignition of the burner--DO NOT ALLOW SPILLS, FOOD, CLEANING AGENTS ORANY OTHER MATERIAL TO ENTERTHE GAS ORIFICE HOLDER OPENING. ALWAYS keep the surface burner cap and surface burner head in place whenever a surface burner is in use.

g. 1

Oven

Door

Fig. 3

Removing & Replacing the Lift-OffOven Door

The door is heavy. For safe, temporary storage, lay the door flat with the inside of the door facing down.

To Remove Oven Door:

1.Open oven door completely (horizontal with floor- See Fig. 1).

2.Pull the door hinge locks on both left and right door hinges down from the oven frame completely towards the oven door (See Fig. 2). A tool such as a small flat-blade screwdriver may be required.

3.Firmly grasp both sides of oven door along the door sides (Do not use the oven door handle - See Fig. 3).

4.Close the door to the broil stop position (the oven door will stop into this position just before fully closing).

5.With the oven door in the broil stop position, lift the oven door hinge arms over the roller pins located on each side of the oven frame (See Fig. 4).

To Replace Oven Door:

1.Firmly grasp both sides of oven door along the door sides (Do not use the oven door handle - See Fig. 3).

2.Holding the oven door at the same angle as the removal position, seat the hook of the hinge arm over the roller pins located on each side of the oven door frame (See Fig. 4). The hook of the hinge arms must be fully seated onto the roller pins.

3.Fully open the oven door (horizontal with floor - See Fig. 1).

4.Push the door hinge locks up towards and into the oven frame on both left and right oven door hinges (See Fig. 2) to the locked position.

5.Close the oven door.

14

Page 14
Image 14
Kenmore 790.7156 manual General Care & Cleaning contd

790.7156 specifications

The Kenmore 790.7156 is a standout model in the realm of kitchen appliances, specifically designed to enhance the cooking experience for both novice chefs and seasoned culinary experts. This sleek and versatile gas range is a perfect blend of functionality and modern technology, making it an essential addition to any kitchen.

One of the most notable features of the Kenmore 790.7156 is its powerful five-burner cooktop. This cooktop configuration includes burners of varying sizes, allowing users to accommodate a wide range of cookware and recipes. The high-powered burner is ideal for boiling water quickly or searing meats, while the lower simmer burners are perfect for delicate sauces and maintaining low heat for long cooking times.

The oven includes a spacious capacity, allowing for larger meals to be prepared simultaneously. With a convection cooking system, this oven ensures even heat distribution, resulting in perfectly baked goods and roasted dishes. The convection feature reduces cooking time, which is especially beneficial for busy home cooks. Additionally, the oven is equipped with self-cleaning capabilities, providing an easy and efficient way to maintain cleanliness and hygiene.

A standout characteristic of the Kenmore 790.7156 is its advanced control panel, which features intuitive knobs and an electronic display. This user-friendly interface allows for precise temperature adjustments and program settings. Whether broiling, baking, or using the oven’s delay-start feature, the controls are designed for simplicity and reliability.

This model also incorporates safety features, such as a flame-out sensor that automatically shuts off the gas supply if the flame goes out. This ensures peace of mind for users while cooking. Additionally, the oven door is built with triple-layer glass, keeping the exterior cool to the touch while preventing heat loss during cooking.

The design of the Kenmore 790.7156 aligns with modern aesthetics, featuring a stainless steel finish that is both stylish and easy to clean. The interior is designed with a seamless surface, minimizing food buildup and making maintenance hassle-free.

Overall, the Kenmore 790.7156 gas range is an ideal choice for those seeking a reliable and efficient cooking appliance. With its range of features, advanced technologies, and safety characteristics, this model is built to make cooking enjoyable and effortless.