Set-Up
Features Special Edition/Signature — Model B60 Brewer
Helpful Hints
1.Plug Brewer into its own grounded outlet.
If the electric circuit is overloaded with other appliances, your Brewer may not function properly. The Brewer should be operated on its own circuit, separate from other appliances.
2.Keep your Brewer turned “ON.”
To brew a fresh cup of coffee, tea or hot cocoa anytime you want, keep your Brewer turned “ON” all the time. However, the Brewer is fully programmable so you can set it to turn on and off automatically to match your schedule.
Or, if you prefer, set the Brewer to automatically turn off after a period of time. Follow the simple instructions on pages
4.Customize the size, flavor & brew that’s perfect for you.
With the choice of over 200 varieties of
5. Remove |
Please see page 7 for brewing instructions. |
2. | Remove enclosed literature. |
3. | Turn the box on its side with front of box |
| face down. |
4. | Reach into the box and grasp the plastic bag |
| that contains the Brewer. |
5. | Carefully pull the plastic bag (and packaging |
| materials) toward you and out of the box. The |
| Brewer will still be encased in the polyfoam |
| and be on its side. |
6. | Remove the top polyfoam packaging material. |
7. | Carefully lift Brewer off of the bottom polyfoam |
| and place it upright on a flat, steady surface. |
8. | Lift plastic bag off of Brewer. |
9. | Record the serial number for this Brewer on |
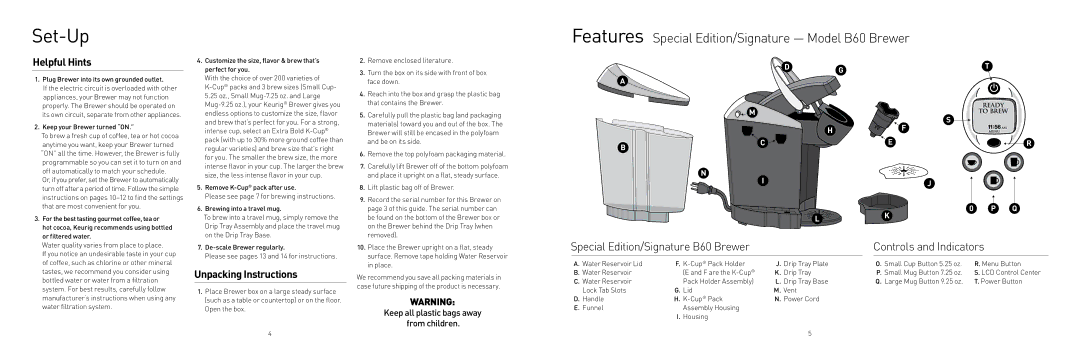
| D | G |
|
| |
A |
|
|
| M |
|
|
| H |
B | C |
|
|
| |
| N |
|
| I |
|
| T |
| READY |
| TO BREW |
F | S |
11:56 AM | |
| MENU |
E | R |
J
that are most convenient for you.
3. For the best tasting gourmet coffee, tea or |
hot cocoa, Keurig recommends using bottled |
or filtered water. |
6. Brewing into a travel mug. |
To brew into a travel mug, simply remove the Drip Tray Assembly and place the travel mug on the Drip Tray Base.
page 3 of this guide. The serial number can |
be found on the bottom of the Brewer box or |
on the Brewer behind the Drip Tray (when |
removed). |
L |
K
0 P Q
Water quality varies from place to place. |
If you notice an undesirable taste in your cup |
of coffee, such as chlorine or other mineral |
tastes, we recommend you consider using |
bottled water or water from a filtration |
system. For best results, carefully follow |
manufacturer’s instructions when using any |
water filtration system. |
7.
Please see pages 13 and 14 for instructions.
Unpacking Instructions
1.Place Brewer box on a large steady surface (such as a table or countertop) or on the floor. Open the box.
4
10. Place the Brewer upright on a flat, steady |
surface. Remove tape holding Water Reservoir |
in place. |
We recommend you save all packing materials in case future shipping of the product is necessary.
WARNING:
Keep all plastic bags away from children.
Special Edition/Signature B60 Brewer |
| Controls and Indicators | ||||
|
|
|
|
|
|
|
| A. Water Reservoir Lid | F. | J. Drip Tray Plate |
| O. Small Cup Button 5.25 oz. | R. Menu Button |
| B. Water Reservoir | (E and F are the | K. Drip Tray |
| P. Small Mug Button 7.25 oz. | S. LCD Control Center |
| C. Water Reservoir | Pack Holder Assembly) | L. Drip Tray Base |
| Q. Large Mug Button 9.25 oz. | T. Power Button |
| Lock Tab Slots | G. Lid | M. Vent |
|
|
|
| D. Handle | H. | N. Power Cord |
|
|
|
| E. Funnel | Assembly Housing |
|
|
|
|
|
| I. Housing |
|
|
|
|
|
|
| 5 |
|
|
|