5.If you have finished all the WIRING, BATTERY INSTALLATION AND TRIM RING MOUNTING STEPS, you can install the alarm on the trim ring. Note: The alarm will mount to the trim ring in 4 positions (every 90 degrees).
6.Install the alarm on the trim ring and rotate the alarm in the direction of the “ON” arrow on the cover until the alarm rachets into place (this ratcheting function allows for aesthetic alignment).
7.Turn on the A.C. power. The green A.C. Power On Indicator should be lit when the alarm is operating from A.C. power.
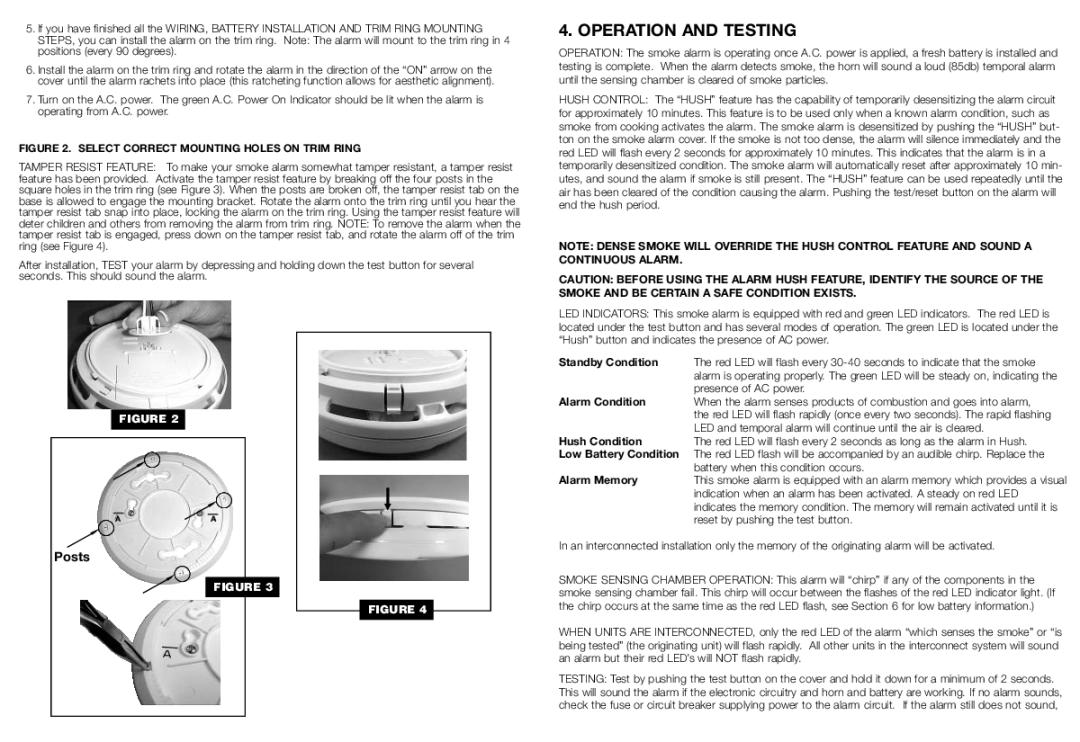
FIGURE 2. SELECT CORRECT MOUNTING HOLES ON TRIM RING
TAMPER RESIST FEATURE: To make your smoke alarm somewhat tamper resistant, a tamper resist feature has been provided. Activate the tamper resist feature by breaking off the four posts in the square holes in the trim ring (see Figure 3). When the posts are broken off, the tamper resist tab on the base is allowed to engage the mounting bracket. Rotate the alarm onto the trim ring until you hear the tamper resist tab snap into place, locking the alarm on the trim ring. Using the tamper resist feature will deter children and others from removing the alarm from trim ring. NOTE: To remove the alarm when the tamper resist tab is engaged, press down on the tamper resist tab, and rotate the alarm off of the trim ring (see Figure 4).
After installation, TEST your alarm by depressing and holding down the test button for several seconds. This should sound the alarm.
FIGURE 2
AA
Posts
FIGURE 3
FIGURE 4
4. OPERATION AND TESTING
OPERATION: The smoke alarm is operating once A.C. power is applied, a fresh battery is installed and testing is complete. When the alarm detects smoke, the horn will sound a loud (85db) temporal alarm until the sensing chamber is cleared of smoke particles.
HUSH CONTROL: The “HUSH” feature has the capability of temporarily desensitizing the alarm circuit for approximately 10 minutes. This feature is to be used only when a known alarm condition, such as smoke from cooking activates the alarm. The smoke alarm is desensitized by pushing the “HUSH” but- ton on the smoke alarm cover. If the smoke is not too dense, the alarm will silence immediately and the red LED will flash every 2 seconds for approximately 10 minutes. This indicates that the alarm is in a temporarily desensitized condition. The smoke alarm will automatically reset after approximately 10 min- utes, and sound the alarm if smoke is still present. The “HUSH” feature can be used repeatedly until the air has been cleared of the condition causing the alarm. Pushing the test/reset button on the alarm will end the hush period.
NOTE: DENSE SMOKE WILL OVERRIDE THE HUSH CONTROL FEATURE AND SOUND A CONTINUOUS ALARM.
CAUTION: BEFORE USING THE ALARM HUSH FEATURE, IDENTIFY THE SOURCE OF THE SMOKE AND BE CERTAIN A SAFE CONDITION EXISTS.
LED INDICATORS: This smoke alarm is equipped with red and green LED indicators. The red LED is located under the test button and has several modes of operation. The green LED is located under the “Hush” button and indicates the presence of AC power.
Standby Condition | The red LED will flash every |
| alarm is operating properly. The green LED will be steady on, indicating the |
| presence of AC power. |
Alarm Condition | When the alarm senses products of combustion and goes into alarm, |
| the red LED will flash rapidly (once every two seconds). The rapid flashing |
| LED and temporal alarm will continue until the air is cleared. |
Hush Condition | The red LED will flash every 2 seconds as long as the alarm in Hush. |
Low Battery Condition | The red LED flash will be accompanied by an audible chirp. Replace the |
| battery when this condition occurs. |
Alarm Memory | This smoke alarm is equipped with an alarm memory which provides a visual |
| indication when an alarm has been activated. A steady on red LED |
| indicates the memory condition. The memory will remain activated until it is |
| reset by pushing the test button. |
In an interconnected installation only the memory of the originating alarm will be activated.
SMOKE SENSING CHAMBER OPERATION: This alarm will “chirp” if any of the components in the smoke sensing chamber fail. This chirp will occur between the flashes of the red LED indicator light. (If the chirp occurs at the same time as the red LED flash, see Section 6 for low battery information.)
WHEN UNITS ARE INTERCONNECTED, only the red LED of the alarm “which senses the smoke” or “is being tested” (the originating unit) will flash rapidly. All other units in the interconnect system will sound an alarm but their red LED’s will NOT flash rapidly.
TESTING: Test by pushing the test button on the cover and hold it down for a minimum of 2 seconds. This will sound the alarm if the electronic circuitry and horn and battery are working. If no alarm sounds, check the fuse or circuit breaker supplying power to the alarm circuit. If the alarm still does not sound,