Electrical Requirements

WARNING

Electrical Shock Hazard

Plug into a grounded 3 prong outlet.

Do not remove ground prong.

Do not use an adapter.

Do not use an extension cord.

Failure to follow these instructions can result in death, fire, or electrical shock.

Before you move your refrigerator into its final location, it is important to make sure you have the proper electrical connection.

Recommended Grounding Method

A 115 Volt, 60 Hz., AC only 15- or 20-amp fused, grounded electrical supply is required. It is recommended that a separate circuit serving only your refrigerator be provided. Use an outlet that cannot be turned off by a switch. Do not use an extension cord.

NOTE: Before performing any type of installation, cleaning, or removing a light bulb, turn the control (Thermostat, Refrigerator or Freezer Control depending on the model) to OFF and then disconnect the refrigerator from the electrical source. When you are finished, reconnect the refrigerator to the electrical source and reset the control (Thermostat, Refrigerator or Freezer Control depending on the model) to the desired setting.

Water Supply Requirements

Gather the required tools and parts before starting installation. Read and follow the instructions provided with any tools listed here.

IMPORTANT:

If you turn the refrigerator on before the water line is connected, turn the ice maker OFF.

All installations must meet local plumbing code requirements.

Use copper tubing and check for leaks. Install copper tubing only in areas where the household temperatures will remain above freezing.

TOOLS NEEDED: Flat-blade screwdriver, ⁷⁄₁₆" and ¹⁄₂" open-end wrenches or two adjustable wrenches, ¹⁄₄" nut driver and drill bit, hand drill or electric drill (properly grounded).

NOTE: Your refrigerator dealer has a kit available with a ¹⁄₄"

(6.35 mm) saddle-type shutoff valve, a union, and copper tubing. Before purchasing, make sure a saddle-type valve complies with your local plumbing codes. Do not use a piercing-type or ³⁄₁₆"

(4.76 mm) saddle valve which reduces water flow and clogs more easily.

Water Pressure

A cold water supply with water pressure of between 30 and

120 psi (207 - 827 kPa) is required to operate the water dispenser and ice maker. If you have questions about your water pressure, call a licensed, qualified plumber.

Reverse Osmosis Water Supply

IMPORTANT: The pressure of the water supply coming out of a reverse osmosis system going to the water inlet valve of the refrigerator needs to be between 30 and 120 psi (207 - 827 kPa).

If a reverse osmosis water filtration system is connected to your cold water supply, the water pressure to the reverse osmosis system needs to be a minimum of 40 to 60 psi (276 - 414 kPa).

If the water pressure to the reverse osmosis system is less than

40 to 60 psi (276 - 414 kPa):

Check to see whether the sediment filter in the reverse osmosis system is blocked. Replace the filter if necessary.

Allow the storage tank on the reverse osmosis system to refill after heavy usage.

If your refrigerator has a water filter cartridge, it may further reduce the water pressure when used in conjunction with a reverse osmosis system. Remove the water filter cartridge. See “Water Filtration System.”

If you have questions about your water pressure, call a licensed, qualified plumber.

Connect the Water Supply

Read all directions before you begin.

IMPORTANT: If you turn the refrigerator on before the water line is connected, turn the ice maker OFF.

Connect to Water Line

1.Unplug refrigerator or disconnect power.

2.Turn OFF main water supply. Turn ON nearest faucet long enough to clear line of water.

3.Locate a ½" to 1¹⁄₄" (1.25 cm to 3.18 cm) vertical cold water pipe near the refrigerator.

IMPORTANT:

Make sure it is a cold water pipe.

Horizontal pipe will work, but drill on the top side of the pipe, not the bottom. This will help keep water away from the drill and normal sediment from collecting in the valve.

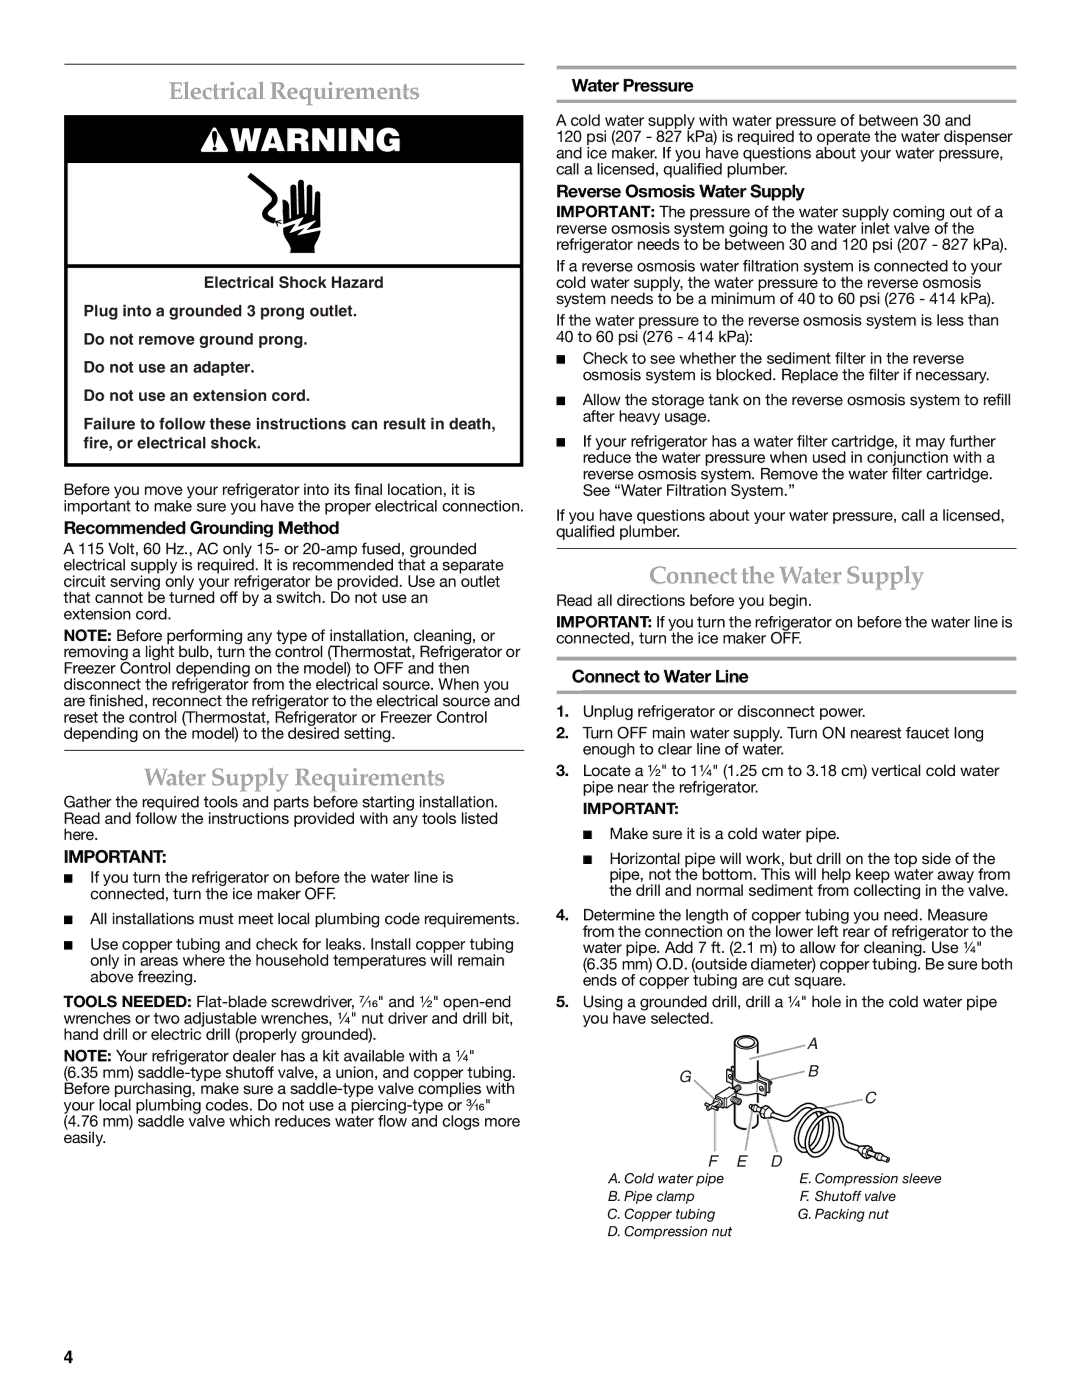
4.Determine the length of copper tubing you need. Measure from the connection on the lower left rear of refrigerator to the water pipe. Add 7 ft. (2.1 m) to allow for cleaning. Use ¹⁄₄" (6.35 mm) O.D. (outside diameter) copper tubing. Be sure both ends of copper tubing are cut square.

5.Using a grounded drill, drill a ¹⁄₄" hole in the cold water pipe you have selected.


A

G

B


C

F E

D

A. Cold water pipe

E. Compression sleeve

B. Pipe clamp

F. Shutoff valve

C. Copper tubing

G. Packing nut

D. Compression nut


4

Page 4
Image 4
KitchenAid 2314464 warranty Electrical Requirements, Water Supply Requirements, Connect the Water Supply

2314464 specifications

The KitchenAid 2314464 is an innovative and versatile kitchen appliance designed to elevate your cooking and baking experience. This product stands out for its robust construction, intuitive design, and a range of features that streamline food preparation.

One of the main features of the KitchenAid 2314464 is its powerful motor, which provides ample strength for mixing, kneading, and whipping. This allows users to tackle a variety of recipes, from dense bread dough to fluffy meringues, with ease and efficiency. The motor is designed to operate quietly, ensuring a pleasant kitchen environment during use.

The appliance comes equipped with a 5-quart stainless steel bowl, offering generous capacity for large batches. The bowl features a handle for easy pouring and transferring of mixtures, making it a practical choice for bakers who frequently work in larger quantities. Additionally, the bowl is dishwasher-safe, simplifying cleanup after culinary creations.

KitchenAid has incorporated a unique planetary mixing action in the 2314464, which means the beater moves in one direction while the bowl rotates in the opposite direction. This design ensures thorough mixing and eliminates the need for manual scraping of the bowl sides, making it a time-saving feature for busy cooks.

Versatility is another hallmark of the KitchenAid 2314464. It is compatible with a wide range of attachments and accessories, allowing users to explore various cooking techniques. From pasta makers to food grinders, the possibilities are endless, transforming the mixer into a multi-functional kitchen hub.

For safety, the appliance includes a tilt-head design, allowing for easy access to the bowl and beaters. This feature also enhances stability during operation, as users can lock the head in place for secure mixing. The base of the unit features suction cups that prevent slipping, further enhancing safety during use.

In terms of aesthetics, the KitchenAid 2314464 is available in multiple color options, allowing it to fit seamlessly into any kitchen decor. Its classic design not only adds a touch of elegance but also reflects the brand's commitment to quality and craftsmanship.

Overall, the KitchenAid 2314464 is a must-have for any serious home cook or baking enthusiast. With its reliable performance, impressive versatility, and user-friendly features, it is designed to inspire creativity and simplify the joys of cooking and baking.