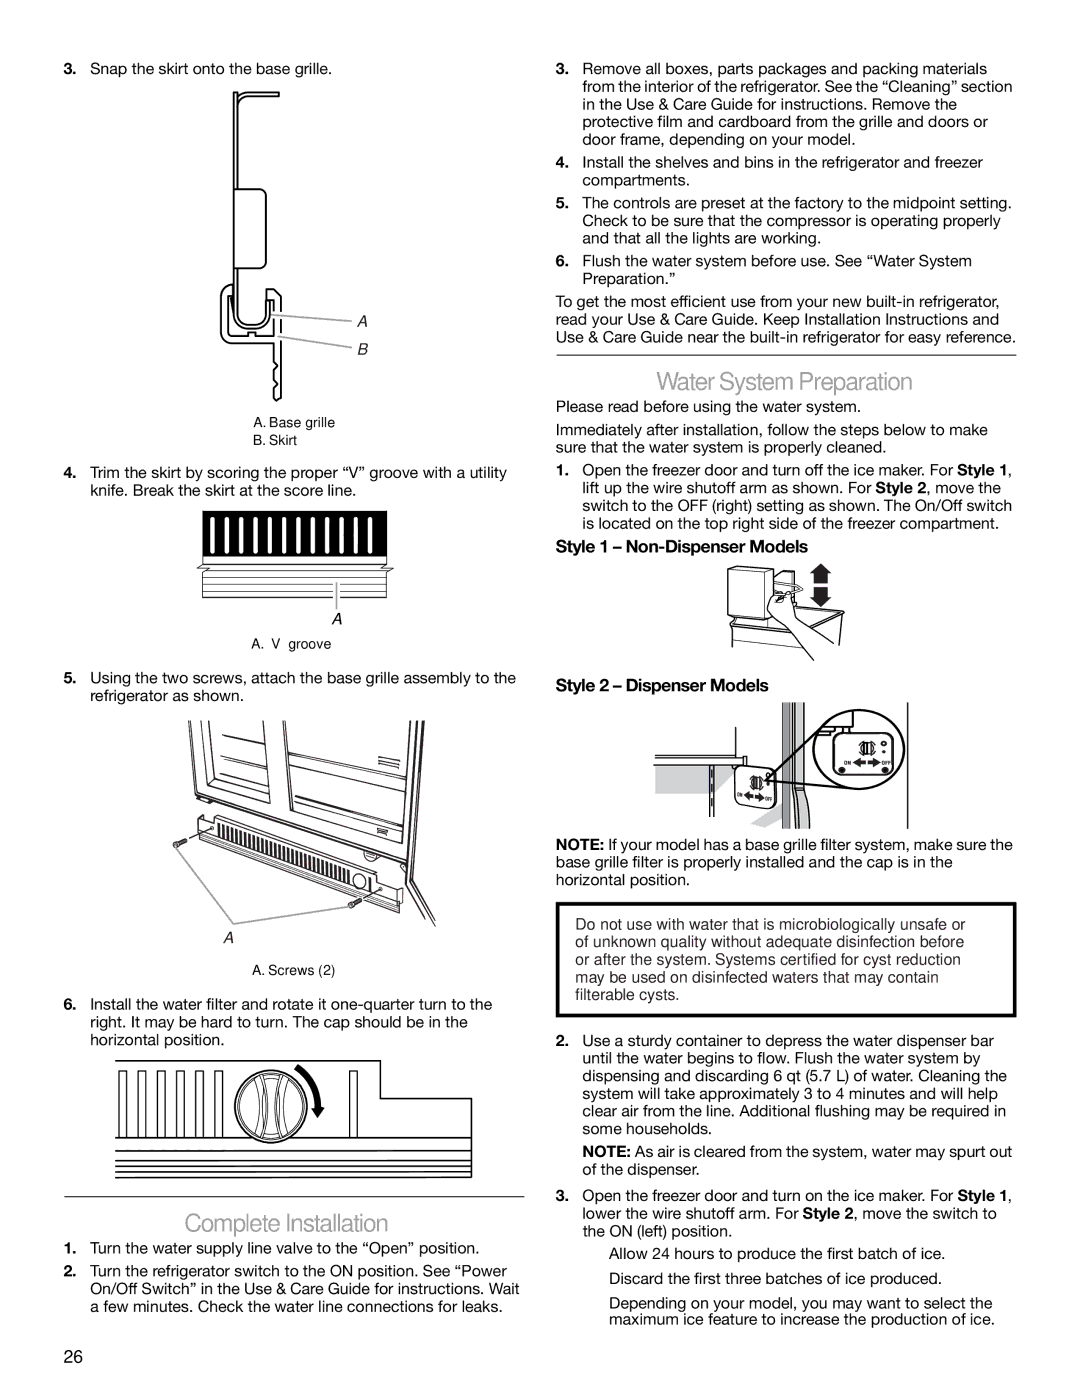
3.Snap the skirt onto the base grille.

A

B

A. Base grille

B.Skirt

4.Trim the skirt by scoring the proper “V” groove with a utility knife. Break the skirt at the score line.

A

A. “V” groove

5.Using the two screws, attach the base grille assembly to the refrigerator as shown.

A

A. Screws (2)

6.Install the water filter and rotate it one-quarter turn to the right. It may be hard to turn. The cap should be in the horizontal position.

Complete Installation

1.Turn the water supply line valve to the “Open” position.

2.Turn the refrigerator switch to the ON position. See “Power On/Off Switch” in the Use & Care Guide for instructions. Wait a few minutes. Check the water line connections for leaks.

3.Remove all boxes, parts packages and packing materials from the interior of the refrigerator. See the “Cleaning” section in the Use & Care Guide for instructions. Remove the protective film and cardboard from the grille and doors or door frame, depending on your model.

4.Install the shelves and bins in the refrigerator and freezer compartments.

5.The controls are preset at the factory to the midpoint setting. Check to be sure that the compressor is operating properly and that all the lights are working.

6.Flush the water system before use. See “Water System Preparation.”

To get the most efficient use from your new built-in refrigerator, read your Use & Care Guide. Keep Installation Instructions and Use & Care Guide near the built-in refrigerator for easy reference.

Water System Preparation

Please read before using the water system.

Immediately after installation, follow the steps below to make sure that the water system is properly cleaned.

1.Open the freezer door and turn off the ice maker. For Style 1, lift up the wire shutoff arm as shown. For Style 2, move the switch to the OFF (right) setting as shown. The On/Off switch is located on the top right side of the freezer compartment.

Style 1 – Non-Dispenser Models

Style 2 – Dispenser Models

NOTE: If your model has a base grille filter system, make sure the base grille filter is properly installed and the cap is in the horizontal position.

Do not use with water that is microbiologically unsafe or of unknown quality without adequate disinfection before or after the system. Systems certified for cyst reduction may be used on disinfected waters that may contain filterable cysts.

2.Use a sturdy container to depress the water dispenser bar until the water begins to flow. Flush the water system by dispensing and discarding 6 qt (5.7 L) of water. Cleaning the system will take approximately 3 to 4 minutes and will help clear air from the line. Additional flushing may be required in some households.

NOTE: As air is cleared from the system, water may spurt out of the dispenser.

3.Open the freezer door and turn on the ice maker. For Style 1, lower the wire shutoff arm. For Style 2, move the switch to the ON (left) position.

Allow 24 hours to produce the first batch of ice.

Discard the first three batches of ice produced.

Depending on your model, you may want to select the maximum ice feature to increase the production of ice.

26

Page 26
Image 26
KitchenAid 2317872A Complete Installation, Water System Preparation, Style 1 Non-Dispenser Models Style 2 Dispenser Models

2317872A specifications

The KitchenAid 2317872A is a standout product in the realm of kitchen appliances, designed to enhance culinary experiences through innovative features and advanced technology. Renowned for its commitment to quality and durability, KitchenAid has embedded essential characteristics into the 2317872A model that cater to the diverse needs of home cooks and professional chefs alike.

One of the standout features of the KitchenAid 2317872A is its robust construction. Built with high-quality materials, it ensures reliable performance even under demanding kitchen environments. This appliance boasts a powerful motor that efficiently handles tasks such as mixing, kneading, and whipping, providing consistent results every time. Its generous capacity allows users to prepare large batches of dough or mixtures, making it perfect for family gatherings or baking marathons.

Technology plays a pivotal role in the functionality of the KitchenAid 2317872A. The appliance comes equipped with a multi-speed control that allows precise adjustments according to the needs of different recipes. Whether you're gently folding ingredients or whipping up a fluffy meringue, the variable speed options provide optimal control for every task. Additionally, the model features a unique planetary mixing action that ensures thorough blending by moving the mixing attachment around the bowl, reaching every corner for a completely incorporated mixture.

User-friendly design is another highlight of the KitchenAid 2317872A. It incorporates a tilt-head mechanism, making it easy to access the mixing bowl and change attachments. The bowl itself is crafted to hold a substantial volume of ingredients, reducing the need for constant reloading. Furthermore, this appliance is compatible with a wide range of attachments, allowing you to expand its functionality beyond mixing. From pasta makers to food grinders and spiralizers, the modular design ensures that your KitchenAid can adapt to your evolving culinary needs.

In terms of maintenance, the KitchenAid 2317872A is designed for easy cleaning. Most attachments are dishwasher-safe, and the smooth surfaces simplify the cleaning process. Its stylish design and variety of available colors make it not only a functional appliance but also an attractive addition to any kitchen decor.

In conclusion, the KitchenAid 2317872A combines durability, versatility, and user-friendly features, making it an indispensable tool for anyone looking to elevate their cooking and baking endeavors. With its state-of-the-art technologies and thoughtful design, it is a worthy investment for both casual home cooks and seasoned chefs.