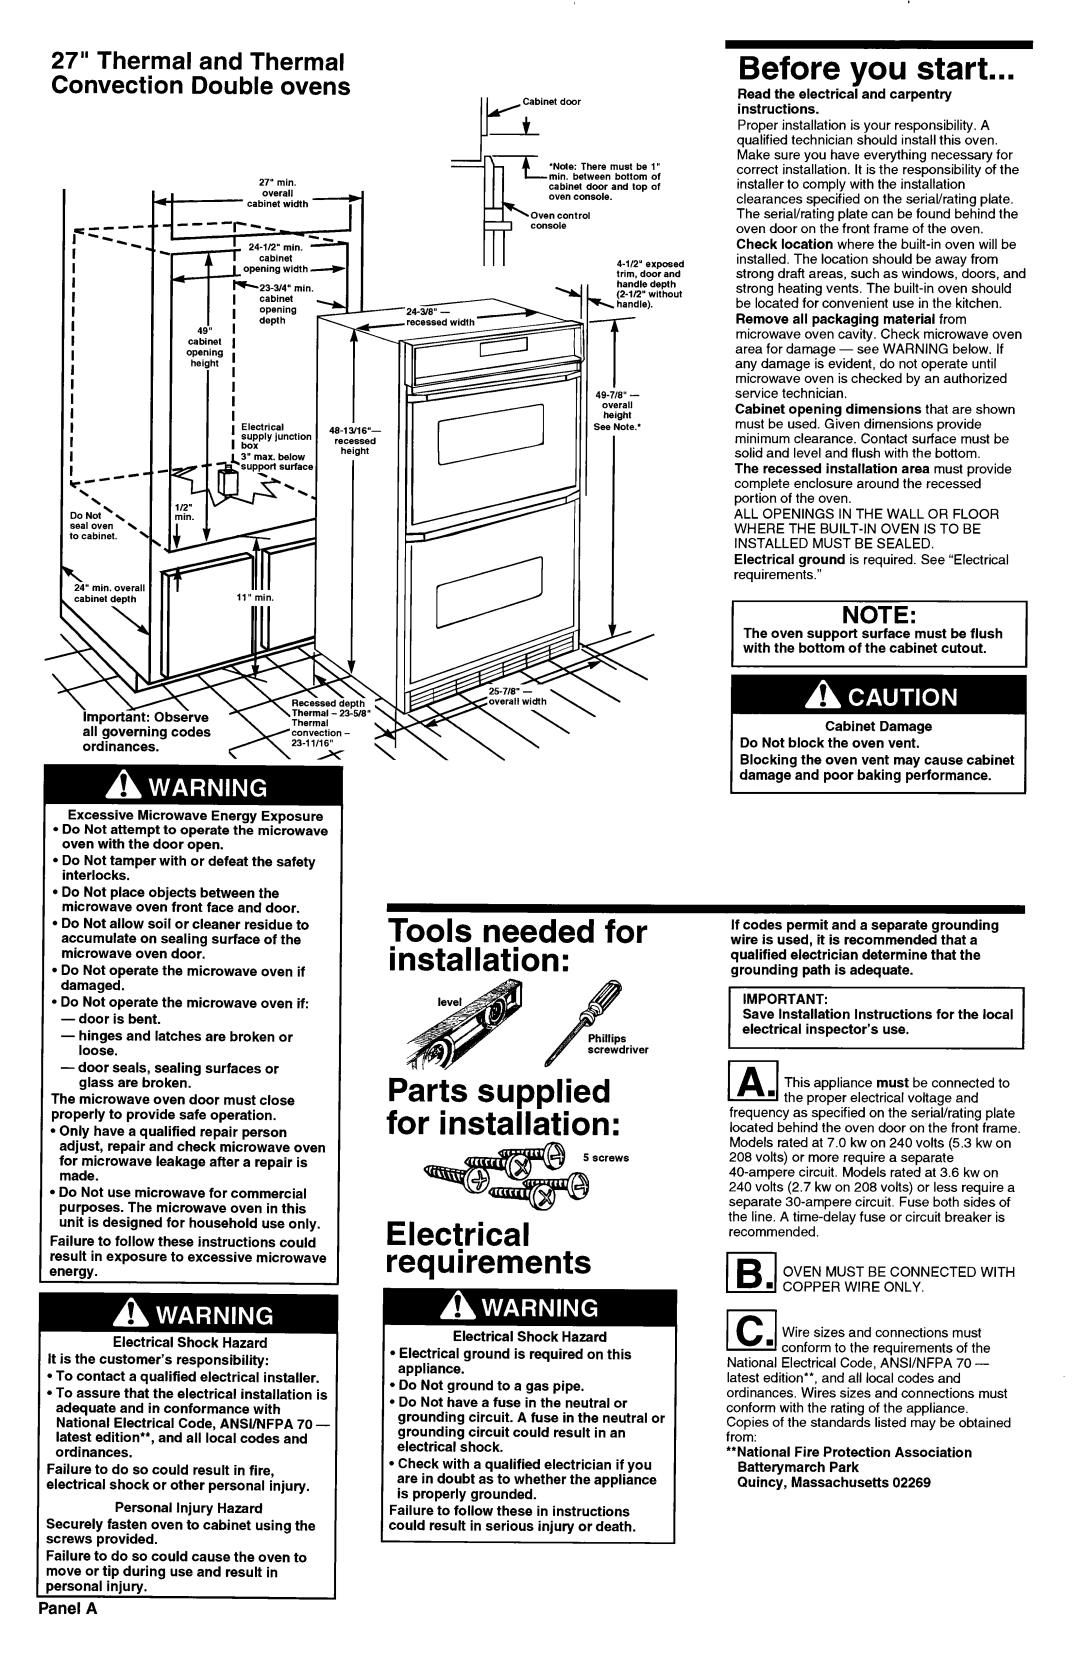
27” Thermal and Thermal Convection Double ovens

27” min.

cabinet width

I

i

depthopening


49”

I


cabinet

I


opening

i


height


I

I


I


I


I


I

Electrical

46-13/16”-


supply junction


ret :es;sed


1

box


hleicIht


PCabinet door

‘Note: There must be 1” min. between bottom of cabinet door and top of oven console.

Oven control

4-112” exoosed trim, do&r and idle depth

/2” without die\.

7

49-7/w - overall height

See Note:

Before you start...

Read the electricaT and carpentry instructions.

Proper installation is your responsibility. A qualified technician should install this oven. Make sure you have everything necessary for correct installation. It is the responsibility of the installer to comply with the installation clearances specified on the serial/rating plate. The serial/rating plate can be found behind the oven door on the front frame of the oven. Check location where the built-in oven will be installed. The location should be away from strong draft areas, such as windows, doors, and strong heating vents. The built-in oven should be located for convenient use in the kitchen. Remove all packaging material from microwave oven cavity. Check microwave oven area for damage - see WARNING below. If any damage is evident, do not operate until microwave oven is checked by an authorized service technician.

Cabinet opening dimensions that are shown must be used. Given dimensions provide minimum clearance. Contact surface must be solid and level and flush with the bottom.

IL

e4-L

\

\


Do

Not’,


nin.


seal

oven

\


to cabinet.


1

1


\


24”

min.

overal


11” min.

cabinet

depth

H


The recessed installation area must provide complete enclosure around the recessed portion of the oven.

ALL OPENINGS IN THE WALL OR FLOOR WHERE THE BUILT-IN OVEN IS TO BE INSTALLED MUST BE SEALED.

Electrical ground is required. See “Electrical requirements.”

I NOTE: I

overall width

\Thermal - 23k6” Thermal

convection - h

ordinances.

IThe oven support surface must be flush with the bottom of the cabinet cutout.

Cabinet Damage

Do Not block the oven vent.

I

Blocking the oven vent may cause cabinet damage and poor baking performance.

Excessive Microwave Energy Exposure l Do Not attempt to operate the microwave

oven with the door open.

l Do Not tamper with or defeat the safety interlocks.

l Do Not place objects between the microwave oven front face and door.

l Do Not allow soil or cleaner residue to accumulate on sealing surface of the microwave oven door.

. Do Not operate the microwave oven if damaged.

l Do Not operate the microwave oven if:

-door is bent.

-hinges and latches are broken or loose.

-door seals, sealing surfaces or glass are broken.

The microwave oven door must close properly to provide safe operation.

bOnly have a qualified repair person adjust, repair and check microwave oven for microwave leakage after a repair is made.

bDo Not use microwave for commercial purposes. The microwave oven in this unit is designed for household use only.

Failure to follow these instructions could result in exposure to excessive microwave 5nerav.

Electrical Shock Hazard It is the customer’s responsibility:

l To contact a qualified electrical installer.

l To assure that the electrical installation is adequate and in conformance with National Electrical Code, ANSUNFPA 70 - latest edition**, and all local codes and ordinances.

Failure to do so could result in fire, electrical shock or other personal injury.

Personal Injury Hazard Securely fasten oven to cabinet using the screws provided.

Failure to do so could cause the oven to move or tip during use and result in personal injury.

_ -

Panel A

Tools needed for installation:

screwdriver

‘arts supplied ‘or installation:

Electrical requirements

Electrical Shock Hazard

l Electrical ground is required on this appliance.

l Do Not ground to a gas pipe.

l Do Not have a fuse in the neutral or grounding circuit. A fuse in the neutral or grounding circuit could result in an electrical shock.

l Check with a qualified electrician if you are in doubt as to whether the appliance is properly grounded.

Failure to follow these in instructions could result in serious injury or death.

If codes permit and a separate grounding wire is used, it is recommended that a qualified electrician determine that the grounding path is adequate.

IMPORTANT:

Save Installation Instructions for the local electrical inspector’s use.

IA This appliance must be connected to

. the proper electrical voltage and frequency as specified on the serial/rating plate located behind the oven door on the front frame. Models rated at 7.0 kw on 240 volts (5.3 kw on 208 volts) or more require a separate

40-ampere circuit. Models rated at 3.6 kw on 240 volts (2.7 kw on 208 volts) or less require a separate 30-ampere circuit. Fuse both sides of the line. A time-delay fuse or circuit breaker is recommended.

(BJOVEN MUST BE CONNECTED WITH

. COPPER WIRE ONLY.

ICIWire sizes and connections must

. conform to the reauirements of the National Electrical Code, ANSI/NFPA 70 - latest edition**, and all local codes and ordinances. Wires sizes and connections must conform with the rating of the appliance.

Copies of the standards listed may be obtained from:

**National Fire Protection Association Battetymarch Park

Quincy, Massachusetts 02269

Page 2
Image 2
KitchenAid 3184435 REV. A Before you start, Tools needed for installation, ‘arts supplied ‘or installation, Panel a

3184435 REV. A specifications

The KitchenAid 3184435 REV. A is a remarkable appliance designed to enhance culinary experiences in the kitchen. Known for its durability and efficiency, this model offers a variety of features that cater to both novice cooks and culinary experts.

One of the main features of the KitchenAid 3184435 REV. A is its powerful motor, which ensures consistent performance whether mixing, kneading, or whipping. This robust motor is designed to handle heavy doughs with ease, making it an excellent choice for bread makers and pastry chefs alike. Its strong mixing capabilities allow for thorough blending of ingredients, which is essential for achieving the perfect consistency in batters and doughs.

Another standout characteristic of this KitchenAid model is its versatile speed settings. With multiple speed options, users can adjust the mixing intensity to suit their specific requirements. From gentle folding to high-speed whipping, the KitchenAid 3184435 REV. A offers precise control over mixing processes, which is crucial for achieving desired outcomes in cooking and baking.

The design of the KitchenAid 3184435 REV. A is not only functional but also aesthetically pleasing. The sleek finish and compact form make it an attractive addition to any kitchen countertop. Additionally, the appliance is built with high-quality materials, ensuring longevity and resistance to wear and tear. This durability is complemented by a warranty that provides consumers with peace of mind.

Technology also plays a significant role in the performance of the KitchenAid 3184435 REV. A. Features such as an ergonomic handle facilitate easy operation, while the bowl-lift mechanism provides stability during mixing. This technology not only enhances user experience but also contributes to safety during high-speed mixing tasks.

Cleaning and maintenance are made simple with this model, as the removable parts are dishwasher safe. This convenience allows users to spend more time enjoying their culinary creations rather than worrying about cleanup.

In conclusion, the KitchenAid 3184435 REV. A is an exceptional appliance that combines power, versatility, and thoughtful design. With its standout features and advanced technologies, it is a testament to KitchenAid's commitment to providing quality kitchen solutions that enhance the cooking experience for everyone. Whether you are a seasoned chef or a beginner, this model is sure to deliver reliable performance for all your culinary adventures.