Installation

1. Remove the top wood sheet from over the top of the cooktop.

2. Remove the shipping brackets and discard.

WARNING

Excessive Weight Hazard

Use two or more people to move and install cooktop.

Failure to do so can result in back or other injury.

3. Carefully lift the cooktop up and set aside. Write down the model and serial numbers before installing the cooktop. Both numbers are on the model/serial number plate located on left front underside of the burner box.

4. Unpack the burner grates, burner caps, simmer plate, regulator, backguard and island trim packaged under the cooktop.

5.The pressure regulator and flexible, stainless steel gas supply line connector can be assembled to the cooktop now or after the cooktop is installed in the cutout. To assemble now, stand the cooktop on its side or back surface and complete this part of the pressure regulator/gas line connector assembly.

To connect the flexible, stainless steel connector to the pressure regulator requires a 1/2" nipple.

Install the pressure regulator with the arrow pointing up toward the bottom of the burner box and in a position where you can reach the regulator cap.

IMPORTANT: All connections must be wrench-tightened. Do not make connections to the gas regulator too tight. Making the connection too tight may crack the regulator and cause a gas leak. Do not allow the regulator to turn on the pipe when tightening fittings.

Use only pipe-joint compound made for use with Natural and L.P. gas. Do not use teflon tape. You will need to determine the fittings required depending on your installation.

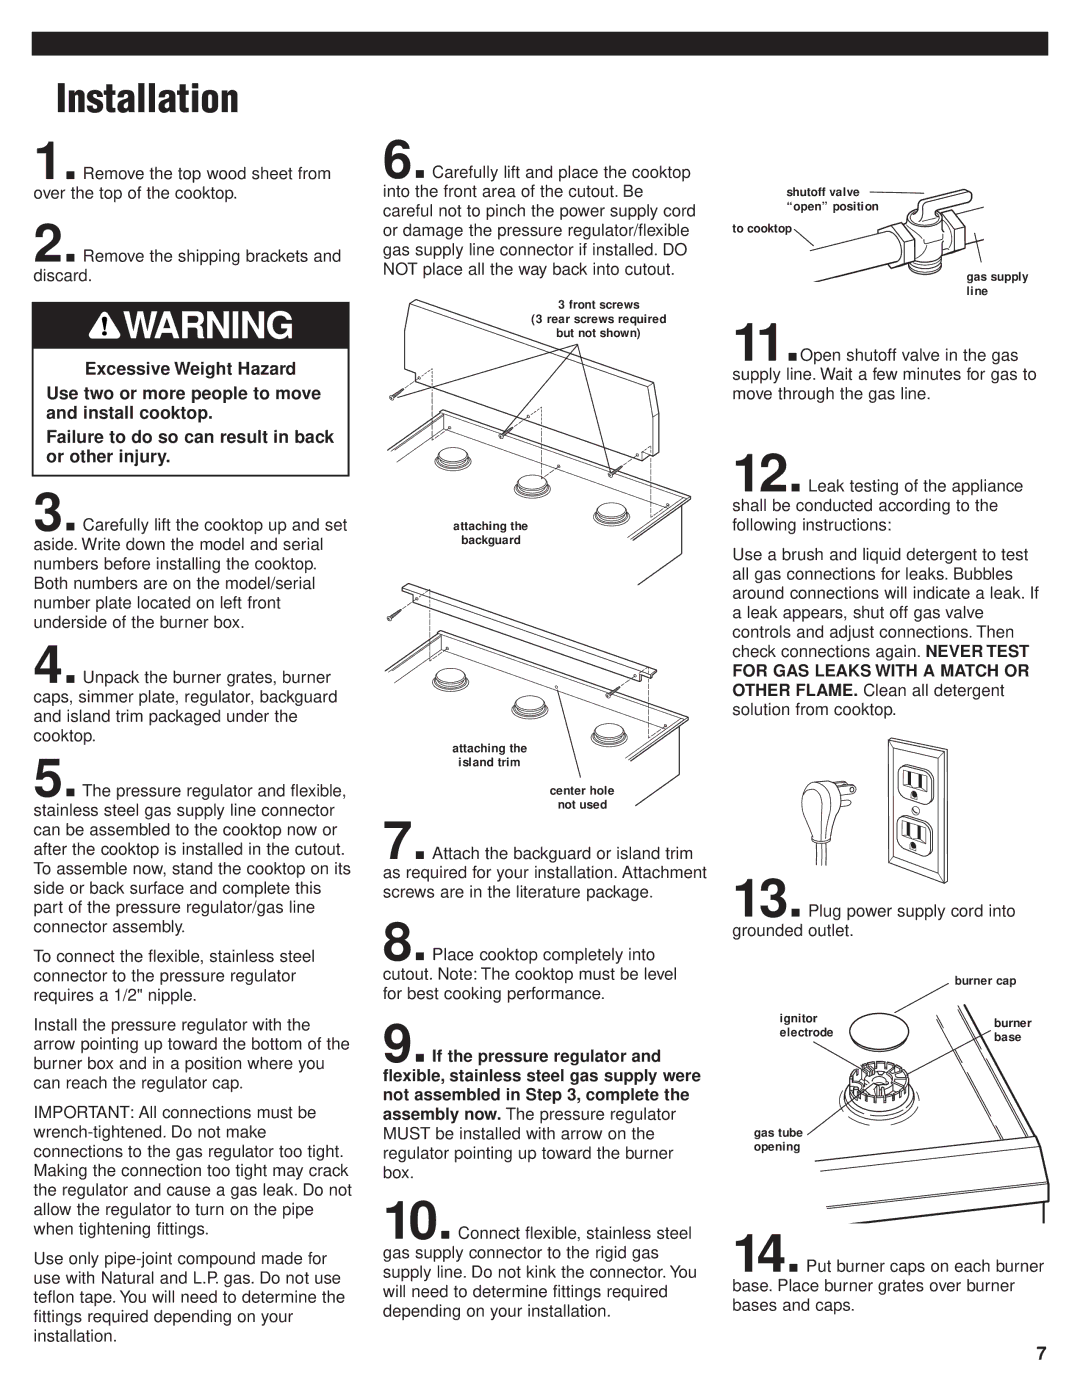
6. Carefully lift and place the cooktop into the front area of the cutout. Be careful not to pinch the power supply cord or damage the pressure regulator/flexible gas supply line connector if installed. DO NOT place all the way back into cutout.

3 front screws

(3 rear screws required

but not shown)

attaching the

backguard

attaching the

island trim

center hole

not used

7. Attach the backguard or island trim as required for your installation. Attachment screws are in the literature package.

8. Place cooktop completely into cutout. Note: The cooktop must be level for best cooking performance.

9. If the pressure regulator and flexible, stainless steel gas supply were not assembled in Step 3, complete the assembly now. The pressure regulator MUST be installed with arrow on the regulator pointing up toward the burner box.

10. Connect flexible, stainless steel gas supply connector to the rigid gas supply line. Do not kink the connector. You will need to determine fittings required depending on your installation.

shutoff valve “open” position

to cooktop

gas supply line

11.Open shutoff valve in the gas supply line. Wait a few minutes for gas to move through the gas line.

12. Leak testing of the appliance shall be conducted according to the following instructions:

Use a brush and liquid detergent to test all gas connections for leaks. Bubbles around connections will indicate a leak. If a leak appears, shut off gas valve controls and adjust connections. Then check connections again. NEVER TEST

FOR GAS LEAKS WITH A MATCH OR OTHER FLAME. Clean all detergent solution from cooktop.

13. Plug power supply cord into grounded outlet.


burner cap

ignitor

burner

electrode

base


gas tube opening

14. Put burner caps on each burner base. Place burner grates over burner bases and caps.

7

Page 7
Image 7
KitchenAid 8284670 installation instructions Installation, Ignitor, Electrode, Base

8284670 specifications

The KitchenAid 8284670 is an exceptional addition to any kitchen, designed for both the amateur cook and the culinary connoisseur. This versatile kitchen appliance is primarily recognized for its innovative features and user-friendly design. One of the standout characteristics of the KitchenAid 8284670 is its powerful motor, ensuring that it can easily handle a variety of tasks, from mixing dough to whipping cream.

A significant highlight of this model is its multiple speed settings, which provide users with the ability to tailor their mixing speed according to the task at hand. Whether you need a gentle fold for delicate ingredients or a robust blend for tougher mixtures, this appliance supports a range of cooking processes.

Incorporating advanced technology, the KitchenAid 8284670 includes its trademark planetary mixing action. This means that the mixing attachment spirals around the bowl, ensuring that all ingredients are perfectly incorporated without the need for manual scraping. This efficient mixing method not only saves time but also guarantees consistent results.

The design of the KitchenAid 8284670 is both aesthetically pleasing and functional. Its sleek, modern appearance is complemented by durable materials, ensuring it will stand the test of time in any culinary setting. The machine is equipped with a large-capacity mixing bowl, making it suitable for preparing larger batches, ideal for family meals or gatherings.

Moreover, the KitchenAid 8284670 offers a range of attachments, expanding its functionality beyond just mixing. From dough hooks to flat beaters and whisk attachments, these accessories enhance the versatility of the appliance, allowing users to tackle a multitude of recipes and culinary techniques with ease.

Ease of use is another notable feature of the KitchenAid 8284670. The intuitive controls and easy-to-follow instructions make it accessible for users of all skill levels. Additionally, the appliance is designed for easy cleaning, often featuring dishwasher-safe components that streamline post-cooking cleanup.

In summary, the KitchenAid 8284670 stands out in the kitchen appliance market due to its powerful performance, advanced technology, and user-friendly design. It is perfect for anyone looking to elevate their cooking experience, making it an indispensable tool for achieving culinary excellence. Whether you’re baking, mixing, or whipping, this appliance proves to be a reliable companion in any kitchen.