4. Using the final measurement from Step 3, measure from the

floor up and mark a horizontal line on the wall where a wall

Electrical Connection Options

stud is located.

A

B

D

C

If your home has:

4-wire direct

5" (12.7 cm)

And you will be

Go to Section:

connecting to:


A fused

4-Wire Cable from

disconnect or

Power Supply

circuit breaker


box


A. Horizontal line marked from Step 4.

B. Wall stud

C. Mounting screws

D. Anti-tip bracket

5. Position top of anti-tip bracket at line marked in Step 4 and

mark holes. Drill two ¹⁄₈" holes at the positions marked on the

wall. Use screws provided to fasten anti-tip bracket to wall.

Anti-tip bracket must be mounted securely to stud in wall

behind the range. Depending on thickness of the wall, longer

3-wire direct

A fused

3-Wire Cable from


disconnect or

Power Supply


circuit breaker


3¹⁄₂"

box


(8.9 cm)


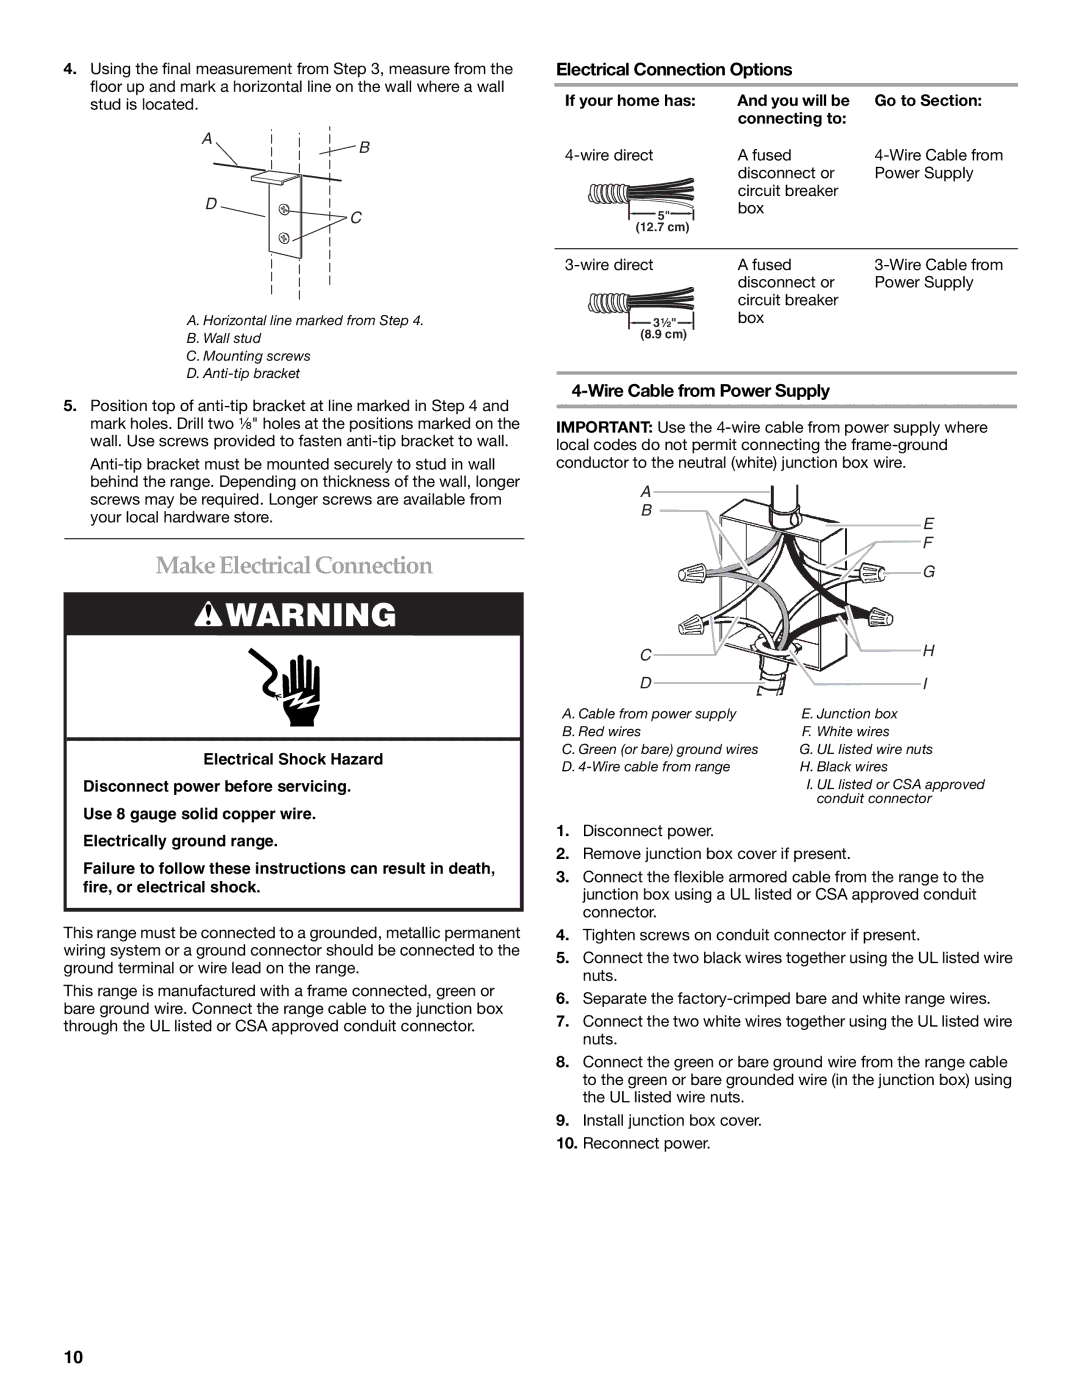
4-Wire Cable from Power Supply

IMPORTANT: Use the 4-wire cable from power supply where local codes do not permit connecting the frame-ground conductor to the neutral (white) junction box wire.

screws may be required. Longer screws are available from

your local hardware store.

Make Electrical Connection

WARNING

Electrical Shock Hazard

Disconnect power before servicing.

Use 8 gauge solid copper wire.

A

B

C

D

A. Cable from power supply B. Red wires

C. Green (or bare) ground wires D. 4-Wire cable from range

E

F

G

H

I

E. Junction box F. White wires

G. UL listed wire nuts H. Black wires

I. UL listed or CSA approved conduit connector

Electrically ground range.

Failure to follow these instructions can result in death, fire, or electrical shock.

This range must be connected to a grounded, metallic permanent wiring system or a ground connector should be connected to the ground terminal or wire lead on the range.

This range is manufactured with a frame connected, green or bare ground wire. Connect the range cable to the junction box through the UL listed or CSA approved conduit connector.

1.Disconnect power.

2.Remove junction box cover if present.

3.Connect the flexible armored cable from the range to the junction box using a UL listed or CSA approved conduit connector.

4.Tighten screws on conduit connector if present.

5.Connect the two black wires together using the UL listed wire nuts.

6.Separate the factory-crimped bare and white range wires.

7.Connect the two white wires together using the UL listed wire nuts.

8.Connect the green or bare ground wire from the range cable to the green or bare grounded wire (in the junction box) using the UL listed wire nuts.

9.Install junction box cover.

10.Reconnect power.

10

Page 10
Image 10
KitchenAid Cooktop Make Electrical Connection, Electrical Connection Options, Wire Cable from Power Supply

Cooktop specifications

The KitchenAid Cooktop stands as a paragon of innovative design and advanced culinary technology, designed to elevate your cooking experience. This premium kitchen appliance combines functionality, style, and performance, catering to both amateur home cooks and seasoned culinary professionals.

One of the main features of the KitchenAid Cooktop is its versatility. Available in both gas and electric options, the cooktop accommodates a diverse range of cooking methods. The gas models boast powerful burners that provide precise temperature control, while the electric induction options offer rapid heating and quick response times that allow for seamless transitions between simmering and boiling.

The cooktop's impressive design features a sleek, minimalist aesthetic that enhances any modern kitchen. With options for both stainless steel and black finishes, it integrates harmoniously with a variety of kitchen styles. The surface is crafted from durable materials, ensuring resistance to scratches and stains while making cleaning straightforward and hassle-free.

One of the standout technologies integrated into the KitchenAid Cooktop is its advanced induction cooking system. This system uses magnetic fields to heat cookware directly, ensuring efficient energy use and a cooler cooking surface. This not only reduces the risk of burns but also allows for easier cleanup, as spills and splatters are less likely to scorch on the cool surface.

Another critical feature is the even heat distribution technology found in certain models. This ensures that food is cooked uniformly, reducing the chances of hot or cold spots that can lead to uneven cooking. Additionally, the cooktop is equipped with intuitive touch controls for precise settings and timer functions, giving users ultimate command over their culinary creations.

Safety is paramount in the design of the KitchenAid Cooktop. Features such as automatic shut-off, hot surface indicators, and child lock safety functions are designed to protect users and provide peace of mind during operation.

In summary, the KitchenAid Cooktop epitomizes the perfect blend of aesthetics, technology, and safety. From its versatile cooking options to its advanced induction technology and user-friendly design, this cooktop is a testament to KitchenAid's commitment to quality and innovation in the culinary appliance market. Whether you're sautéing vegetables or simmering sauces, the KitchenAid Cooktop delivers a reliable and efficient cooking experience that enhances any kitchen.