4.Gas orifice spuds are stamped with a number on the side. Replace the LP gas orifice spud with the correct Natural gas orifice spud.

XXX

A


A. Stamped number

Refer to the following chart for the correct Natural gas orifice spud placement.

Natural Gas Orifice Spud Chart for Standard Surface Burners

Burner Location

Burner Rating

Size

Right front

6,000

Btu/h

1.10 mm

Left front

14,000

Btu/h

1.70 mm

Right rear

12,500

Btu/h

1.61 mm

Left rear

6,000

Btu/h

1.10 mm


5.Place LP gas orifice spuds in plastic parts bag for future use and keep with literature package.

6.Replace burner cap.

7.Repeat steps 1-6 for the remaining burners, except for the TripleTier® Flame burner (on some models). See “To Convert TripleTier® Flame Burners” section.

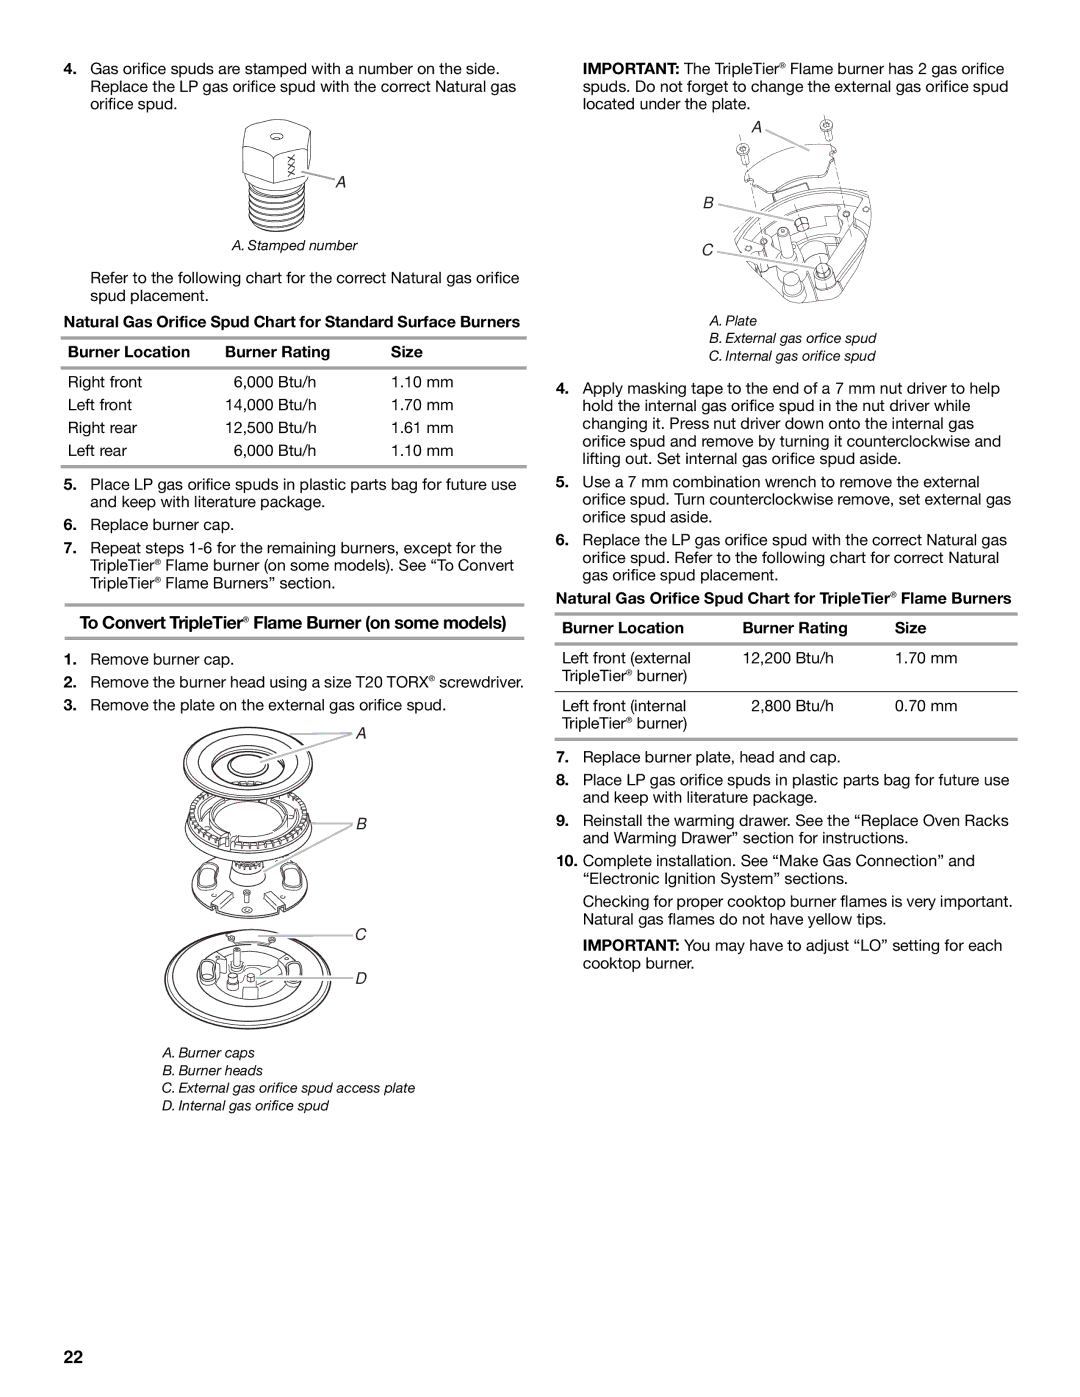
To Convert TripleTier® Flame Burner (on some models)

1.Remove burner cap.

2.Remove the burner head using a size T20 TORX® screwdriver.

3.Remove the plate on the external gas orifice spud.

A

B

C

D

A. Burner caps

B. Burner heads

C. External gas orifice spud access plate

D. Internal gas orifice spud

IMPORTANT: The TripleTier® Flame burner has 2 gas orifice spuds. Do not forget to change the external gas orifice spud located under the plate.

A

B

C

A.Plate

B.External gas orfice spud

C.Internal gas orifice spud

4.Apply masking tape to the end of a 7 mm nut driver to help hold the internal gas orifice spud in the nut driver while changing it. Press nut driver down onto the internal gas orifice spud and remove by turning it counterclockwise and lifting out. Set internal gas orifice spud aside.

5.Use a 7 mm combination wrench to remove the external orifice spud. Turn counterclockwise remove, set external gas orifice spud aside.

6.Replace the LP gas orifice spud with the correct Natural gas orifice spud. Refer to the following chart for correct Natural gas orifice spud placement.

Natural Gas Orifice Spud Chart for TripleTier® Flame Burners

Burner Location

Burner Rating

Size


Left front (external

12,200

Btu/h

1.70 mm

TripleTier® burner)


Left front (internal

2,800

Btu/h

0.70 mm

TripleTier® burner)


7.Replace burner plate, head and cap.

8.Place LP gas orifice spuds in plastic parts bag for future use and keep with literature package.

9.Reinstall the warming drawer. See the “Replace Oven Racks and Warming Drawer” section for instructions.

10.Complete installation. See “Make Gas Connection” and “Electronic Ignition System” sections.

Checking for proper cooktop burner flames is very important. Natural gas flames do not have yellow tips.

IMPORTANT: You may have to adjust “LO” setting for each cooktop burner.

22

Page 22
Image 22
KitchenAid DUALFUEL RANGES installation instructions To Convert TripleTier Flame Burner on some models

DUALFUEL RANGES specifications

KitchenAid DUALFUEL RANGES are designed to offer a seamless fusion of gas and electric cooking technologies, providing home chefs with the best of both worlds. These ranges combine powerful gas burners for precise cooking control with the consistent and even heating of an electric oven, making them ideal for a variety of culinary tasks.

One of the standout features of KitchenAid DUALFUEL RANGES is the gas burners equipped with high BTU output. This ensures rapid heat-up times, allowing users to achieve high heat for searing meats or quickly boiling water. The burners are also designed with precise simmer settings, perfect for delicate sauces and melting chocolate without risk of burning. Additionally, the range often includes a removable burner cap, making it easier to clean.

The electric ovens in these ranges offer sophisticated baking capabilities through their Even-Heat technology. This feature ensures that every inch of the oven is heated consistently, providing optimal baking results, whether you’re baking a soufflé or roasting vegetables. Some models also come with a convection option, which circulates air for quicker, more uniform cooking, and browning. This can greatly enhance the results for baked goods, ensuring that cookies and cakes rise perfectly every time.

Another notable characteristic of KitchenAid DUALFUEL RANGES is the inclusion of an integrated temperature probe. This handy tool allows chefs to monitor the internal temperature of their dishes without opening the oven door, ensuring perfectly cooked meat every time while conserving energy and maintaining optimal heat levels.

Ease of use and elegant design are also hallmarks of KitchenAid DUALFUEL RANGES. With an intuitive control panel, backlit knobs, and sleek stainless-steel finishes, these ranges add a touch of sophistication to any kitchen. Many models also feature self-cleaning options that simplify maintenance, allowing homeowners to spend less time scrubbing and more time enjoying their culinary creations.

In summary, KitchenAid DUALFUEL RANGES deliver exceptional cooking performance through their powerful gas burners and innovative electric ovens. With features like Even-Heat technology, precise controls, a built-in temperature probe, and easy maintenance, these ranges represent a perfect blend of functionality and style, making them an excellent choice for both home cooks and culinary enthusiasts.