2.Connect the flexible stainless steel connector to the pressure regulator using a ¹⁄₂" male pipe thread adapter.

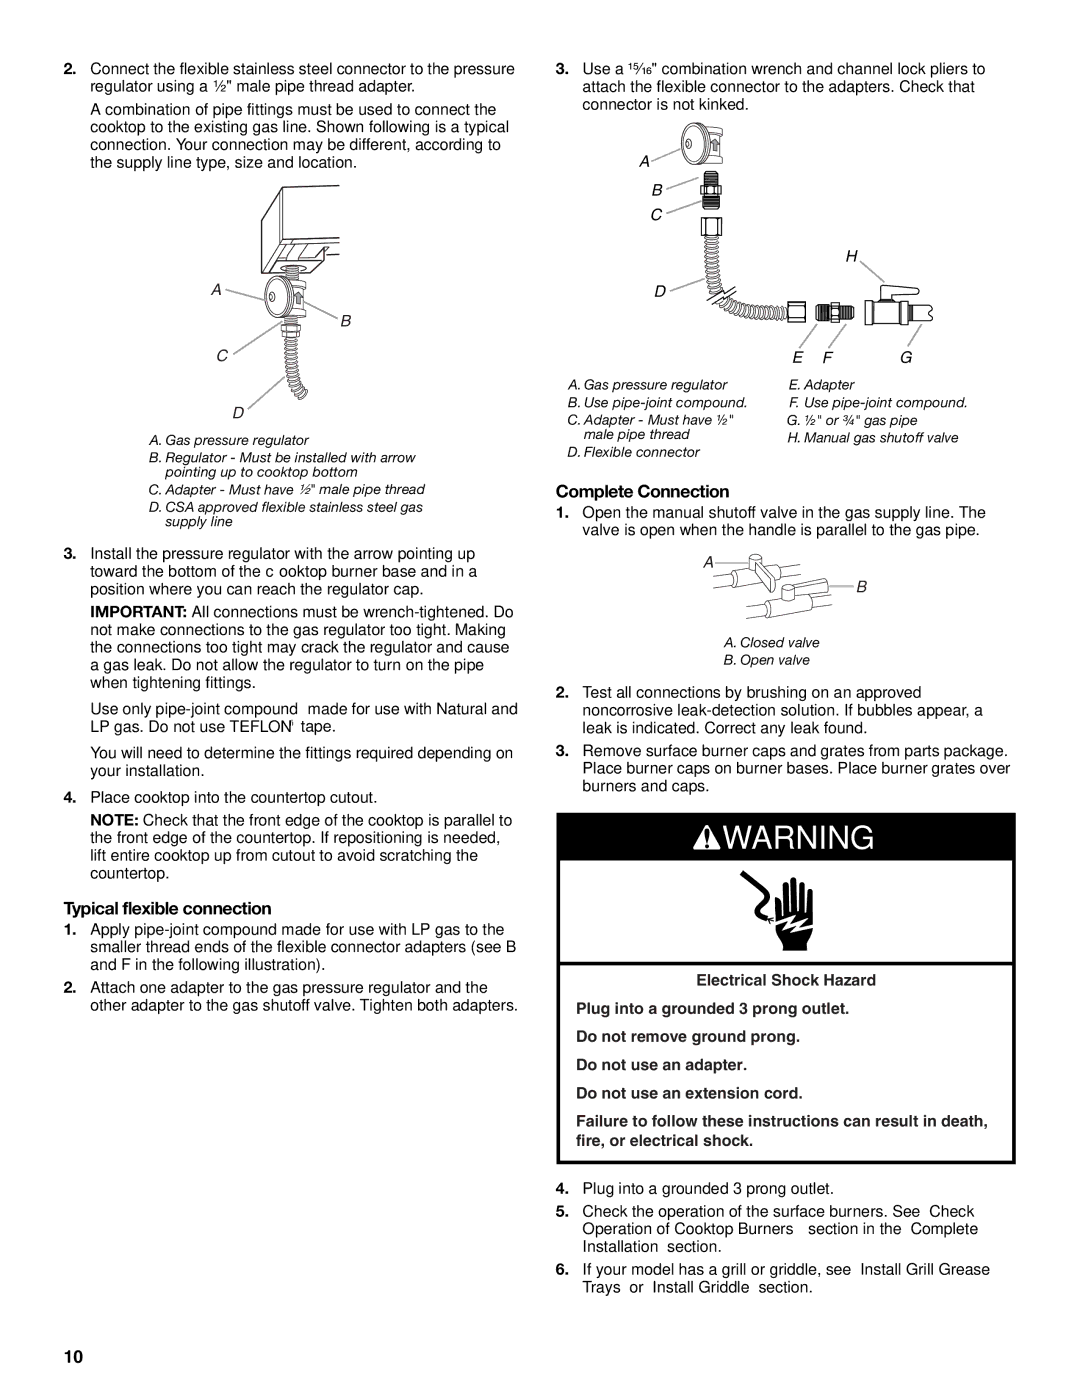
A combination of pipe fittings must be used to connect the cooktop to the existing gas line. Shown following is a typical connection. Your connection may be different, according to the supply line type, size and location.

A

B

C

D

A. Gas pressure regulator

B. Regulator - Must be installed with arrow pointing up to cooktop bottom

C. Adapter - Must have ¹⁄₂" male pipe thread

D. CSA approved flexible stainless steel gas supply line

3.Install the pressure regulator with the arrow pointing up toward the bottom of the cooktop burner base and in a position where you can reach the regulator cap.

IMPORTANT: All connections must be wrench-tightened. Do not make connections to the gas regulator too tight. Making the connections too tight may crack the regulator and cause a gas leak. Do not allow the regulator to turn on the pipe when tightening fittings.

Use only pipe-joint compound made for use with Natural and LP gas. Do not use TEFLON® tape.

You will need to determine the fittings required depending on your installation.

4.Place cooktop into the countertop cutout.

NOTE: Check that the front edge of the cooktop is parallel to the front edge of the countertop. If repositioning is needed, lift entire cooktop up from cutout to avoid scratching the countertop.

Typical flexible connection

1.Apply pipe-joint compound made for use with LP gas to the smaller thread ends of the flexible connector adapters (see B and F in the following illustration).

2.Attach one adapter to the gas pressure regulator and the other adapter to the gas shutoff valve. Tighten both adapters.

3.Use a ¹⁵⁄₁₆" combination wrench and channel lock pliers to attach the flexible connector to the adapters. Check that connector is not kinked.

A

B

C


H


D


E F

G

A. Gas pressure regulator

E. Adapter


B. Use pipe-joint compound.

F. Use pipe-joint compound.

C. Adapter - Must have ½"

G. ½" or ¾" gas pipe

male pipe thread

H. Manual gas shutoff valve

D. Flexible connector


Complete Connection

1.Open the manual shutoff valve in the gas supply line. The valve is open when the handle is parallel to the gas pipe.

A

B

A. Closed valve

B. Open valve

2.Test all connections by brushing on an approved noncorrosive leak-detection solution. If bubbles appear, a leak is indicated. Correct any leak found.

3.Remove surface burner caps and grates from parts package. Place burner caps on burner bases. Place burner grates over burners and caps.

WARNING

Electrical Shock Hazard

Plug into a grounded 3 prong outlet.

Do not remove ground prong.

Do not use an adapter.

Do not use an extension cord.

Failure to follow these instructions can result in death, fire, or electrical shock.

4.Plug into a grounded 3 prong outlet.

5.Check the operation of the surface burners. See “Check Operation of Cooktop Burners” section in the “Complete Installation” section.

6.If your model has a grill or griddle, see “Install Grill Grease Trays” or “Install Griddle” section.

10

Page 10
Image 10
KitchenAid W10271686B installation instructions Typical flexible connection, Complete Connection

W10271686B specifications

The KitchenAid W10271686B is a high-performance kitchen appliance designed to enhance food preparation and cooking efficiency. Known for its durability and user-friendly features, this appliance has become a favorite among home cooks and professional chefs alike.

One of the standout features of the KitchenAid W10271686B is its robust construction. Made from premium materials, it ensures longevity and resilience, making it a reliable addition to your kitchen. The stylish design is not only aesthetically pleasing but also functional, allowing it to seamlessly blend into various kitchen decors.

The W10271686B model incorporates advanced technologies that make cooking more effortless and enjoyable. With its intuitive controls, users can easily adjust settings to meet specific cooking needs. The appliance features multiple speed settings, enabling precise adjustments whether you’re kneading dough, mixing batter, or whipping cream. This versatility highlights its capability to handle a range of culinary tasks with ease.

Another major characteristic of this model is its powerful motor. The robust motor provides the necessary torque to mix heavy ingredients thoroughly, ensuring consistent results every time. This feature is particularly beneficial for baking enthusiasts, as it can easily tackle thick doughs and batters without strain.

One of the innovations that sets the KitchenAid W10271686B apart is the inclusion of a planetarium mixing action. This technology ensures that the mixing action covers the entire bowl, eliminating the need for manual scraping and ensuring that every ingredient is evenly combined. This results in perfectly blended mixtures that are crucial for achieving the best flavor and texture in various recipes.

Additionally, the KitchenAid W10271686B comes equipped with a range of attachments and accessories, expanding its functionality. Users can easily switch between different attachments, such as dough hooks, flat beaters, and whisk attachments, allowing them to customize their cooking experience based on the task at hand.

In conclusion, the KitchenAid W10271686B embodies a perfect blend of power, efficiency, and versatility. Its user-centric design, premium construction, and innovative features make it an invaluable tool in any kitchen. Whether you’re a novice or a seasoned chef, this appliance will elevate your culinary experience and help you create delicious dishes with ease and precision.