Connect to Refrigerator

Depending on your model, the water line may come down from the top or up from the bottom. Follow the connection instructions for your model.

Style 1

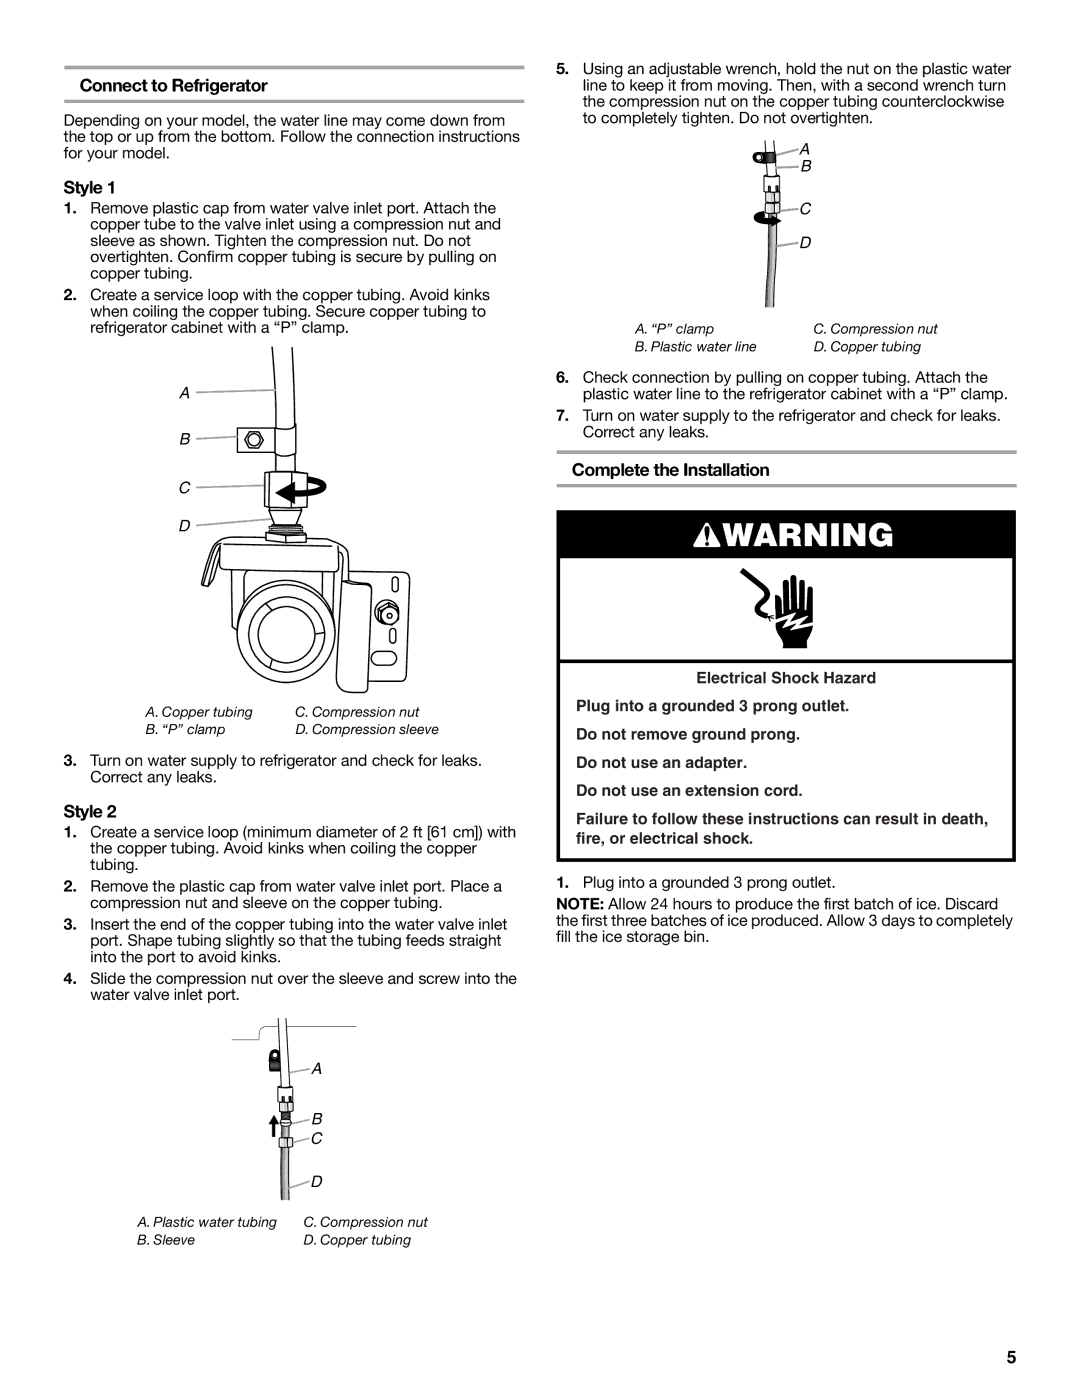
1.Remove plastic cap from water valve inlet port. Attach the copper tube to the valve inlet using a compression nut and sleeve as shown. Tighten the compression nut. Do not overtighten. Confirm copper tubing is secure by pulling on copper tubing.

2.Create a service loop with the copper tubing. Avoid kinks when coiling the copper tubing. Secure copper tubing to refrigerator cabinet with a “P” clamp.

A

B

C

D

A. Copper tubing

C. Compression nut

B. “P” clamp

D. Compression sleeve

3.Turn on water supply to refrigerator and check for leaks. Correct any leaks.

Style 2

1.Create a service loop (minimum diameter of 2 ft [61 cm]) with the copper tubing. Avoid kinks when coiling the copper tubing.

2.Remove the plastic cap from water valve inlet port. Place a compression nut and sleeve on the copper tubing.

3.Insert the end of the copper tubing into the water valve inlet port. Shape tubing slightly so that the tubing feeds straight into the port to avoid kinks.

4.Slide the compression nut over the sleeve and screw into the water valve inlet port.


A


B


C


D

A. Plastic water tubing

C. Compression nut

B. Sleeve

D. Copper tubing

5.Using an adjustable wrench, hold the nut on the plastic water line to keep it from moving. Then, with a second wrench turn the compression nut on the copper tubing counterclockwise to completely tighten. Do not overtighten.

A

B

C

D

A. “P” clamp

C. Compression nut

B. Plastic water line

D. Copper tubing

6.Check connection by pulling on copper tubing. Attach the plastic water line to the refrigerator cabinet with a “P” clamp.

7.Turn on water supply to the refrigerator and check for leaks. Correct any leaks.

Complete the Installation

WARNING

Electrical Shock Hazard

Plug into a grounded 3 prong outlet.

Do not remove ground prong.

Do not use an adapter.

Do not use an extension cord.

Failure to follow these instructions can result in death, fire, or electrical shock.

1.Plug into a grounded 3 prong outlet.

NOTE: Allow 24 hours to produce the first batch of ice. Discard the first three batches of ice produced. Allow 3 days to completely fill the ice storage bin.

5

Page 5
Image 5
KitchenAid W10366208A installation instructions Connect to Refrigerator, Style, Complete the Installation

W10366208A specifications

The KitchenAid W10366208A is a versatile and essential appliance for any modern kitchen. Designed to enhance culinary experiences, this product is part of the renowned KitchenAid brand, known for its innovative kitchen solutions.

One of the standout features of the W10366208A is its advanced motor technology. The powerful motor ensures consistent performance whether you are mixing, kneading, or blending. It can handle various tasks seamlessly, making it ideal for both casual cooks and professional chefs alike. This efficiency is enhanced by the appliance’s multiple speed settings, allowing users to customize their mixing experience based on the recipe requirements.

In terms of design, the W10366208A boasts a sleek stainless-steel finish that not only adds a modern touch to any kitchen but also ensures durability. The materials used in its construction are resistant to rust and corrosion, maintaining the appliance’s aesthetic appeal over time. Furthermore, its compact size allows for easy storage, making it a practical choice for kitchens with limited counter space.

The appliance features a range of attachments that elevate its functionality. From dough hooks to various mixing whisks, the W10366208A can effortlessly switch between tasks, catering to a wide array of recipes, from airy meringues to heavy bread doughs. The ease of attachment removal and replacement is a bonus for quick transitions while cooking.

Safety is also a priority with the W10366208A. The appliance incorporates several safety features, such as an automatic shut-off function that kicks in when the motor overheats, preventing potential damage and ensuring long-term reliability.

Moreover, maintenance is straightforward, as most of its detachable parts are dishwasher-safe, simplifying the cleanup process after a busy cooking session. Overall, the KitchenAid W10366208A combines power, precision, and convenience, making it an indispensable tool in the kitchen. Whether you are whipping up a quick dessert or preparing a full-course meal, this appliance stands ready to assist, making cooking a more enjoyable experience.