WALL MOUNTING
Each Synergy SLX speaker can be mounted vertically or horizontally. When mounted vertically, the wall bracket can be aligned with a wall stud (in which case the supplied drywall anchors will not be used) or simply attached to drywall (in which case the supplied dry wall anchors will be used). When mounting the bracket horizontally, one of the two pairs of mounting holes shown in Figure 2 to be 16" apart (holes 1 and 5 or holes 2 and 6) can be aligned with wall studs that are sixteen inches apart. Either of the two pairs can be used. Dry wall anchors and screws should then be used in the remaining four attachment locations. If you do not wish to mount the bracket to wall studs, all six drywall anchors and screws must be used to attach the bracket to the wall.
1 | 16" |
| 5 |
|
|
| |
| 3 | 4 |
|
Figure 2 | 2 | 16" | 6 |
|
|
|
To install the Synergy SLX, follow these instructions:
1.Position the mounting bracket on the wall in the desired location and orientation (vertical or horizontal).
2.Using the mounting bracket as a template, mark the six screw locations taking care to notice the location of wall studs. (Wall studs can be used, if desired, as stated above. However, it is not necessary to attach the SLX bracket to wall studs.) If used in the center channel position, make sure that the bracket is level.
3.Remove the mounting bracket and install the necessary number of supplied drywall anchors into the wall. (Drywall anchors are not necessary in the locations where the screw will attach to a wall stud.)
4.Route speaker wire through the mounting bracket. Wire routing channels are incorporated into the rear of the mounting bracket. Wire can enter at any side of the bracket and will exit in the center of the bracket directly behind the connections on the rear of the SLX as shown
in Figure 3.
From Amplifier |
|
Figure 3 | From Amplifier |
5.Place the mounting bracket in the desired location and attach it to the wall by driving the supplied screws through the bracket’s mounting holes and into the drywall anchors or wall stud(s), making sure not to overtighten the screws.
6.Connect the speaker wire to the SLX's binding posts. See "Speaker to Amplifier: Keeping it Straight" for speaker wiring information.
7.Attach the SLX to the mounting bracket by seating the SLX's mounting slots, located on
each end of the back of the SLX, onto the mounting tabs of the bracket as shown in Figure 4. The tabs will "click" into place when the connection is made. Lightly pull forward on the SLX to make sure a solid connection has been made. To remove the SLX from the mounting bracket, depress both buttons at each end of the back of the SLX and pull the speaker off of the mounting bracket. The SLX should slide off easily. DO NOT force it. Make sure both buttons are depressed.
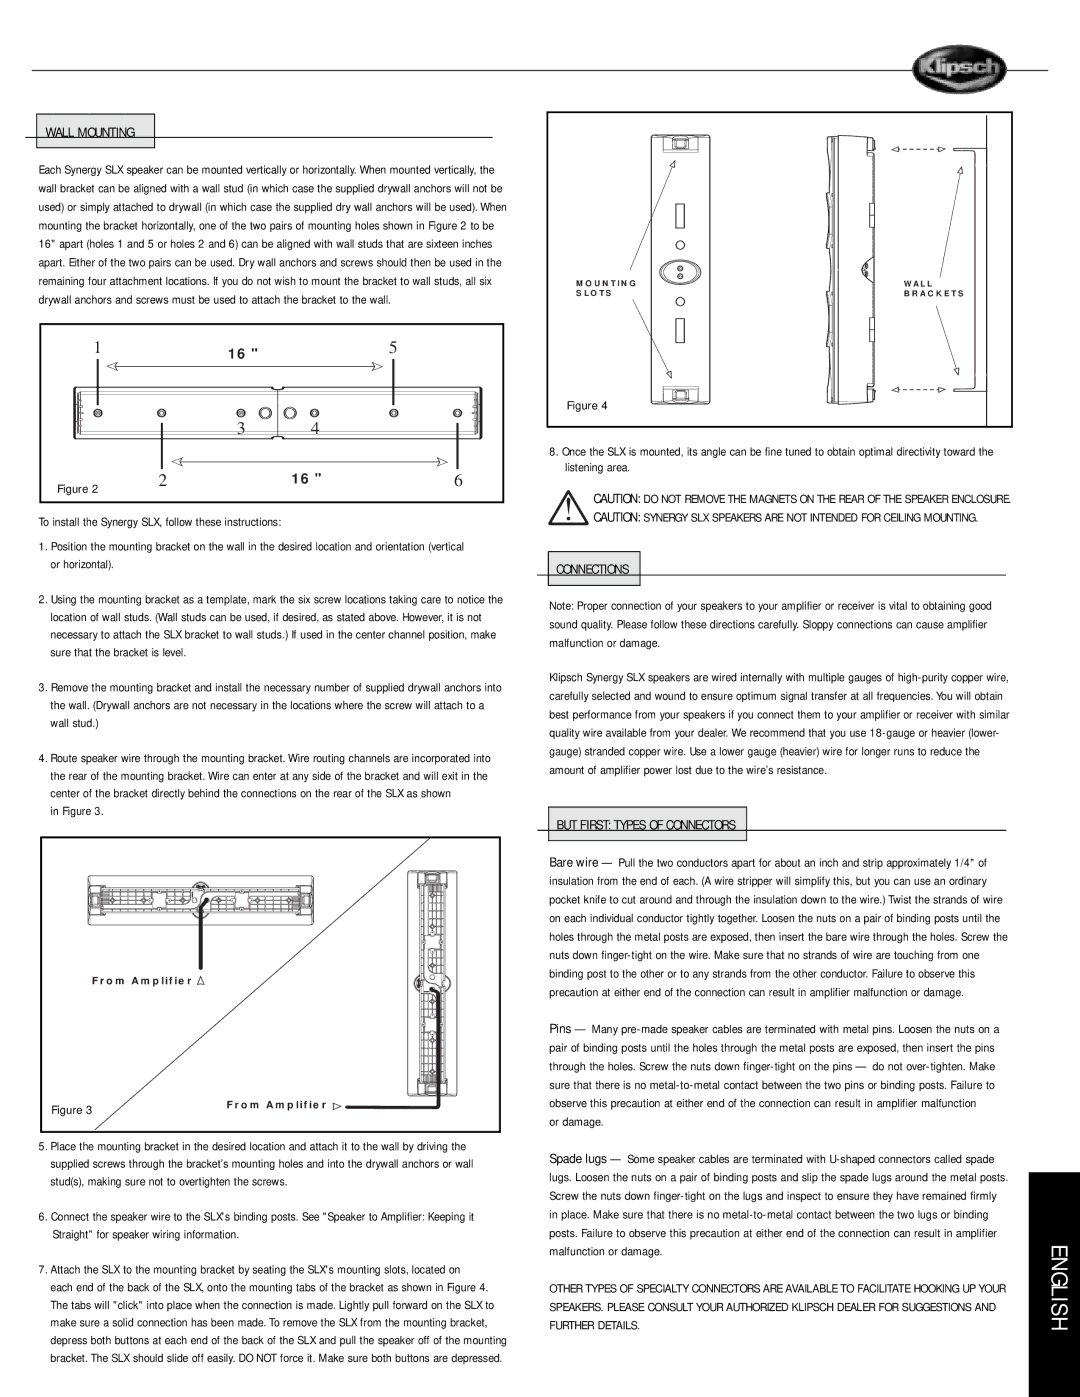
MOUNTING | WALL |
SLOTS | BRACKETS |
Figure 4 |
|
8.Once the SLX is mounted, its angle can be fine tuned to obtain optimal directivity toward the listening area.
CAUTION: DO NOT REMOVE THE MAGNETS ON THE REAR OF THE SPEAKER ENCLOSURE.
CAUTION: SYNERGY SLX SPEAKERS ARE NOT INTENDED FOR CEILING MOUNTING.
CONNECTIONS
Note: Proper connection of your speakers to your amplifier or receiver is vital to obtaining good sound quality. Please follow these directions carefully. Sloppy connections can cause amplifier malfunction or damage.
Klipsch Synergy SLX speakers are wired internally with multiple gauges of
BUT FIRST: TYPES OF CONNECTORS
Bare wire — Pull the two conductors apart for about an inch and strip approximately 1/4" of insulation from the end of each. (A wire stripper will simplify this, but you can use an ordinary pocket knife to cut around and through the insulation down to the wire.) Twist the strands of wire on each individual conductor tightly together. Loosen the nuts on a pair of binding posts until the holes through the metal posts are exposed, then insert the bare wire through the holes. Screw the nuts down
Pins — Many
or damage.
Spade lugs — Some speaker cables are terminated with
OTHER TYPES OF SPECIALTY CONNECTORS ARE AVAILABLE TO FACILITATE HOOKING UP YOUR SPEAKERS. PLEASE CONSULT YOUR AUTHORIZED KLIPSCH DEALER FOR SUGGESTIONS AND FURTHER DETAILS.
ENGLISH