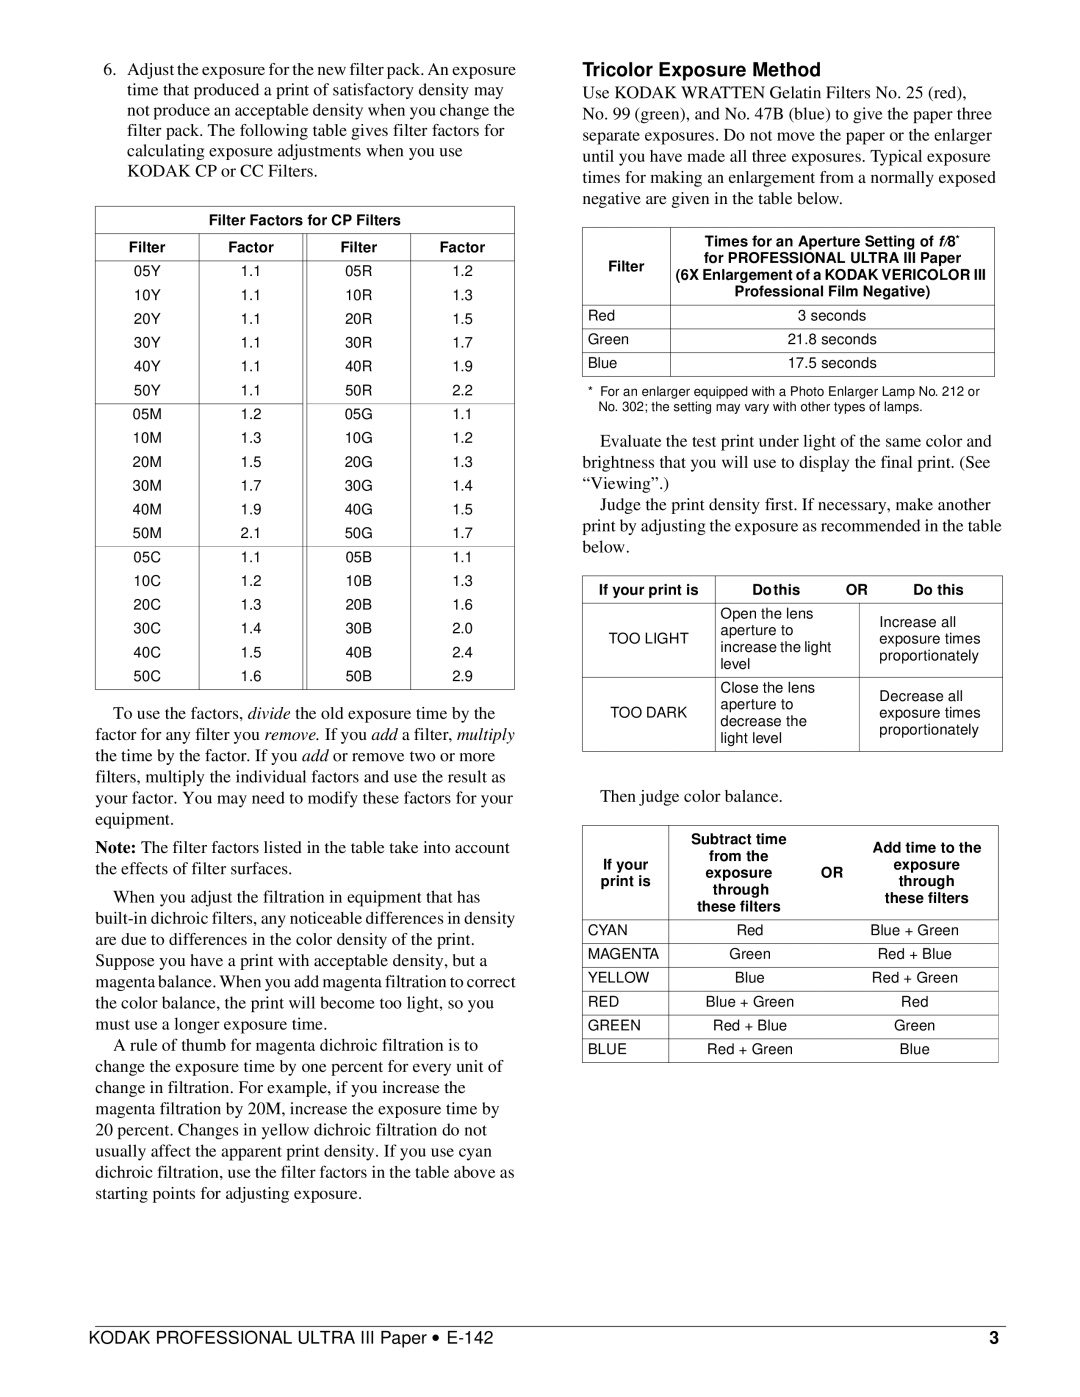
6.Adjust the exposure for the new filter pack. An exposure time that produced a print of satisfactory density may not produce an acceptable density when you change the filter pack. The following table gives filter factors for calculating exposure adjustments when you use KODAK CP or CC Filters.
Filter Factors for CP Filters
Filter | Factor |
| Filter | Factor |
|
|
|
|
|
05Y | 1.1 |
| 05R | 1.2 |
10Y | 1.1 |
| 10R | 1.3 |
20Y | 1.1 |
| 20R | 1.5 |
30Y | 1.1 |
| 30R | 1.7 |
40Y | 1.1 |
| 40R | 1.9 |
50Y | 1.1 |
| 50R | 2.2 |
|
|
|
|
|
05M | 1.2 |
| 05G | 1.1 |
10M | 1.3 |
| 10G | 1.2 |
20M | 1.5 |
| 20G | 1.3 |
30M | 1.7 |
| 30G | 1.4 |
40M | 1.9 |
| 40G | 1.5 |
50M | 2.1 |
| 50G | 1.7 |
|
|
|
|
|
05C | 1.1 |
| 05B | 1.1 |
10C | 1.2 |
| 10B | 1.3 |
20C | 1.3 |
| 20B | 1.6 |
30C | 1.4 |
| 30B | 2.0 |
40C | 1.5 |
| 40B | 2.4 |
50C | 1.6 |
| 50B | 2.9 |
|
|
|
|
|
To use the factors, divide the old exposure time by the factor for any filter you remove. If you add a filter, multiply the time by the factor. If you add or remove two or more filters, multiply the individual factors and use the result as your factor. You may need to modify these factors for your equipment.
Note: The filter factors listed in the table take into account the effects of filter surfaces.
When you adjust the filtration in equipment that has
A rule of thumb for magenta dichroic filtration is to change the exposure time by one percent for every unit of change in filtration. For example, if you increase the magenta filtration by 20M, increase the exposure time by 20 percent. Changes in yellow dichroic filtration do not usually affect the apparent print density. If you use cyan dichroic filtration, use the filter factors in the table above as starting points for adjusting exposure.
Tricolor Exposure Method
Use KODAK WRATTEN Gelatin Filters No. 25 (red), No. 99 (green), and No. 47B (blue) to give the paper three separate exposures. Do not move the paper or the enlarger until you have made all three exposures. Typical exposure times for making an enlargement from a normally exposed negative are given in the table below.
| Times for an Aperture Setting of f/8* | |
Filter | for PROFESSIONAL ULTRA III Paper | |
(6X Enlargement of a KODAK VERICOLOR III | ||
| ||
| Professional Film Negative) | |
|
| |
Red | 3 seconds | |
|
| |
Green | 21.8 seconds | |
|
| |
Blue | 17.5 seconds | |
|
|
*For an enlarger equipped with a Photo Enlarger Lamp No. 212 or No. 302; the setting may vary with other types of lamps.
Evaluate the test print under light of the same color and brightness that you will use to display the final print. (See “Viewing”.)
Judge the print density first. If necessary, make another print by adjusting the exposure as recommended in the table below.
If your print is | Do this | OR | Do this | |
|
|
|
|
|
| Open the lens |
|
| Increase all |
TOO LIGHT | aperture to |
|
| |
|
| exposure times | ||
increase the light |
|
| ||
|
|
| proportionately | |
| level |
|
| |
|
|
|
| |
|
|
|
|
|
| Close the lens |
|
| Decrease all |
TOO DARK | aperture to |
|
| |
|
| exposure times | ||
decrease the |
|
| ||
|
|
| proportionately | |
| light level |
|
| |
|
|
|
| |
|
|
|
|
|
Then judge color balance.
| Subtract time |
| Add time to the | |
If your | from the |
| ||
| exposure | |||
exposure | OR | |||
print is | through | |||
through |
| |||
|
| these filters | ||
| these filters |
| ||
|
|
| ||
|
|
|
| |
CYAN | Red |
| Blue + Green | |
|
|
|
| |
MAGENTA | Green |
| Red + Blue | |
|
|
|
| |
YELLOW | Blue |
| Red + Green | |
|
|
|
| |
RED | Blue + Green |
| Red | |
|
|
|
| |
GREEN | Red + Blue |
| Green | |
|
|
|
| |
BLUE | Red + Green |
| Blue | |
|
|
|
|
| KODAK PROFESSIONAL ULTRA III Paper • | 3 |