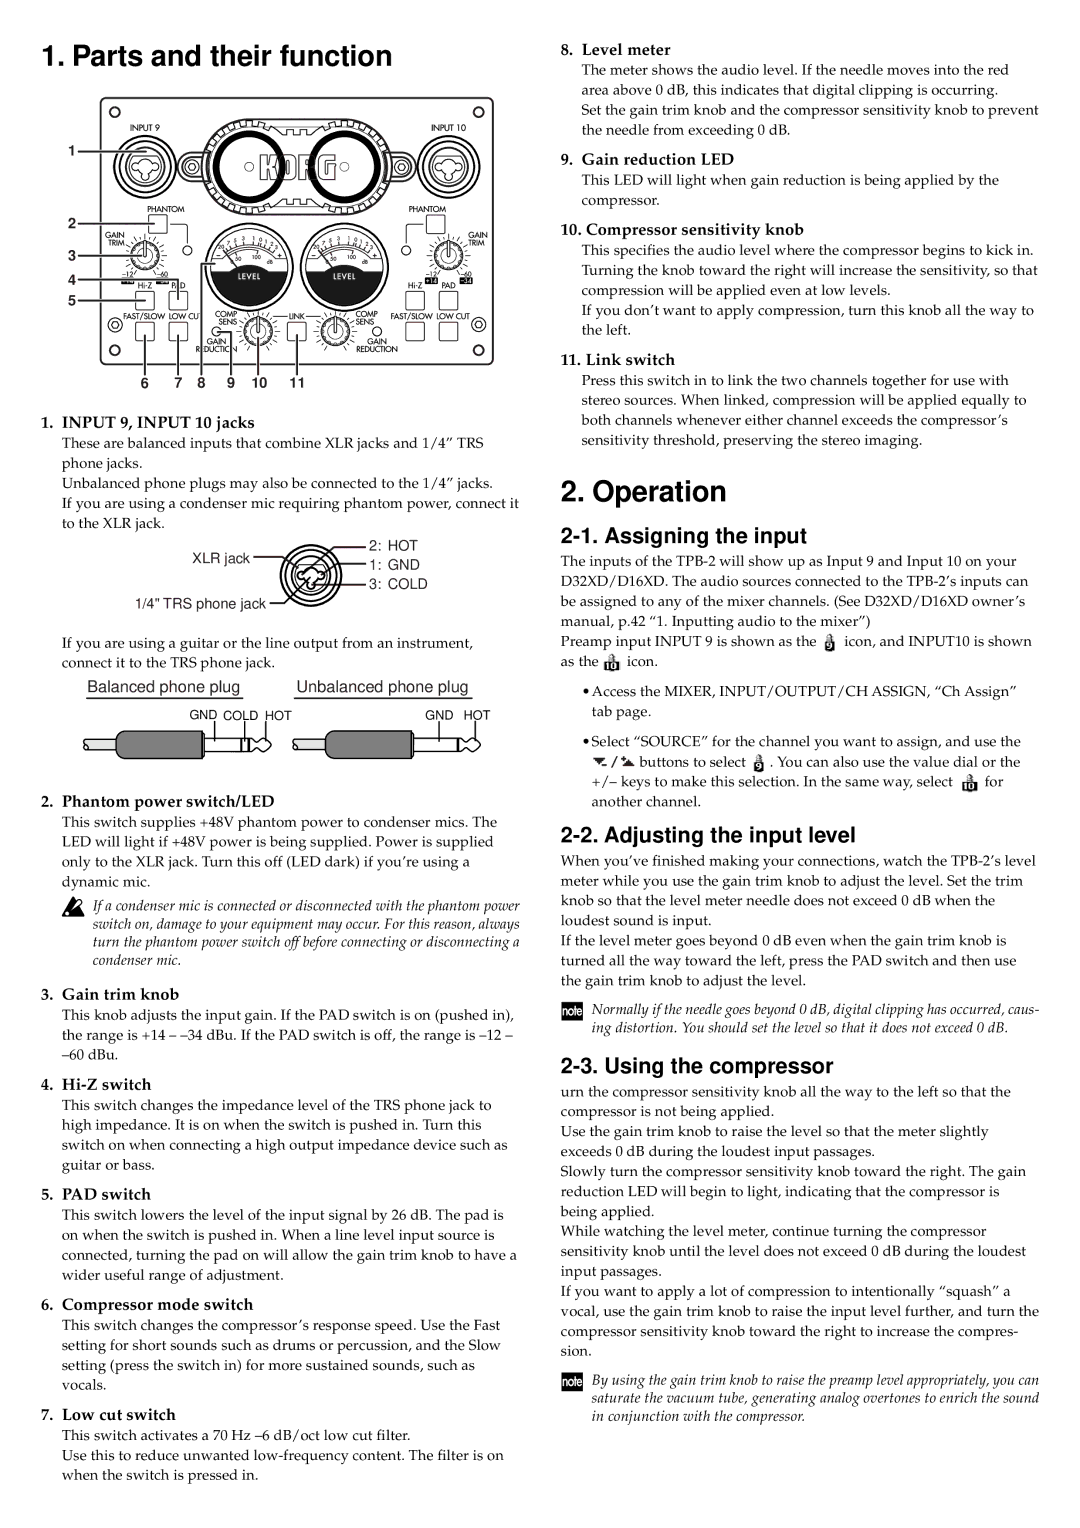
1. Parts and their function
1
2
3
4
5
6 | 7 | 8 | 9 | 10 | 11 |
1.INPUT 9, INPUT 10 jacks
These are balanced inputs that combine XLR jacks and 1/4Ó TRS phone jacks.
Unbalanced phone plugs may also be connected to the 1/4Ó jacks.
If you are using a condenser mic requiring phantom power, connect it to the XLR jack.
XLR jack | 2: HOT | |
1: GND | ||
|
3: COLD
1/4" TRS phone jack
If you are using a guitar or the line output from an instrument, connect it to the TRS phone jack.
Balanced phone plug |
| Unbalanced phone plug |
|
GND COLD HOT | GND HOT | ||
2.Phantom power switch/LED
This switch supplies +48V phantom power to condenser mics. The LED will light if +48V power is being supplied. Power is supplied only to the XLR jack. Turn this off (LED dark) if youÕre using a dynamic mic.
![]() If a condenser mic is connected or disconnected with the phantom power switch on, damage to your equipment may occur. For this reason, always turn the phantom power switch off before connecting or disconnecting a condenser mic.
If a condenser mic is connected or disconnected with the phantom power switch on, damage to your equipment may occur. For this reason, always turn the phantom power switch off before connecting or disconnecting a condenser mic.
3.Gain trim knob
This knob adjusts the input gain. If the PAD switch is on (pushed in), the range is +14 Ð Ð34 dBu. If the PAD switch is off, the range is Ð12 Ð Ð60 dBu.
4.Hi-Z switch
This switch changes the impedance level of the TRS phone jack to high impedance. It is on when the switch is pushed in. Turn this switch on when connecting a high output impedance device such as guitar or bass.
5.PAD switch
This switch lowers the level of the input signal by 26 dB. The pad is on when the switch is pushed in. When a line level input source is connected, turning the pad on will allow the gain trim knob to have a wider useful range of adjustment.
6.Compressor mode switch
This switch changes the compressorÕs response speed. Use the Fast setting for short sounds such as drums or percussion, and the Slow setting (press the switch in) for more sustained sounds, such as vocals.
7.Low cut switch
This switch activates a 70 Hz Ð6 dB/oct low cut filter.
Use this to reduce unwanted
8.Level meter
The meter shows the audio level. If the needle moves into the red area above 0 dB, this indicates that digital clipping is occurring.
Set the gain trim knob and the compressor sensitivity knob to prevent the needle from exceeding 0 dB.
9.Gain reduction LED
This LED will light when gain reduction is being applied by the compressor.
10.Compressor sensitivity knob
This specifies the audio level where the compressor begins to kick in. Turning the knob toward the right will increase the sensitivity, so that compression will be applied even at low levels.
If you donÕt want to apply compression, turn this knob all the way to the left.
11. Link switch
Press this switch in to link the two channels together for use with stereo sources. When linked, compression will be applied equally to both channels whenever either channel exceeds the compressorÕs sensitivity threshold, preserving the stereo imaging.
2. Operation
2-1. Assigning the input
The inputs of the
Preamp input INPUT 9 is shown as the ![]() icon, and INPUT10 is shown as the
icon, and INPUT10 is shown as the ![]() icon.
icon.
¥Access the MIXER, INPUT/OUTPUT/CH ASSIGN, ÒCh AssignÓ tab page.
¥Select ÒSOURCEÓ for the channel you want to assign, and use the
![]()
![]()
![]() buttons to select
buttons to select ![]() . You can also use the value dial or the
. You can also use the value dial or the
+/Ð keys to make this selection. In the same way, select ![]() for another channel.
for another channel.
2-2. Adjusting the input level
When youÕve finished making your connections, watch the
If the level meter goes beyond 0 dB even when the gain trim knob is turned all the way toward the left, press the PAD switch and then use the gain trim knob to adjust the level.
Normally if the needle goes beyond 0 dB, digital clipping has occurred, caus- ing distortion. You should set the level so that it does not exceed 0 dB.
2-3. Using the compressor
urn the compressor sensitivity knob all the way to the left so that the compressor is not being applied.
Use the gain trim knob to raise the level so that the meter slightly exceeds 0 dB during the loudest input passages.
Slowly turn the compressor sensitivity knob toward the right. The gain reduction LED will begin to light, indicating that the compressor is being applied.
While watching the level meter, continue turning the compressor sensitivity knob until the level does not exceed 0 dB during the loudest input passages.
If you want to apply a lot of compression to intentionally ÒsquashÓ a vocal, use the gain trim knob to raise the input level further, and turn the compressor sensitivity knob toward the right to increase the compres- sion.
By using the gain trim knob to raise the preamp level appropriately, you can saturate the vacuum tube, generating analog overtones to enrich the sound in conjunction with the compressor.
