INFORMACIÓN GENERAL DE SEGURIDAD
Al usar aparatos eléctricos, las precauciones básicas de seguridad
deberan siempre de seguirse para reducir el riesgo de incendio, choque
eléctrico, y daño a personas, incluyenda las siguientes.
1.Lea todas las instrucciones antes de usar este Calefactor.
2.Use este Calefactor solamente como se describe en este manual. Cualquier otro uso no recomendado por el fabricante podría causar incendio, choque eléctrico o lesiones a personas.
3.Asegúrese que la fuente de alimentación eléctrica sea la adecuada para los requerimientos eléctricos del Calefactor.
4.Es necesario tener extremo cuidado cuando se utiliza cualquier Calefactor junto a o cerca de niños o discapacitados y siempre que el Calefactor esté en funcionamiento sin atención de otras personas.
5.Este aparato tiene la clavija polarizada (un diente es más ancho que el otro). Esta clavija está diseñada para ser insertada en un tomacorriente polar de una sola forma a fin de reducir el riesgo de choque eléctrico. Si la clavija no encaja totalmente en el tomacorriente, dele vuelta. Si aun así no encaja, consulte a un técnico electricista. No trate de modificar estas características de seguridad.
6.NO enchufe el Calefactor en ningún otro dispositivo que tenga cables conectados, tales como distribuidores de electricidad, disyuntores de electricidad, adaptadores de tomacorrientes múltiples o refrescadores de aire enchufables. El uso de tales dispositivos podría crear un riesgo de incendio. Conecte la unidad directamente a un tomacorriente de pared de 120V únicamente.
7.Evite el uso de cables de alargue porque el cable de alargue podría sobrecalentarse y provocar un riesgo de incendio. Sin embargo, si tiene que usar un cable de alargue, minimice el riesgo de sobrecalentamiento garantizando que el mismo esté aprobado por la UL. El cable deberá ser uno de 3 alambres, con conexión a tierra, con un tamaño mínimo N° 14 AWG y clasificado para no menos de 1875 vatios. NUNCA use un solo cable de alargue para operar más de un Calefactor.
8.No opere ningún Calefactor con un cable o enchufe dañados o después que el Calefactor funcione mal, se haya caído o haya sido dañado de alguna manera. Lleve el Calefactor a la empresa de reparaciones autorizada para su revisión, ajuste eléctrico o mecánico o reparación.
9.Para desconectar el Calefactor, coloque los controles en la posición APAGADO, luego retire el enchufe del tomacorriente.
10.Siempre desconecte el Calefactor cuando no esté en uso. Desconecte el cable eléctrico antes de reparar o mover el Calefacto r.
ADVERTENCIA: NO DEPENDA DEL INTERRUPTOR DE ENCENDIDO / APAGADO COMO ÚNICO MEDIO PARA DESCONECTAR LA ELECTRICIDAD CUANDO ESTÉ REPARANDO O TRASLADANDO EL CALEFACTOR. SIEMPRE DESCONECTE EL CABLE ELÉCTRICO.
11.No inserte ni permita que alguien introduzca dedos u objetos extraños en cualquier abertura de ventilación o de escape ya que podrían causar un choque eléctrico o un incendio, o dañar el Calefactor. No bloquee ni toque indebidamente el Calefactor de ninguna manera mientras esté en funcionamiento.
12.Para evitar un posible incendio, no bloquee las tomas o los escapes de aire de ninguna manera. No coloque sobre superficies suaves, como una cama, donde las aberturas podrían resultar bloqueadas.
13.Siempre coloque el Calefactor sobre una superficie estable, lisa y nivelada cuando esté en funcionamiento, para evitar la posibilidad de que el Calefactor se caiga. Coloque el Cable Eléctrico de modo tal que el Calefactor u otros objetos no estén apoyados sobre él. No introduzca el Cable Eléctrico debajo de alfombras. No cubra el Cable Eléctrico con tapetes, alfombrillas u objetos similares. Coloque el Cable Eléctrico lejos de los lugares transitados de la habitación y donde nadie pueda tropezarse con el mismo.
14.Este Calefactor está caliente cuando se lo utiliza. Para evitar quemaduras, no permita que la piel desnuda toque las superficies calientes. Siempre use la agarradera cuando traslade este Calefactor. Mantenga los materiales combustibles, tales como muebles, almohadas, ropa de cama, papeles, ropa y cortinas a una distancia de por lo menos 3 pies (0.9 m) del frente del Calefactor y manténgalas a una distancia de por lo menos 1 pie (0.3 m) de los laterales y de la parte posterior.
15.Un Calefactor tiene partes calientes y con arcos o chispas en su interior. No use el Calefactor en áreas donde se utilice o almacene gasolina, pintura o líquidos inflamables. NO debe ser usado en lugares potencialmente peligrosos tales como atmósferas inflamables, explosivas, cargadas de sustancias químicas o húmedas. Este Calefactor está diseñado SÓLO para uso general.
16.Este Calefactor no está diseñado para ser usado en lugares húmedos o mojados. Este Calefactor no está diseñado para usarse en baños, áreas de lavandería y similares emplazamientos interiores. Nunca coloque un Calefactor donde podría caer dentro de una tina de baño o cualquier otro contenedor de agua.
17.No use el Calefactor al aire libre.
OPERATION
1.Carefully remove the Heater from the bag and the carton.
2.Place the Heater on a firm, level surface.
WARNING: Plastic or rubber tabs, like the feet on this unit, may stick to furniture surfaces and/or hardwood floors. The unit may leave a residue that could darken, stain or leave permanent blemishes on the finish of certain furniture surfaces, including wood surfaces, and/ or hardwood floors.
3.Plug the cord set into a 120V~ electrical outlet. Be sure plug fits tightly in outlet.
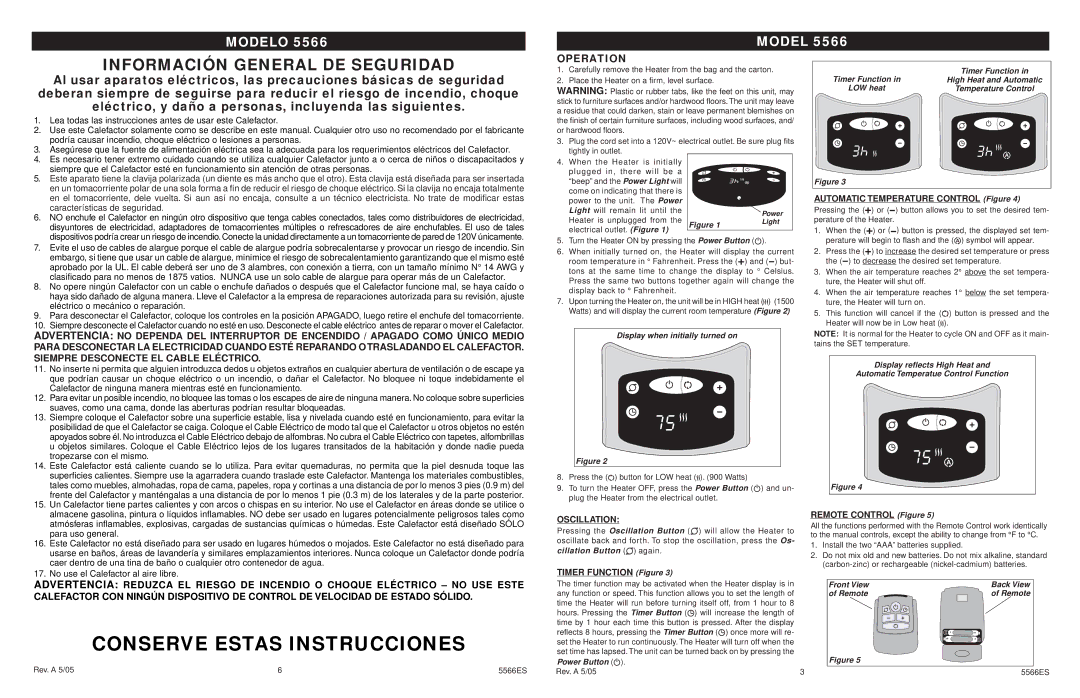
4.When the Heater is initially
plugged in, there will be a | | |
“beep” and thePower Light will | | |
come on indicating that there is | | |
power to the unit. The Power | | |
Light will remain lit until the | | Power |
Heater is unplugged from the | |
Figure 1 | Light |
electrical outlet. (Figure 1) | |
| |
5.Turn the Heater ON by pressing the Power Button ( ).
).
6.When initially turned on, the Heater will display the current
room temperature in ° Fahrenheit. Press the ( ) and (
 ) but- tons at the same time to change the display to ° Celsius. Press the same two buttons together again will change the display back to ° Fahrenheit.
7.Upon turning the Heater on, the unit will be in HIGH heat (

 ) (1500 Watts) and will display the current room temperature (Figure 2)
Display when initially turned on
Figure 2
8.Press the (

 ) button for LOW heat (
 ). (900 Watts)
9.To turn the Heater OFF, press the Power Button ( ) and un- plug the Heater from the electrical outlet.
OSCILLATION:
Pressing the Oscillation Button ( ) will allow the Heater to oscillate back and forth. To stop the oscillation, press the Os- cillation Button (
 ) again.
TIMER FUNCTION (Figure 3)
Timer Function in | Timer Function in |
High Heat and Automatic |
LOW heat | Temperature Control |
Figure 3
AUTOMATIC TEMPERATURE CONTROL (Figure 4)
Pressing the ( ) or (
 ) button allows you to set the desired tem- perature of the Heater.
1.When the ( ) or (
 ) button is pressed, the displayed set tem- perature will begin to flash and the (
 ) symbol will appear.
2.Press the ( ) to increase the desired set temperature or press the (
 ) to decrease the desired set temperature.
3.When the air temperature reaches 2° above the set tempera- ture, the Heater will shut off.
4.When the air temperature reaches 1° below the set tempera- ture, the Heater will turn on.
5.This function will cancel if the (
 ) button is pressed and the Heater will now be in Low heat (
 ).
).
NOTE: It is normal for the Heater to cycle ON and OFF as it main- tains the SET temperature.
Display reflects High Heat and
Automatic Temperatue Control Function
Figure 4
REMOTE CONTROL (Figure 5)
All the functions performed with the Remote Control work identically to the manual controls, except the ability to change from °F to °C.
1.Install the two “AAA” batteries supplied.
2.Do not mix old and new batteries. Do not mix alkaline, standard (carbon-zinc) or rechargeable (nickel-cadmium) batteries.