INSTALLATION

General

Read this entire instruction manual, as well as the instructions supplied in separate equipment, before starting the installation. Observe and follow all warn- ings, cautions, instructional labels, and tags. Failure to comply with these instructions could result in an unsafe condition and/or premature component failure.

These instructions are intended as a general guide only for use by qualified personnel and do not supersede any national or local codes in any way. The installation must comply with all provincial, state, and local codes as well as the National Electrical Code (U.S.) or Canadian Electrical Code (Canada). Compliance should be determined prior to installation.

When servicing or repairing HVAC components, ensure the fasteners are appropriately tightened. Table 1 shows torque values for fasteners.

Torque Table

Fastener

Torque


Stem Caps

8 ft. lbs.


Service Port Caps

8 ft. lbs.

Sheet Metal Screws

16 in. lbs.


#8 Machine Screws

16 in. lbs.

#10 Machine Screws

28 in. lbs.


Compressor Bolts

90 in. lbs.


Table 1

Inspection of Shipment

Upon receipt of equipment, carefully inspect it for possible shipping damage. If damage is found, it should be noted on the carrier’s freight bill. Take special care to examine the unit inside the carton if the carton is damaged. Any concealed damage discovered should be reported to the last carrier immediately, preferably in writing, and should include a request for inspection by the carrier’s agent.

If any damages are discovered and reported to the carrier DO NOT INSTALL THE UNIT, as claim may be denied.

Check the unit rating plate to confirm specifications are as ordered.

Location of Unit

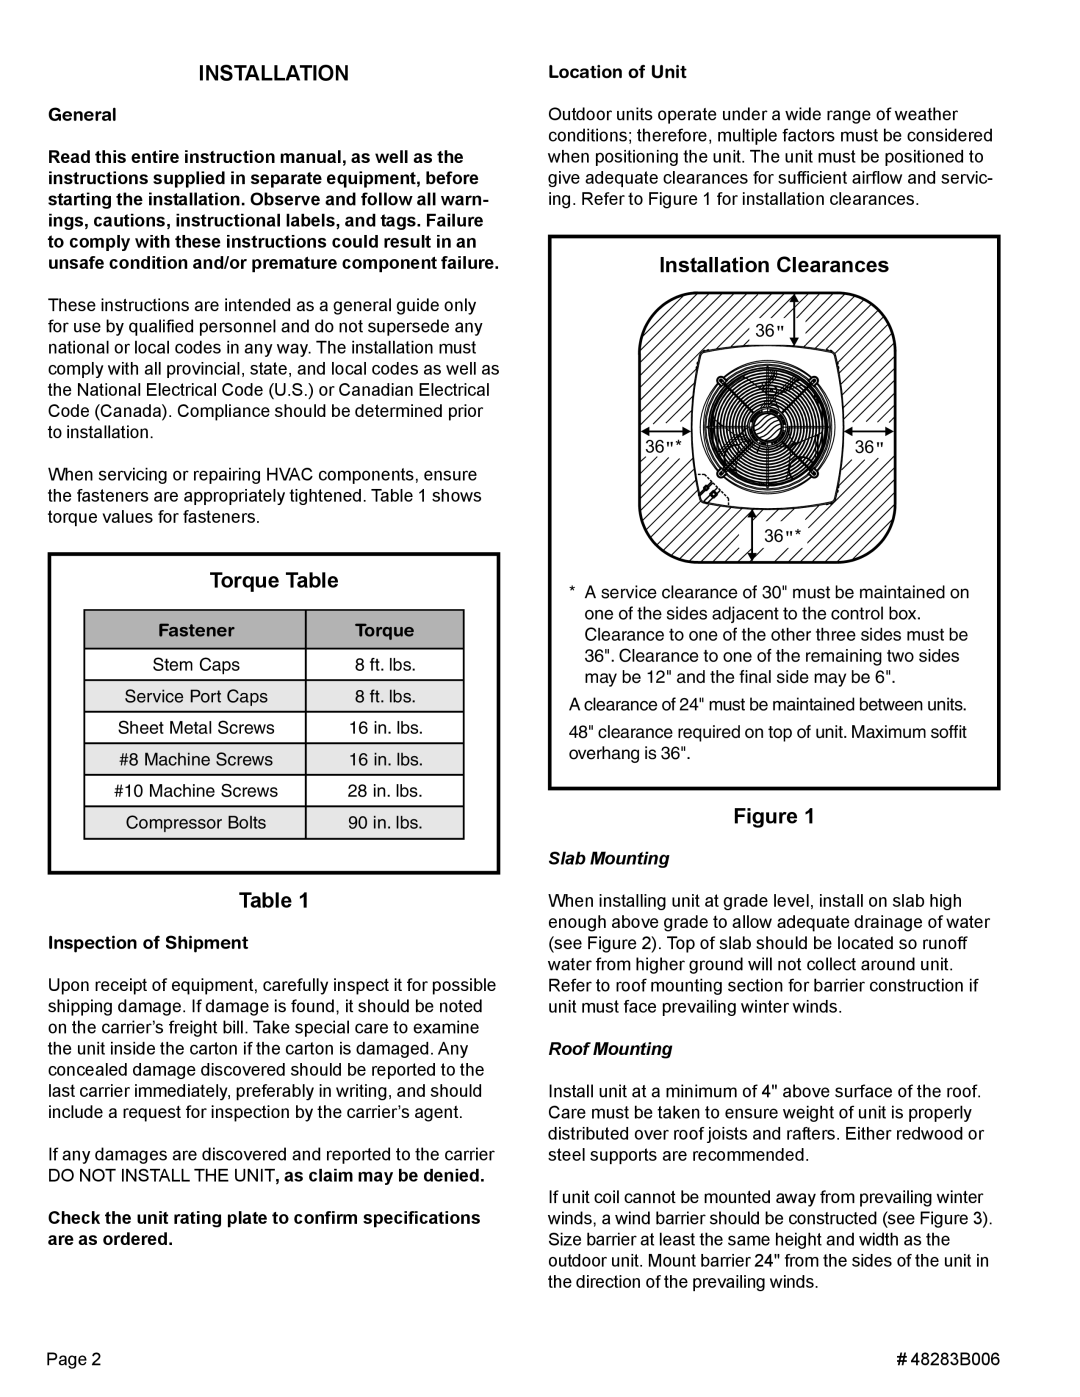
Outdoor units operate under a wide range of weather conditions; therefore, multiple factors must be considered when positioning the unit. The unit must be positioned to give adequate clearances for sufficient airflow and servic- ing. Refer to Figure 1 for installation clearances.

Installation Clearances

36￿

36￿*36￿

36￿*

*A service clearance of 30" must be maintained on one of the sides adjacent to the control box. Clearance to one of the other three sides must be 36". Clearance to one of the remaining two sides may be 12" and the final side may be 6".

A clearance of 24" must be maintained between units.

48" clearance required on top of unit. Maximum soffit overhang is 36".

Figure 1

Slab Mounting

When installing unit at grade level, install on slab high enough above grade to allow adequate drainage of water (see Figure 2). Top of slab should be located so runoff water from higher ground will not collect around unit. Refer to roof mounting section for barrier construction if unit must face prevailing winter winds.

Roof Mounting

Install unit at a minimum of 4" above surface of the roof. Care must be taken to ensure weight of unit is properly distributed over roof joists and rafters. Either redwood or steel supports are recommended.

If unit coil cannot be mounted away from prevailing winter winds, a wind barrier should be constructed (see Figure 3). Size barrier at least the same height and width as the outdoor unit. Mount barrier 24" from the sides of the unit in the direction of the prevailing winds.

Page 2

# 48283B006

Page 2
Image 2
Lennox International Inc 2SCU13 warranty Torque Table, Installation Clearances, Slab Mounting, Roof Mounting

2SCU13 specifications

Lennox International Inc. is renowned for its innovation in heating, ventilation, air conditioning, and refrigeration (HVACR) systems. One of its standout products is the 2SCU13 model, which embodies the company's commitment to energy efficiency and customer comfort. This air conditioning unit is particularly appreciated in both residential and light commercial applications for its robust performance and advanced features.

The 2SCU13 is designed with a focus on energy efficiency, boasting a SEER rating of up to 14. This not only eases the burden on utility bills but also aligns with environmentally conscious practices by reducing carbon footprints. The unit’s efficiency is further enhanced by its scroll compressor, which is known for reliable performance and quiet operation.

One of the key characteristics of the 2SCU13 is its two-stage cooling system. This technology allows the unit to operate at two different cooling capacities, adapting to varying temperature conditions. By running at a lower capacity during mild weather, the 2SCU13 minimizes energy consumption, while still ensuring optimal comfort during hotter days by ramping up to full capacity when needed. This adaptability also contributes to a more consistent temperature throughout the space being cooled.

Another notable feature is the unit's humidity control capabilities. The two-stage operation also aids in managing indoor humidity levels, making it an excellent choice for areas with high humidity. Proper humidity control not only enhances comfort but also plays a crucial role in improving indoor air quality.

The design of the 2SCU13 ensures durability and longevity. It comes equipped with a rugged cabinet that withstands the elements, along with a baked-on powder coat finish that resists rust and corrosion. The unit also includes a protective grille that serves to shield the coil from debris, further enhancing its lifespan.

With easy installation and maintenance in mind, Lennox has incorporated service-friendly features into the design of the 2SCU13. The unit includes a convenient access panel that simplifies routine checks and repairs, making it easier for homeowners and technicians alike.

Overall, Lennox International Inc. 2SCU13 represents a harmonization of efficiency, comfort, and durability, making it a noteworthy choice among HVAC systems. Its advanced technology and design features ensure that it meets the evolving needs of consumers while providing reliable performance for years to come.