![](/images/new-backgrounds/1010500/1050025x1.webp)
Hardware | Hardware Installation |
Installation |
Product Features
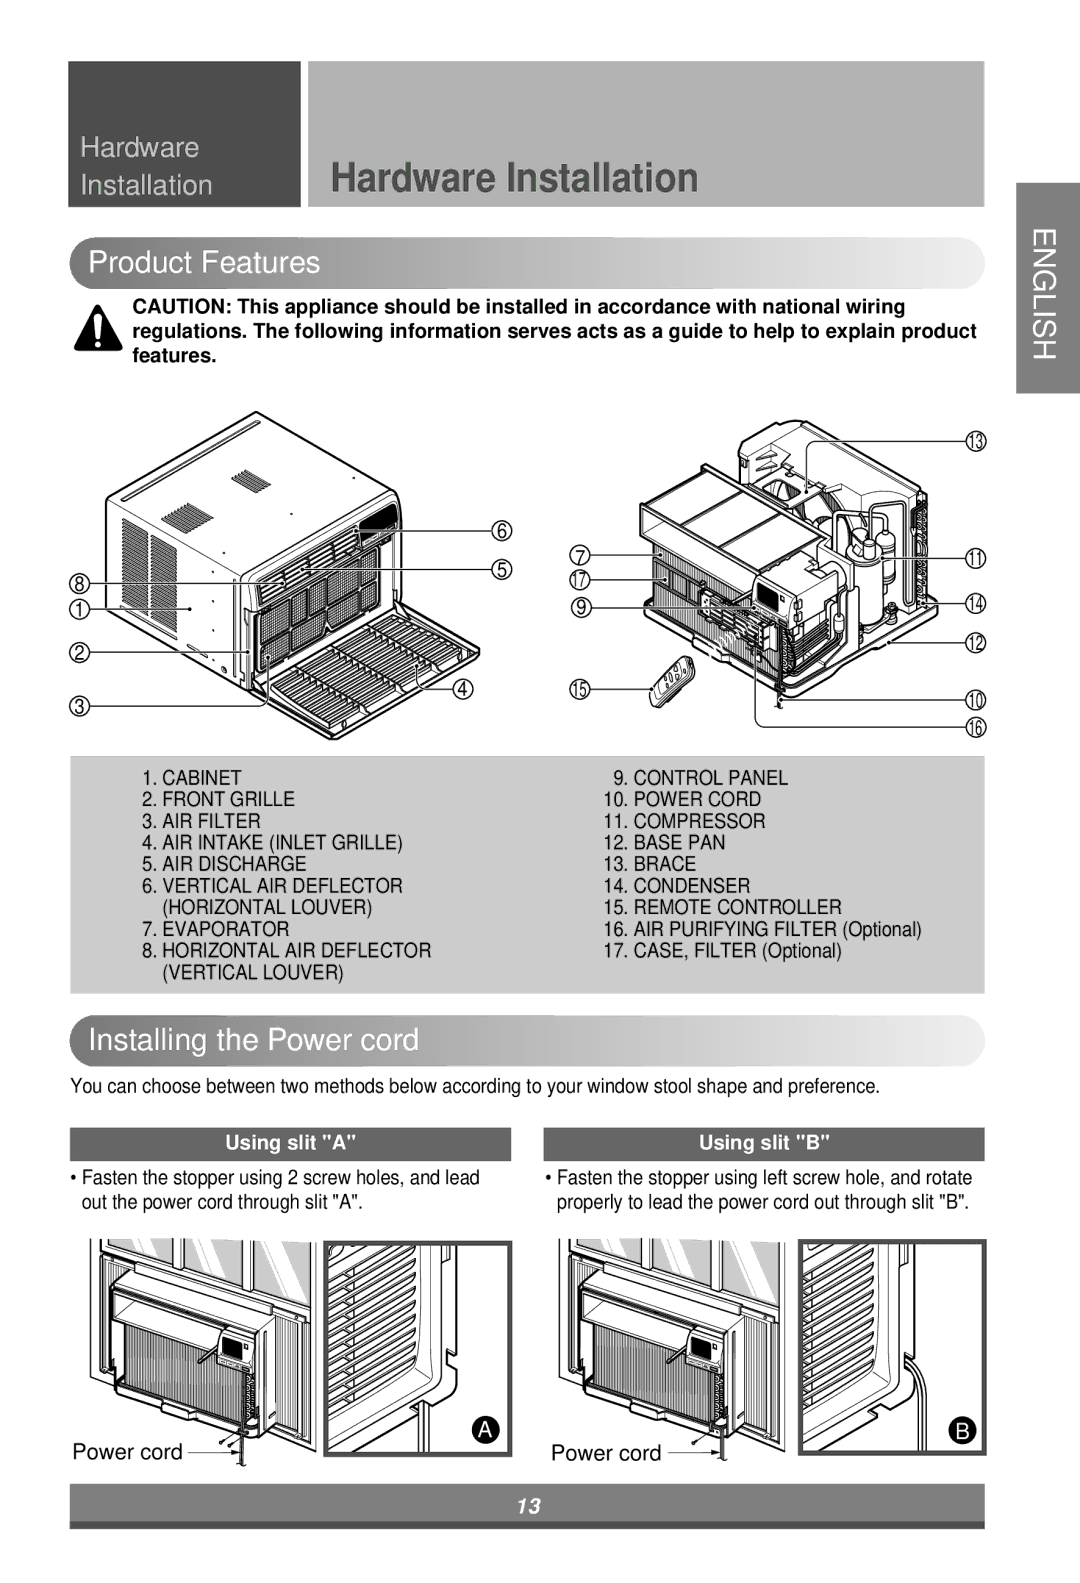
CAUTION: This appliance should be installed in accordance with national wiring regulations. The following information serves acts as a guide to help to explain product features.
13
ENGLISH
6
5 8
1
2
4
3
7 | 11 |
17 |
|
9 | 14 |
| 12 |
15 | 10 |
| |
| 16 |
1. CABINET | 9. CONTROL PANEL |
2. FRONT GRILLE | 10. POWER CORD |
3. AIR FILTER | 11. COMPRESSOR |
4. AIR INTAKE (INLET GRILLE) | 12. BASE PAN |
5. AIR DISCHARGE | 13. BRACE |
6. VERTICAL AIR DEFLECTOR | 14. CONDENSER |
(HORIZONTAL LOUVER) | 15. REMOTE CONTROLLER |
7. EVAPORATOR | 16. AIR PURIFYING FILTER (Optional) |
8. HORIZONTAL AIR DEFLECTOR | 17. CASE, FILTER (Optional) |
(VERTICAL LOUVER) |
|
|
|
![](/images/new-backgrounds/1010500/1050025xi68.webp)
Installing
the
Power
cord![](/images/new-backgrounds/1010500/1050025xi73.webp)
![](/images/new-backgrounds/1010500/1050025xi74.webp)
![](/images/new-backgrounds/1010500/1050025xi75.webp)
![](/images/new-backgrounds/1010500/1050025xi76.webp)
![](/images/new-backgrounds/1010500/1050025xi77.webp)
![](/images/new-backgrounds/1010500/1050025xi78.webp)
![](/images/new-backgrounds/1010500/1050025xi79.webp)
![](/images/new-backgrounds/1010500/1050025xi80.webp)
![](/images/new-backgrounds/1010500/1050025xi81.webp)
![](/images/new-backgrounds/1010500/1050025xi82.webp)
![](/images/new-backgrounds/1010500/1050025xi83.webp)
![](/images/new-backgrounds/1010500/1050025xi84.webp)
![](/images/new-backgrounds/1010500/1050025xi85.webp)
![](/images/new-backgrounds/1010500/1050025xi86.webp)
![](/images/new-backgrounds/1010500/1050025xi87.webp)
![](/images/new-backgrounds/1010500/1050025xi88.webp)
![](/images/new-backgrounds/1010500/1050025xi89.webp)
![](/images/new-backgrounds/1010500/1050025xi90.webp)
![](/images/new-backgrounds/1010500/1050025xi91.webp)
![](/images/new-backgrounds/1010500/1050025xi92.webp)
![](/images/new-backgrounds/1010500/1050025xi93.webp)
![](/images/new-backgrounds/1010500/1050025xi94.webp)
![](/images/new-backgrounds/1010500/1050025xi95.webp)
![](/images/new-backgrounds/1010500/1050025xi96.webp)
![](/images/new-backgrounds/1010500/1050025xi97.webp)
![](/images/new-backgrounds/1010500/1050025xi98.webp)
![](/images/new-backgrounds/1010500/1050025xi99.webp)
![](/images/new-backgrounds/1010500/1050025xi100.webp)
![](/images/new-backgrounds/1010500/1050025xi101.webp)
![](/images/new-backgrounds/1010500/1050025xi102.webp)
![](/images/new-backgrounds/1010500/1050025xi103.webp)
![](/images/new-backgrounds/1010500/1050025xi104.webp)
![](/images/new-backgrounds/1010500/1050025xi105.webp)
![](/images/new-backgrounds/1010500/1050025xi106.webp)
![](/images/new-backgrounds/1010500/1050025xi107.webp)
![](/images/new-backgrounds/1010500/1050025xi108.webp)
![](/images/new-backgrounds/1010500/1050025xi109.webp)
![](/images/new-backgrounds/1010500/1050025xi110.webp)
![](/images/new-backgrounds/1010500/1050025xi111.webp)
![](/images/new-backgrounds/1010500/1050025xi112.webp)
![](/images/new-backgrounds/1010500/1050025xi113.webp)
![](/images/new-backgrounds/1010500/1050025xi114.webp)
![](/images/new-backgrounds/1010500/1050025xi115.webp)
![](/images/new-backgrounds/1010500/1050025xi116.webp)
![](/images/new-backgrounds/1010500/1050025xi117.webp)
![](/images/new-backgrounds/1010500/1050025xi118.webp)
You can choose between two methods below according to your window stool shape and preference.
Using slit "A" | Using slit "B" |
• Fasten the stopper using 2 screw holes, and lead | • Fasten the stopper using left screw hole, and rotate |
out the power cord through slit "A". | properly to lead the power cord out through slit "B". |
Power cord
A
Power cord
B
13