8.Attach the
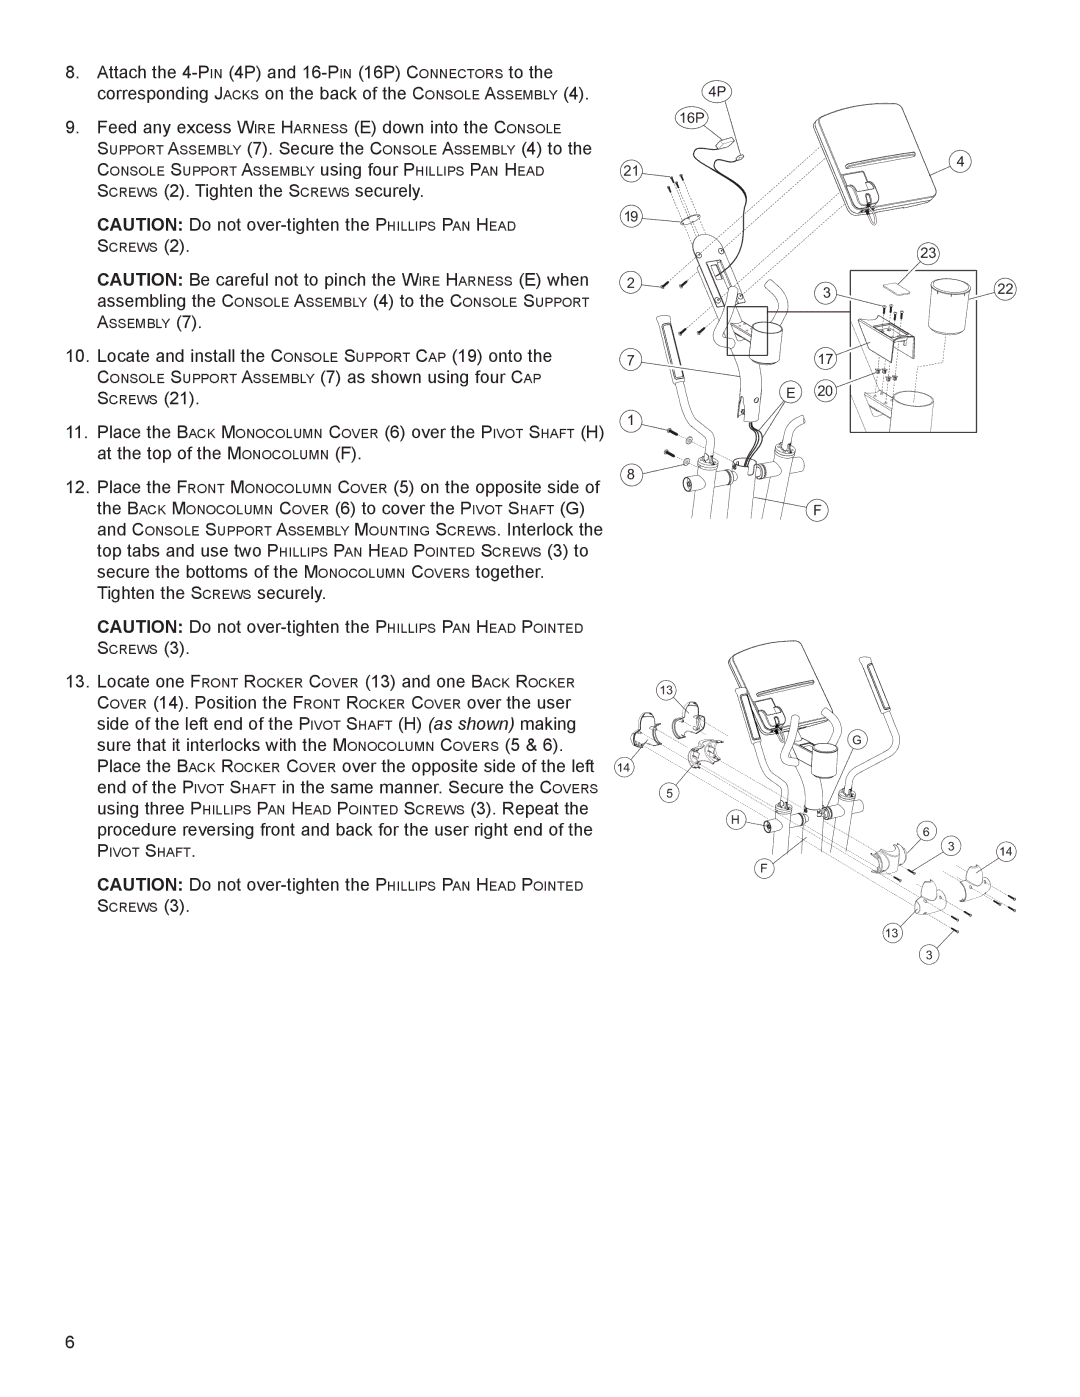
9.Feed any excess WIRE HARNESS (E) down into the CONSOLE
SUPPORT ASSEMBLY (7). Secure the CONSOLE ASSEMBLY (4) to the CONSOLE SUPPORT ASSEMBLY using four PHILLIPS PAN HEAD
SCREWS (2). Tighten the SCREWS securely.
CAUTION: Do not
| 4P |
| 16P |
21 | 4 |
| |
19 |
|
| 23 |
| CAUTION: Be careful not to pinch the WIRE HARNESS (E) when | 2 | 3 |
| assembling the CONSOLE ASSEMBLY (4) to the CONSOLE SUPPORT |
| |
|
|
| |
| ASSEMBLY (7). |
|
|
10. | Locate and install the CONSOLE SUPPORT CAP (19) onto the | 7 | 17 |
| CONSOLE SUPPORT ASSEMBLY (7) as shown using four CAP | E | 20 |
| SCREWS (21). | ||
|
|
| |
11. | Place the BACK MONOCOLUMN COVER (6) over the PIVOT SHAFT (H) | 1 |
|
|
| ||
| at the top of the MONOCOLUMN (F). |
|
|
12. Place the FRONT MONOCOLUMN COVER (5) on the opposite side of | 8 | |
| ||
the BACK MONOCOLUMN COVER (6) to cover the PIVOT SHAFT (G) | F | |
and CONSOLE SUPPORT ASSEMBLY MOUNTING SCREWS. Interlock the |
| |
top tabs and use two PHILLIPS PAN HEAD POINTED SCREWS (3) to |
| |
secure the bottoms of the MONOCOLUMN COVERS together. |
| |
Tighten the SCREWS securely. |
| |
CAUTION: Do not |
| |
SCREWS (3). |
| |
13. Locate one FRONT ROCKER COVER (13) and one BACK ROCKER | 13 | |
COVER (14). Position the FRONT ROCKER COVER over the user | ||
| ||
side of the left end of the PIVOT SHAFT (H) (as shown) making | G | |
sure that it interlocks with the MONOCOLUMN COVERS (5 & 6). | ||
Place the BACK ROCKER COVER over the opposite side of the left | 14 | |
end of the PIVOT SHAFT in the same manner. Secure the COVERS | 5 | |
using three PHILLIPS PAN HEAD POINTED SCREWS (3). Repeat the | ||
H | ||
procedure reversing front and back for the user right end of the | ||
6 | ||
PIVOT SHAFT. | 3 |
F
CAUTION: Do not
SCREWS (3).
13
3
22
14
6