READ AND UNDERSTAND THESE INSTRUCTIONS BEFORE INSTALLING FIXTURE
This fixture is intended for installation in accordance with the National Electrical Code and local regulations. To assure full compliance with local codes and regulations, check with your local electrical inspector before installation. To prevent electrical shock, turn off electricity at fuse box before proceeding.
Retain these instructions for maintenance reference.
INSTRUCTION SHEET NO.
IS:3R
C0400 Page 1 of 1
INSTALLATION PROCEDURE FOR REMODELER KITS
2003R (3 3/4”), 1003R (5”), 1103R (6 3/4”)
FOR USE WITH LYTECASTER 2000 SERIES, 1000 SERIES OR 1100 SERIES TRIMS (FINISHING SECTIONS) ONLY
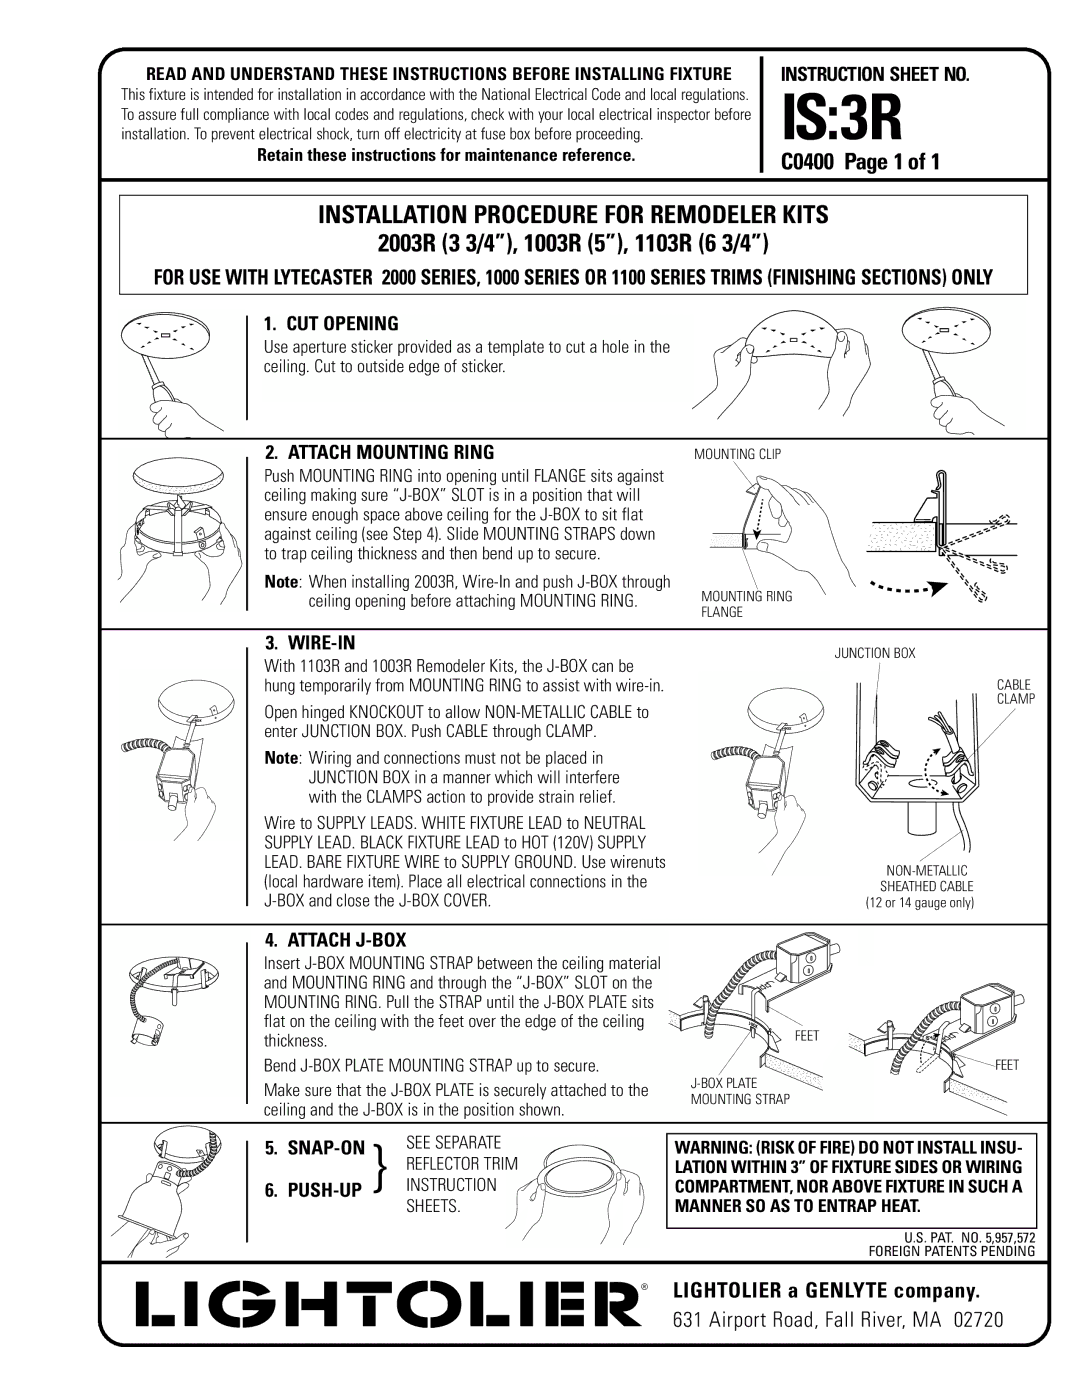
1. CUT OPENING
Use aperture sticker provided as a template to cut a hole in the ceiling. Cut to outside edge of sticker.
2. ATTACH MOUNTING RING | MOUNTING CLIP |
Push MOUNTING RING into opening until FLANGE sits against ceiling making sure
Note: When installing 2003R,
ceiling opening before attaching MOUNTING RING. MOUNTING RING FLANGE
3. WIRE-IN
JUNCTION BOX
With 1103R and 1003R Remodeler Kits, the
hung temporarily from MOUNTING RING to assist with ![]() CABLE CLAMP
CABLE CLAMP
Open hinged KNOCKOUT to allow
Note: Wiring and connections must not be placed in JUNCTION BOX in a manner which will interfere with the CLAMPS action to provide strain relief.
Wire to SUPPLY LEADS. WHITE FIXTURE LEAD to NEUTRAL |
| |
SUPPLY LEAD. BLACK FIXTURE LEAD to HOT (120V) SUPPLY |
| |
LEAD. BARE FIXTURE WIRE to SUPPLY GROUND. Use wirenuts | ||
(local hardware item). Place all electrical connections in the | ||
SHEATHED CABLE | ||
(12 or 14 gauge only) |
4. ATTACH J-BOX
Insert |
| ||
and MOUNTING RING and through the |
| ||
MOUNTING RING. Pull the STRAP until the |
| ||
flat on the ceiling with the feet over the edge of the ceiling | FEET | ||
thickness. |
| ||
Bend | FEET | ||
Make sure that the | |||
MOUNTING STRAP | |||
ceiling and the | |||
| |||
5. | SEE SEPARATE | WARNING: (RISK OF FIRE) DO NOT INSTALL INSU- | |
6. | REFLECTOR TRIM | LATION WITHIN 3” OF FIXTURE SIDES OR WIRING | |
INSTRUCTION | COMPARTMENT, NOR ABOVE FIXTURE IN SUCH A | ||
| SHEETS. | MANNER SO AS TO ENTRAP HEAT. | |
|
| U.S. PAT. NO. 5,957,572 | |
|
| FOREIGN PATENTS PENDING | |
| ® | LIGHTOLIER a GENLYTE company. | |
631 Airport Road, Fall River, MA 02720