IS:4531

4551, and 4552 Series Fixtures.


Instructions for Installation of Arco™ 4531, 4532, 4533,


Page 1 of 2

0995


Read and understand these instructions before installing fixture.

This fixture is intended for installation in accordance with the National Electrical Code and local or Federal code specifications. To prevent electric shock, turn off electricity at fuse box before proceeding.

Retain these instructions for maintenance reference.

NOTE:

This instruction sheet covers both compact fluorescent and incandescent fixtures. Although illustration shows compact fluorescent, the incandescent version assembles and installs in the same manner.

NOTE:

The Backplate is provided with (3) Auxiliary Mounting Knockout Holes (4531, 4532, 4551, and 4552 series fixtures) for direct mounting to wall surfaces. These can be used for added security or where direct Outlet Box mounting is not available. To remove plug in Knockout Holes, follow steps 1 through 3 below.

For 4533 series fixtures, (4) Auxiliary Mounting Knockout Holes are provided for direct mounting to wall surfaces (no plugs to remove). It is recommended that Auxiliary Mounting Holes be used on 4532, 4533 and 4552 series fixtures.

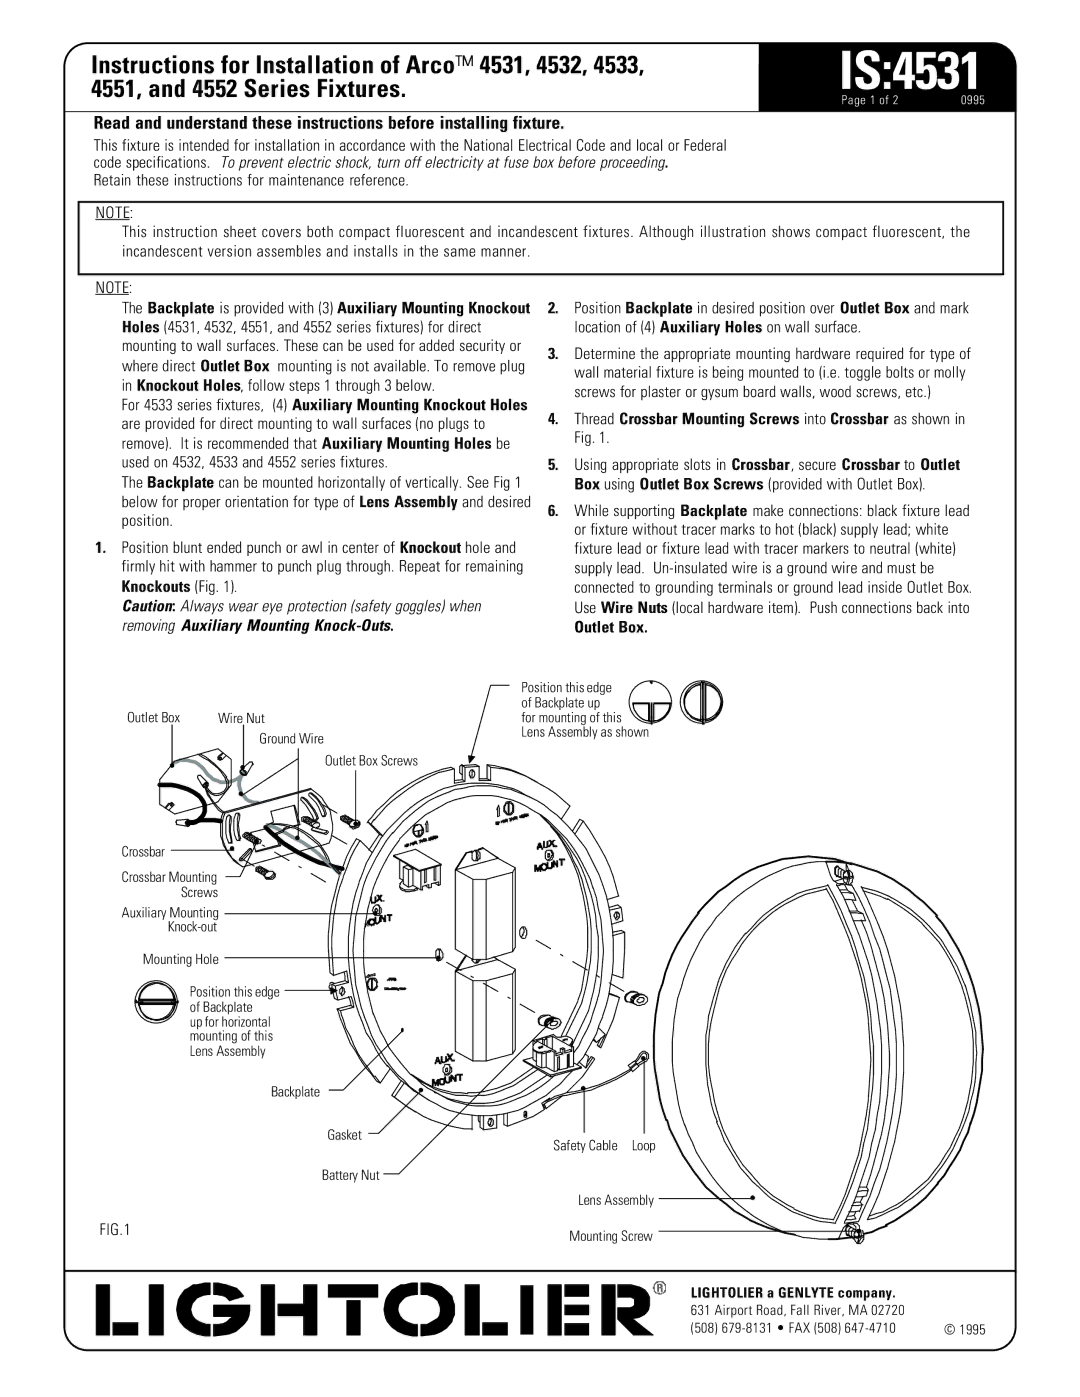
The Backplate can be mounted horizontally of vertically. See Fig 1 below for proper orientation for type of Lens Assembly and desired position.

1.Position blunt ended punch or awl in center of Knockout hole and firmly hit with hammer to punch plug through. Repeat for remaining Knockouts (Fig. 1).

Caution: Always wear eye protection (safety goggles) when removing Auxiliary Mounting Knock-Outs.

2.Position Backplate in desired position over Outlet Box and mark location of (4) Auxiliary Holes on wall surface.

3.Determine the appropriate mounting hardware required for type of wall material fixture is being mounted to (i.e. toggle bolts or molly screws for plaster or gysum board walls, wood screws, etc.)

4.Thread Crossbar Mounting Screws into Crossbar as shown in Fig. 1.

5.Using appropriate slots in Crossbar, secure Crossbar to Outlet Box using Outlet Box Screws (provided with Outlet Box).

6.While supporting Backplate make connections: black fixture lead or fixture without tracer marks to hot (black) supply lead; white fixture lead or fixture lead with tracer markers to neutral (white) supply lead. Un-insulated wire is a ground wire and must be connected to grounding terminals or ground lead inside Outlet Box. Use Wire Nuts (local hardware item). Push connections back into Outlet Box.

Outlet Box

Wire Nut


Ground Wire


Position this edge

of Backplate up

for mounting of this

Lens Assembly as shown

Outlet Box Screws

Crossbar

Crossbar Mounting

Screws

Auxiliary Mounting

Knock-out

Mounting Hole

Position this edge of Backplate up for horizontal

mounting of this Lens Assembly


Backplate


Gasket


Safety Cable Loop


Battery Nut


Lens Assembly

FIG.1

Mounting Screw


LIGHTOLIER a GENLYTE company.


631 Airport Road, Fall River, MA 02720


(508) 679-8131 • FAX (508) 647-4710

© 1995

Page 1
Image 1
Lightolier 4532, 4552 series, 4551 specifications IS4531

4551, 4531, 4532, 4552 series specifications

Lightolier, a well-regarded name in the lighting industry, has made significant strides with its 4531, 4551, 4532, and 4552 series of fixtures. These products epitomize modern lighting design by integrating innovative technology with aesthetic versatility. Each series caters to a unique blend of residential and commercial needs, ensuring that spaces are both functional and visually appealing.

The 4531 and 4551 series are particularly noted for their sleek and contemporary designs, making them perfect for modern interiors. Featuring durable materials such as die-cast aluminum, these fixtures not only offer longevity but also enhance the architectural design of any space. Their clean lines and minimalistic look are suitable for varied applications, from office spaces to upscale residential settings. Both series utilize advanced LED technology, ensuring energy efficiency and significantly longer lifespans compared to traditional lighting options.

In terms of functionality, the 4531 and 4551 series incorporate adjustable beam spreads, allowing users to customize the lighting experience according to their specific needs. This feature is particularly beneficial in environments that require precise lighting control, such as galleries or showrooms. With Color Rendering Index (CRI) ratings that exceed 90, these fixtures provide excellent color accuracy, making them ideal for retail spaces where product presentation is crucial.

On the other hand, the 4532 and 4552 series focus on adaptability and ease of installation. These models are designed for recessed applications and are equipped with a range of compatible housing options. The inclusion of interchangeable trims allows for design flexibility, making it easier for designers to achieve the desired ambiance in various settings. The flicker-free performance and high lumen output make these fixtures perfect for environments that require uniform lighting, like offices or educational institutions.

Both series emphasize sustainable technology, utilizing energy-efficient LED sources that reduce energy consumption while maintaining high-performance lighting. Additionally, they support various dimming capabilities, offering users complete control over their lighting environments.

In conclusion, the Lightolier 4531, 4551, 4532, and 4552 series stand out for their combination of aesthetics, advanced technology, and practical features. They cater to a wide range of applications, making them a smart choice for anyone looking to enhance their lighting design while prioritizing efficiency and style.