D-1

MAINTENANCE

D-1


REMOVAL, INSTALLATION AND TRIMMING INSTRUCTIONS FOR MAGNUM® LINERS FEEDING STEEL WIRE

(KP44 and KP44N liner series)

NOTE: The variation in cable lengths prevents the interchangeability of liners. Once a liner has been cut for a particular gun, it should not be installed in anoth- er gun, unless it can meet the liner cut off length requirement. Liners are shipped with the jacket of the liner extended the proper amount.

a.Lay the gun and cable straight on a flat surface.

b.Remove and save the gas nozzle and nozzle insu- lator. Make sure that the set screw in the gas dif- fuser is backed out so as not to damage the liner. Use the 5/64” (2.0 mm) Allen wrench provided. Remove and save the gas diffuser from the end of the gun tube assembly. Remove and save the liner nut from connector end.

c.Remove old liner and insert a new untrimmed liner into the connector end of the cable. Be sure the liner bushing is stenciled appropriately for the wire size being used.

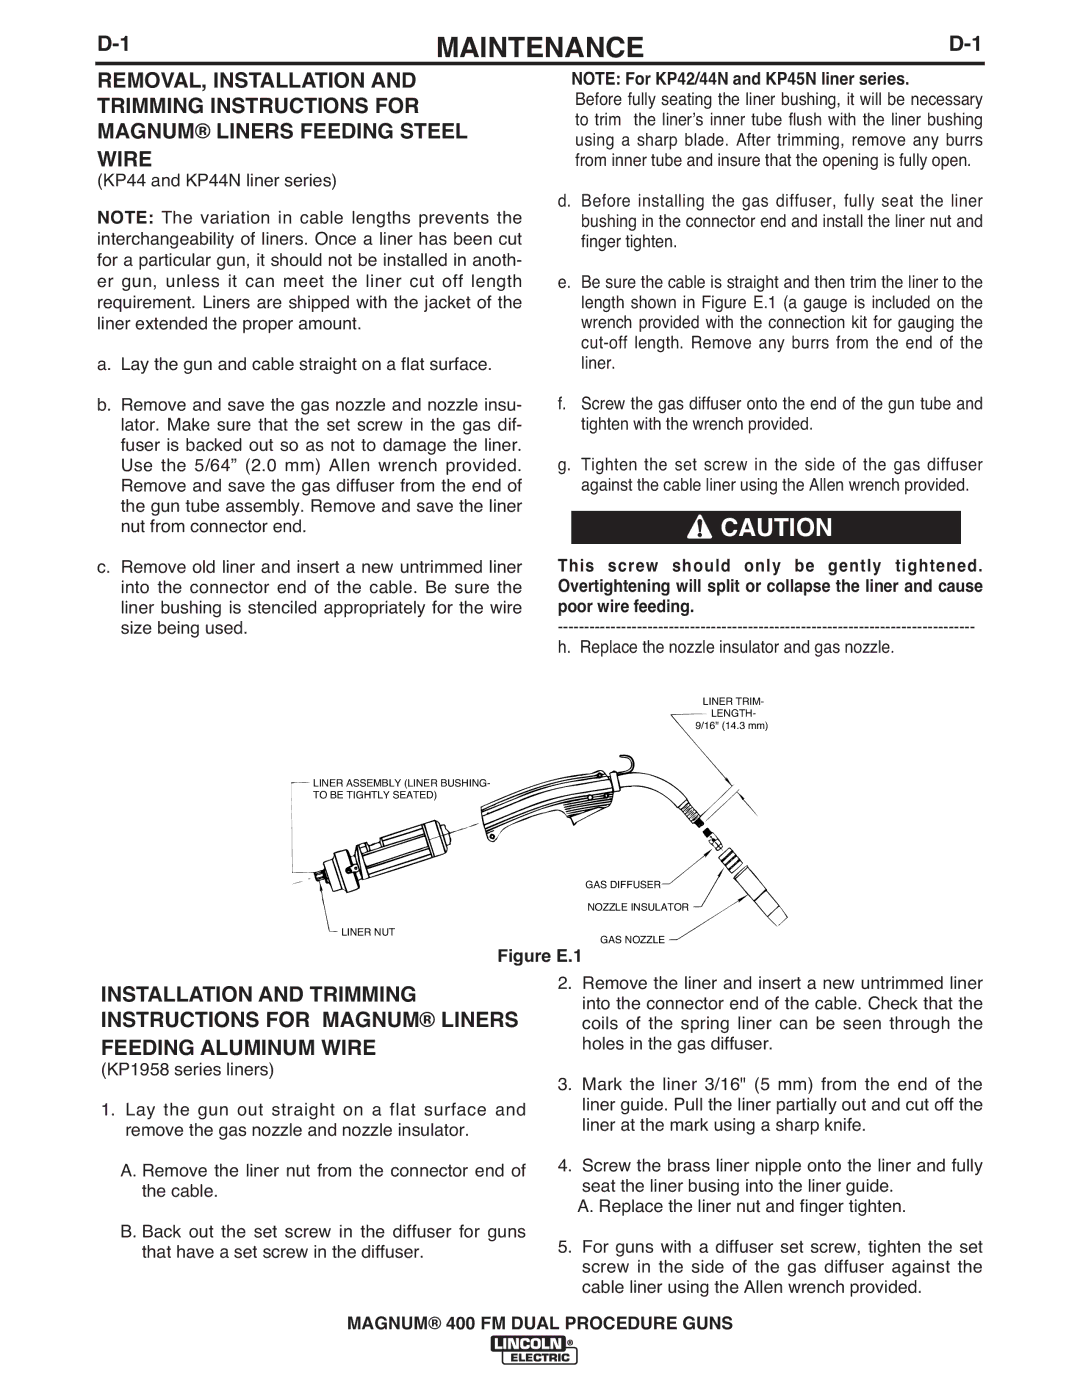
LINER ASSEMBLY (LINER BUSHING

TO BE TIGHTLY SEATED)

LINER NUT

NOTE: For KP42/44N and KP45N liner series.

Before fully seating the liner bushing, it will be necessary to trim the linerʼs inner tube flush with the liner bushing using a sharp blade. After trimming, remove any burrs from inner tube and insure that the opening is fully open.

d.Before installing the gas diffuser, fully seat the liner bushing in the connector end and install the liner nut and finger tighten.

e.Be sure the cable is straight and then trim the liner to the length shown in Figure E.1 (a gauge is included on the wrench provided with the connection kit for gauging the cut-off length. Remove any burrs from the end of the liner.

f.Screw the gas diffuser onto the end of the gun tube and tighten with the wrench provided.

g.Tighten the set screw in the side of the gas diffuser against the cable liner using the Allen wrench provided.

CAUTION

This screw should only be gently tightened. Overtightening will split or collapse the liner and cause poor wire feeding.

-------------------------------------------------------------------------------

h. Replace the nozzle insulator and gas nozzle.

LINER TRIM

LENGTH

9/16" (14.3 mm)

GAS DIFFUSER

NOZZLE INSULATOR

GAS NOZZLE

Figure E.1

INSTALLATION AND TRIMMING INSTRUCTIONS FOR MAGNUM® LINERS FEEDING ALUMINUM WIRE

(KP1958 series liners)

1.Lay the gun out straight on a flat surface and remove the gas nozzle and nozzle insulator.

A.Remove the liner nut from the connector end of the cable.

B.Back out the set screw in the diffuser for guns that have a set screw in the diffuser.

2.Remove the liner and insert a new untrimmed liner into the connector end of the cable. Check that the coils of the spring liner can be seen through the holes in the gas diffuser.

3.Mark the liner 3/16" (5 mm) from the end of the liner guide. Pull the liner partially out and cut off the liner at the mark using a sharp knife.

4.Screw the brass liner nipple onto the liner and fully seat the liner busing into the liner guide.

A. Replace the liner nut and finger tighten.

5.For guns with a diffuser set screw, tighten the set screw in the side of the gas diffuser against the cable liner using the Allen wrench provided.

MAGNUM® 400 FM DUAL PROCEDURE GUNS

Page 12
Image 12
Lincoln Electric IM647-A manual Maintenance, Figure E.1

IM647-A specifications

The Lincoln Electric IM647-A is a notable welding machine that epitomizes precision, performance, and innovation in the welding industry. Designed for professionals and industries requiring high-quality welding solutions, this machine combines advanced technology with user-friendly features to enhance productivity and output quality.

One of the key features of the IM647-A is its multi-process capabilities. It accommodates MIG, TIG, Stick, and flux-cored welding, providing versatility for various applications and materials. This flexibility makes it an ideal choice for fabricators, maintenance facilities, and production shops needing a reliable machine for diverse welding tasks.

The IM647-A is equipped with Lincoln Electric’s advanced inverter technology which allows for a more compact design without sacrificing power. This technology provides a high-duty cycle, ensuring the machine can handle extended periods of use. The inverter system also contributes to better arc stability and control, resulting in cleaner welds and reduced spatter.

Another notable characteristic is the machine's intuitive interface. The user-friendly controls enable welders to quickly set parameters and make adjustments based on their needs. The digital display offers clear readouts of voltage and amperage, allowing welders to monitor their performance effectively. This ease of use is essential for both seasoned professionals and beginners.

Safety features are incorporated into the design of the IM647-A, including thermal overload protection and a robust housing that ensures durability while protecting internal components. These features are crucial for maintaining the integrity of the machine even in demanding work environments.

Additionally, the Lincoln Electric IM647-A is compatible with Lincoln’s extensive range of welding accessories and equipment, further enhancing its functionality. With its compact design, the machine is also lightweight, making it easy to transport between job sites without compromising on capability.

Overall, with its multi-process versatility, advanced inverter technology, user-friendly interface, and robust safety features, the Lincoln Electric IM647-A stands out as a superior choice for professionals seeking efficiency and reliability in their welding operations. It continues to set a benchmark in the welding industry, combining quality and innovation to meet the evolving needs of welders.