| PRODUCT DESCRIPTION | 1. REMOVE THE COVER PLATE | |
| |||
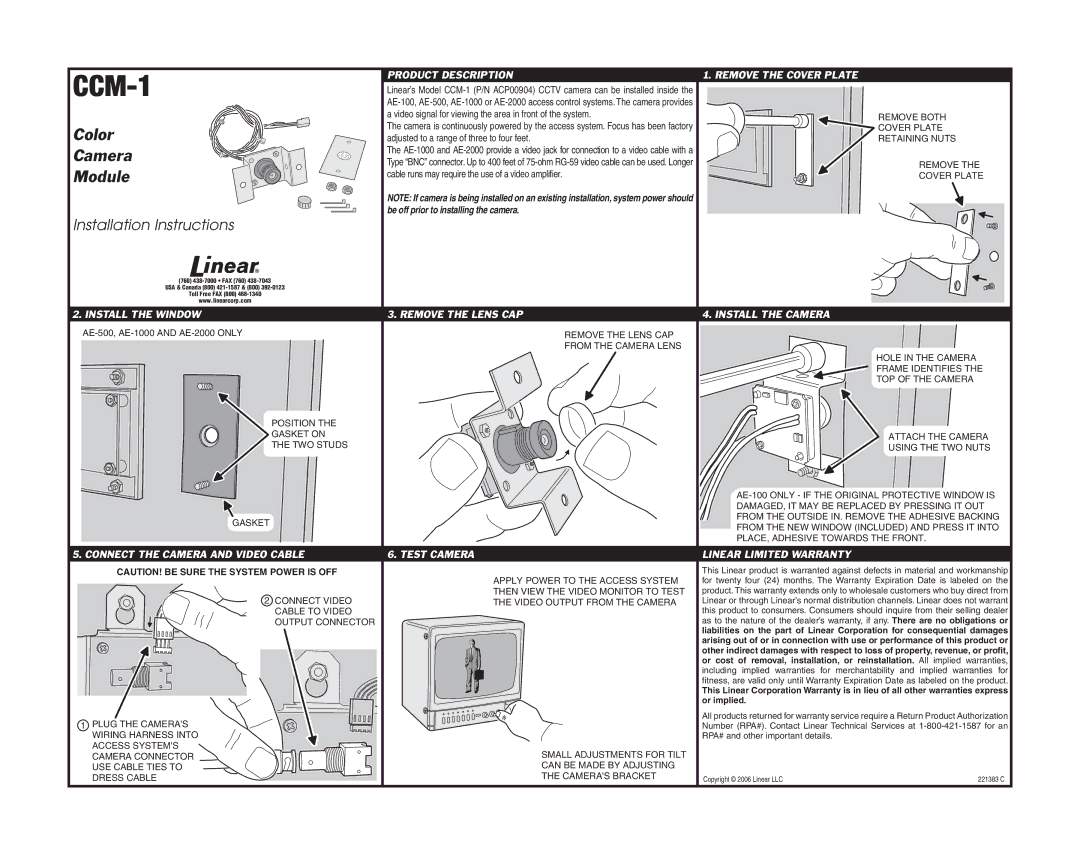
| Linear’s Model |
| |
|
| ||
| a video signal for viewing the area in front of the system. | REMOVE BOTH | |
| The camera is continuously powered by the access system. Focus has been factory | ||
Color | COVER PLATE | ||
adjusted to a range of three to four feet. | RETAINING NUTS | ||
Camera | The |
| |
Type “BNC” connector. Up to 400 feet of | REMOVE THE | ||
Module | cable runs may require the use of a video amplifier. | ||
COVER PLATE | |||
|
NOTE: If camera is being installed on an existing installation, system power should be off prior to installing the camera.
Installation Instructions
(760) |
|
|
|
USA & Canada (800) |
|
|
|
Toll Free FAX (800) |
|
|
|
www.linearcorp.com |
|
|
|
2. INSTALL THE WINDOW | 3. REMOVE THE LENS CAP | 4. INSTALL THE CAMERA |
|
REMOVE THE LENS CAP |
|
| |
| FROM THE CAMERA LENS |
|
|
|
|
| HOLE IN THE CAMERA |
|
|
| FRAME IDENTIFIES THE |
|
|
| TOP OF THE CAMERA |
POSITION THE |
|
|
|
GASKET ON |
|
| ATTACH THE CAMERA |
THE TWO STUDS |
|
| |
|
| USING THE TWO NUTS | |
|
|
| |
|
| ||
|
| DAMAGED, IT MAY BE REPLACED BY PRESSING IT OUT | |
GASKET |
| FROM THE OUTSIDE IN. REMOVE THE ADHESIVE BACKING | |
| FROM THE NEW WINDOW (INCLUDED) AND PRESS IT INTO | ||
|
| ||
|
| PLACE, ADHESIVE TOWARDS THE FRONT. | |
5. CONNECT THE CAMERA AND VIDEO CABLE | 6. TEST CAMERA | LINEAR LIMITED WARRANTY | |
CAUTION! BE SURE THE SYSTEM POWER IS OFF |
| This Linear product is warranted against defects in material and workmanship | |
| APPLY POWER TO THE ACCESS SYSTEM | for twenty four (24) months. The Warranty Expiration Date is labeled on the | |
2 CONNECT VIDEO | THEN VIEW THE VIDEO MONITOR TO TEST | product. This warranty extends only to wholesale customers who buy direct from | |
THE VIDEO OUTPUT FROM THE CAMERA | Linear or through Linear’s normal distribution channels. Linear does not warrant | ||
CABLE TO VIDEO |
| this product to consumers. Consumers should inquire from their selling dealer | |
OUTPUT CONNECTOR |
| as to the nature of the dealer’s warranty, if any. There are no obligations or | |
|
| liabilities on the part of Linear Corporation for consequential damages | |
|
| arising out of or in connection with use or performance of this product or | |
|
| other indirect damages with respect to loss of property, revenue, or profit, | |
|
| or cost of removal, installation, or reinstallation. All implied warranties, | |
|
| including implied warranties for | merchantability and implied warranties for |
|
| fi tness, are valid only until Warranty Expiration Date as labeled on the product. | |
|
| This Linear Corporation Warranty is in lieu of all other warranties express | |
|
| or implied. |
|
1 PLUG THE CAMERA'S |
| All products returned for warranty service require a Return Product Authorization | |
| Number (RPA#). Contact Linear Technical Services at | ||
WIRING HARNESS INTO |
| RPA# and other important details. |
|
ACCESS SYSTEM'S | SMALL ADJUSTMENTS FOR TILT |
|
|
CAMERA CONNECTOR |
|
| |
USE CABLE TIES TO | CAN BE MADE BY ADJUSTING |
|
|
DRESS CABLE | THE CAMERA'S BRACKET | Copyright © 2006 Linear LLC | 221383 C |