D In its
1Obtain an IP Automatically (DHCP)
aIf your ISP says that you are connecting through DHCP or a dynamic IP address from your ISP, then select Obtain an IP automatically as the Internet Connection Type.
bClick the Save Settings button, and go to Step E.
2 Static IP
aIf your ISP says that you are connecting through a static or fixed IP address from your ISP, then select Static IP as the Internet Connection Type.
bEnter the IP Address, Subnet Mask and Gateway Address provided by your ISP.
D1
D2
cIn the Primary and Secondary DNS fields, enter the DNS address(es) provided by your ISP. You need to enter at least one DNS address.
dClick the Save Settings button, and go to Step E.
3 PPPoE
aIf your ISP says that you are connecting through PPPoE or if you normally enter a user name and password to access the Internet, then select PPPoE as the Internet Connection Type.
bEnter the User Name and Pass- word provided by your ISP. (Also enter the Service Name, if required.)
cClick the Save Settings button.
dClick the Status tab, and then click the Connect button to start the connection.
eGo to Step E.
4 RAS
RAS is a service used in Singapore only. If you are using a RAS connec- tion, check with your ISP for the nec- essary setup information. When you are finished, go to Step E.
D3
D4
5 PPTP
PPTP is a service used in Europe and Israel only. If you are using a PPTP connection, check with your ISP for the necessary setup information. When you are finished, go to Step E.
6 Heart Beat Signal
Heart Beat Signal is a service used in Australia only. If you are using a Heart Beat Signal connection, check with your ISP for the necessary setup infor- mation. When you are finished, go to Step E.
E Depending on the setup infor- mation from your ISP, you may need to provide a host name and domain name for the Router. The Host Name and Domain Name fields are usu- ally left blank. If requested by your ISP (usually cable ISPs), complete these two fields.
F If you haven’t already done so, click the Save Settings button. Then close the web browser.
G Power your cable or DSL modem off and back on again.
H Restart or power on your PCs so they can obtain the Router’s new settings.
D5
D6
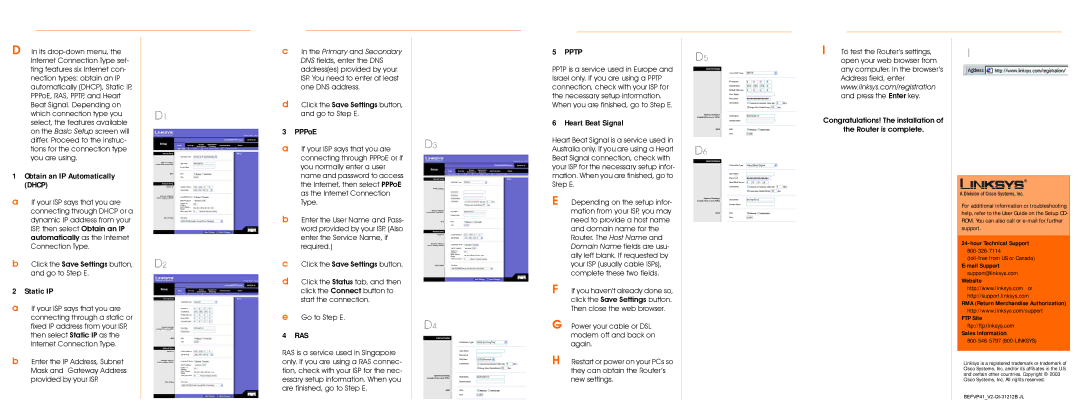
I To test the Router’s settings, open your web browser from any computer. In the browser’s Address field, enter www.linksys.com/registration and press the Enter key.
Congratulations! The installation of
the Router is complete.
I
For additional information or troubleshooting help, refer to the User Guide on the Setup CD- ROM. You can also call or
support@linksys.com Website
http://www.linksys.com or http://support.linksys.com
RMA (Return Merchandise Authorization)
http://www.linksys.com/support
FTP Site
ftp://ftp.linksys.com
Sales Information
Linksys is a registered trademark or trademark of Cisco Systems, Inc. and/or its affiliates in the U.S. and certain other countries. Copyright © 2003 Cisco Systems, Inc. All rights reserved.